Showing posts with label Sharpie. Show all posts

Friday, November 20, 2015

3 Easy Preschool Robot Art Ideas

Does your child love robots?  My preschooler loves them!  We regularly speak in robot voice and robot dance around the house. So today I'm adding to our growing list of Preschool crafts and activities with these 3 easy robot art ideas!

3 Easy Preschool Robot Art Ideas


3 Easy Preschool Robot Art Activities - No prep, fun activities!


Saturday, April 11, 2015

5 Flower + Plant Activities for Preschoolers!

Spring is here! Spring is here!  In honor of this lovely season, here are 5 flower and plant activities that are just perfect for preschoolers!

5 Preschool Flower + Plant Activities


5 flower + plant activities that are perfect for kids!


Friday, March 13, 2015

The Artful Year and Melted Crayon Friendship Rocks

Chuck doesn't always enjoy making things with me.  (What? Yup.)  A lot of days he would just rather that we read books or race airplanes together.   And I'm really trying harder to let go and follow his lead.  But I love crafting.  So I keep putting out those invitations in hopes that he'll join me.  And on those special occasions when he's interested and involved in a craft... boy oh boy... those days are really magic.


The Artful Year
This post contains affiliate links.  Thank you for your support!

We recently received a copy of Jean Van't Hul's The Artful Year to review.  Jean is an artist, mom of 2, and author of the amazing kids' art blog Artful Parent.  (She's also the author of another great kids' art book The Artful Parent. ) 

In her newest book, Jean shares a whopping 175 family-friendly crafts, and recipes!  The photos are dreamy and beautiful; the crafts span through all the seasons and holidays of the year; and the recipes look really, really yummy.  I love this book.  But those things aren't what I love the most about her book.

What I love the most about the book is her voice.  In the beginning she shares this beautiful quote-

"We need to be more intentional than ever as we carve out quality time together, celebrate in meaningful ways, build traditions and memories and create stronger families.  It's not about doing more.  It's about making choices, fostering creativity, and building family connection."  

Wow.  That just hit so close to home.  I don't want to just make things with Chuck.  Things eventually break down, get lost, or tossed away.  I want to foster creativity.  I want to build our relationship.  I want to make lasting memories.

Ok.  This was a super long intro, I know. But I just had to get that all out there.  Because it really is a beautiful, beautiful book.

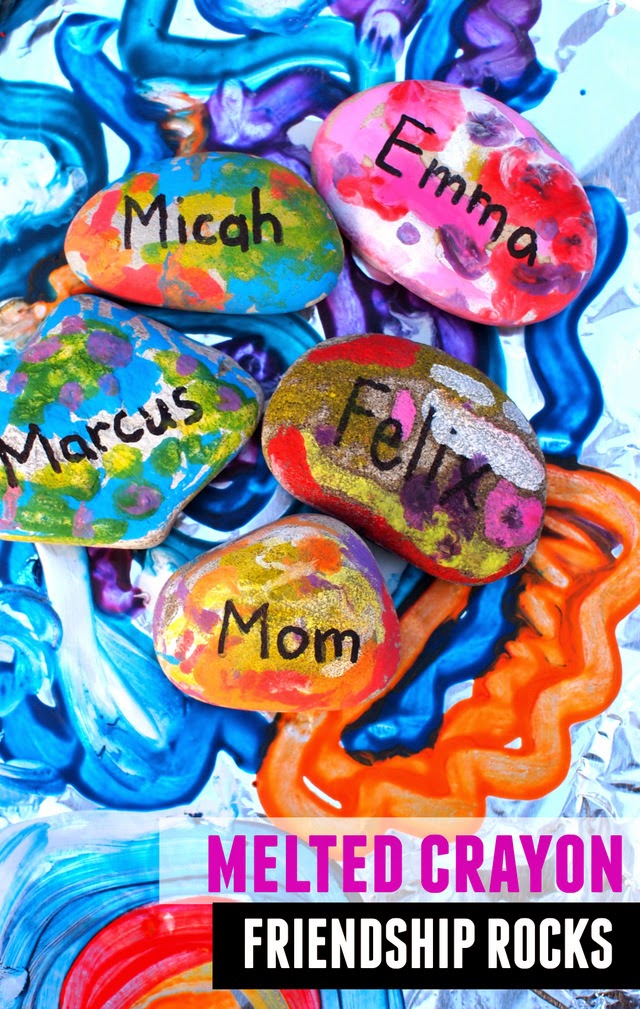
Here's the craft that we chose to try out first from the book:

Melted Crayon Friendship Rocks


Melted Crayon Friendship Rocks- A craft inspired by The Artful Year


Friday, February 27, 2015

Easy Tissue Paper Art

Ah tissue paper.  It's colorful, cheap, and I've recently discovered, also great for making art!  Recently Chuck and I both used it to create some new tissue paper artwork for his room.

Easy Tissue Paper Art

Can yon tell which one Chuck made?

easy tissue paper artwork to be made with the kids

Wednesday, February 18, 2015

DIY Disney Character Snack Bags

As a child, I LOVED watching Disney Movies.  I watched Little Mermaid and Beauty, Beast and the Beast a million times (no kidding).  In fact, to this day I know 80% of the lyrics by heart.  (But ask me any question about US history and I'll totally draw a blank.  Crazy how the mind works, right?)

Why all the Disney talk?  Well, today 7 other kid bloggers and I challenged ourselves to come up with easy, Disney Inspired Crafts.  But wait, there's a catch... we have to make the crafts with... kitchen items!  (Duh, duh, duuuuuh!)   So stick around to the end of the post to see the other ladies' great ideas!

I thought it would be fun to make Chuck some Disney Character Snack Bags.   They took a couple of minutes to make, and really make the bags special for kids.


DIY Disney Character Snack Bags! 


Add Disney Characters to any of your snack bags using this quick and easy method!
This post contains affiliate links.  Thank you for your support!

Wednesday, January 28, 2015

Shark Valentine Card Box

Sometimes I wish I could be a kid again just to experience the magic of different holidays.  Do you ever feel that way?  As a child New Years seemed cooler, Christmas seemed more magical, and Valentine's Day was way more romantic.  Now that Chuck's getting older, I see him getting excited about holidays too.... and I LOVE it.

Here's a fun Valentine Card Box that I recently designed with Chuck in mind.  (He loooooves sharks.) Isn't it hilarious that the shark "eats" the Valentines?

Shark Valentine Card Box

Valentine Card- Shark Box!

You can find out how I made this Shark Valentine Card Box at MollyMooo Crafts!

And if you're looking for 3 other cute Valentines day crafts, check out the links below!


Let's keep in Contact!

You can always find other fun ideas on my Pinterest, Facebook, Instagram, or Twitter accounts!  (Or subscribe to my email mailing list by filling out the pink bar at the top of your screen.)


Happy making friends!

Wednesday, November 12, 2014

DIY Colorful Shoelaces!

Lately I've been thinking about super simple Christmas gifts that kids could make for their friends.  Last year Chuck used Sharpies to make his own Sharpie Tie-Dye Shirt.  This time I thought I'd have a turn using Sharpies to turn plain white shoelaces into cute and colorful shoelaces!


DIY Colorful Shoe laces

DIY Colorful Shoelaces - Great for shnazzing up shoes, or a great gift for kids to make for others
This post contains affiliate links.  Thank you for your support!

This was a super fun project with colorful and unique results!

Let's get started!

Thursday, October 30, 2014

Ice-Skating Popsicle Stick Dolls

I LOVE popsicle sticks.  Today I'm over at MollyMoo sharing these easy-to-make and adorable ice-skating popsicle stick dolls!

 So be sure to pop on over there and check the tutorial out.  Weeeeeeeee!  (I'm pretending to ice-skate away.)


Let's keep in Contact!

Like this idea?  You can always find other fun ideas on my Pinterest, Facebook, Instagram, or Twitter accounts!  Or, sign up for the weekly newsletter in the pink bar at the top of the site. 

Keep creating, friends!

Monday, April 21, 2014

Make Easter Egg Weebles

This Easter we had a lot of fun hanging out with family and friends.  I kept meaning to take lots of photos.... but I was having too much fun doing activities with the kids.  I'll try to upload my one or two photos this week.  Today I just wanted to show you this really quick DIY Easter Egg Weeble Craft.  Yup, you read that right. I made Chuck a couple of cute little Easter Egg Weebles from plastic Easter Eggs.  They're weighted, so they don't fall down.  (Scroll down for a video of Chuck trying to run them over with a Jeep... yup... that's my kid.)

Cacti and Farm Animal Easter Egg Weebles

Make Plastic Easter Egg Weebles

If you still have your plastic eggs lying around, you might like making these little guys too.  Keep reading to find out more!

Thursday, March 13, 2014

DIY Tin Wall Art

The weather last weekend was glorious and I'm mentally already in Spring mode.  Doesn't matter that today was freezing cold... nope, no siree.  The sun is shining, it's March, so yes, Spring is here (in my mind at least.)  And to celebrate the sunnier, warmer weather, I'm over at Handmade Charlotte today sharing how I made this lovely spring themed DIY Tin Wall Art.


Use disposible baking dish to make tin wall art


Tin Wall Art sounds pretty fancy-shmancy.  I actually made it using materials that I already had at home!  Adults and kids can easily turn a simple disposable aluminum baking pan into a piece of lovely and personalized artwork.  So grab your Sharpies and baking pan, and head on over to Handmade Charlotte to see how to make yourself some lovely DIY Tin Wall Art!

Wednesday, May 30, 2012

DIY-Sharpie dye your clothes

I've always wanted to learn how to tie dye properly.  I tried to do it once way back in elementary school, but ended up with a light grey stained shirt.  (We were going for bright purple.) 

Now that summer is showing off her vibrant hues, I once again felt inspired to try this colorful art form.  Some quick researching online showed that people were actually using Sharpie markers to dye their shirts!   The method was so simple and I had all the materials at home.  Score!  So, I decided to give this craft a try. 

Here are the materials that I used:


Here's what I did: 
  1. I placed a piece of cardboard inside my shirt so the marker wouldn't seep through.  (I only wanted one side of my shirt dyed.) Note:  You could probably also use a plastic bag too. 
  2. I channeled my inner artist and began doodling on my shirts.  Note:  I used old markers which didn't have much ink in them.  I recommend using juicy, new, fat markers.  Then you can put more ink on the shirt and get a better effect.      
  3. I stretched my t-shirt over a baking pan to catch the alcohol.  Note:  Again, you could probably just do this part with a plastic bag.
  4. I used my dropper to drip alcohol onto my design.  A couple of drops was all it took to make the marker bleed. 
  5. I let my shirt dry.
  6. I ironed my shirt to set the colors.  (Note:  This didn't work because the colors still bled when I hand washed the shirts.  Other people suggested placing your shirts briefly in the microwave or dryer.)
  7. I hand washed my shirts.
 Want to see the results?
Here's my first attempt:
My inspiration came from beach waves and fourth of July fireworks.
The design reminded hubby of a dental x-ray.
Hmm... crafty or crappy?  Not sure if I'm digging my design...


And here's my second attempt:  (This time I tried something simpler.)  

All in all the method worked relatively well.  The colors were vibrant and reminded me of watercolors.  But, the markers bled during my hand washing, resulting in staining on the back of the shirts.  Also, the rubbing alcohol and markers smelled A LOT.  So just be sure to do this in a well ventilated room!

Have you tried using sharpies to dye your clothes?