Showing posts with label Winter. Show all posts

Wednesday, December 11, 2013

It snowed!

Yesterday morning we awoke and saw that it was snowing!  Yippee, wish granted!  So we bundled up in our warmest gear, played outside, and then came back home for some hot cocoa.  Here are some photos from our outdoor adventures.  

We built our first snowman.
 (Perler beads and pipe cleaners make up his shnazzy accessories.)

Keep on reading....

Tuesday, December 10, 2013

Make Snowflake Window Clings

Tomorrow it's supposed to snow.  Chuck went to bed super excited because I promised him that we'd build a snowman. 

Cross your fingers that our town is dusted in snow, ok?

Although this will be the first real snowfall of the season, our apartment's windows have already been covered with snowflakes for the past couple of weeks.  Every winter I cut out snowflakes from paper, but this year I tried something new and made snowflake window clings out of tulle and fabric paint.  I think they make Chuck's room a bit more festive and fun.

To see how I made them, read on...

Monday, December 9, 2013

Make Homeamde Felt Milk Jug Cap Ornaments


Each year I try to make a couple of handmade ornaments for our tree.  Last year, Chuck and I made these hand and feet salt dough ornaments.  I would have made him a new set this year... but his feet are so big that the ornaments would end up being the size of small plates.

So instead, this year I turned a bunch of milk jug caps (gifted to me by a craft-loving aunt- thanks!) to make these mini felt ornaments.  Each one has a different design and they came out so colorful and cute.... I just want to eat them up.   But don't worry, I won't because they're made of felt...and glue...and plastic...

Can you guess which one is Chuck's favorite?  Keep on reading to find out... 

Tuesday, December 3, 2013

Make mini Christmas trees from Pipe Cleaners and Cardboard

Yesterday I shared how I made a miniature Christmas village out of plaster of paris.  Today I just wanted wanted to show how I quickly made these uber cute cardboard and pipe cleaner Christmas trees for my village.

(And if you like these trees, check out my tutorial for mini paint chip trees!

mini cardboard and pipe cleaner trees tutorial


Cardboard Christmas Trees

mini cardboard Christmas trees tutorial
Materials:
  • Cardboard
  • Cutting Mat
  • Pattern (see below)
  • Pen/pencil
  • Exacto knife
  • Scissors

Directions:
  1. Print out the template to make one large and one small tree. 
  2. Cut out the Christmas tree parts. 
  3. Trace them onto cardboard.
  4. Cut our your parts with an exacto knife.
  5. Slide both pieces together and you've got yourself a mini tree!


Pipe Cleaner Christmas Trees
mini pipe cleaner trees tutorial

Materials:
  • Paper
  • Pen
  • Scissors
  • Pipe cleaners (three per tree)
  • Pom Poms
  • Tacky glue

Directions:
1.  Doodle out a tree on a piece of paper.
2.  Bend a green pipe cleaner around your doodle.  Wrap both ends together to secure your tree.  Trim excess bits off.  Repeat this for all three tree shapes. 
3. Tie the three trees together by wrapping the tops and bottoms together with pipe cleaner.
4.  Gently separate the branches and glue small pom poms on with tacky glue.

That's it!  Happy crafting!  (Chuck was the artistic director for this photo shoot.  Can you tell?)
make mini Christmas trees tutorial


Monday, December 2, 2013

DIY Mini Plaster of Paris Christmas Village

I've always loved Christmas.  It's the time of year when twinkly lights decorate the dark nighttime sky.  And, it's the time of year that I'm reminded to hope because of God's great love for us.

Nowadays, Chuck and I love looking at the miniature Christmas village on display at our local craft store.  We always walk around oohing and ahhing over the little houses, ferris wheel, and tiny dog playing in snow.  It's magical.

So that's why I made us our own miniature Christmas village out of materials that we had lying around our apartment.

Let's Make a DIY Mini Christmas Village!


DIY Mini Plaster of Paris Christmas Village
This post contains affiliate links.  Thank you for your support!

(Psst- Click here to see see how I made the pipe cleaner and cardboard trees.)


Wednesday, November 20, 2013

Geometric Popsicle Stick Christmas Tree Ornament Craft

Christmas tree ornaments?  What? 

Yurp.  I know that we haven't celebrated Thanksgiving yet.... and this craft is for Christmas... but please bear with me.  I was bored one night and began playing around with leftover mini craft popsicle sticks.  After messing around with them for a bit, I came up with this easy, geometric looking Christmas tree ornament.


It was really easy to make, so if you like the design, the kiddos can certainly help out too. (Ooh.   Did you notice the sequins?  Bling bling!)


Here's what I did:

Materials:
  • Mini Popsicle Sticks (I used 22)
  • Scrap paper
  • Paint Brush
  • Paint (Shades of green and brown)
  • Hot glue gun
  • Parchment paper
  • Sequins 
  • String or ribbon

 Directions:
1.    Cover your work area.  Paint 18 of your popsicle sticks shades of green.  Paint 4 of your popsicle sticks shades of brown.  (I only painted the front and the sides of the sticks, but you might want to paint the backs too if your ornament is going to twirl around.)

2.  Once your paint dries, begin hot gluing your sticks together.  (I made sure to hot glue on top of parchment paper so my glue won't stick to my work surface.  Cheapie crapter tip:  You can reuse this parchment paper for other project too!)  To ensure that my triangles looked the same, I made one triangle first, then traced the corners onto the parchment paper. I then used those corners as guidelines when hot gluing other triangles.)

3.  Hot glue your "trunk" sticks on.

4.  Hot glue your sequins onto the green triangles' corners.

Smaller versions would like nice as ornaments or strung together as a garland.  Right now my bigger tree is just hanging outside of our door, waiting for December.

Happy Wednesday!

Thursday, September 12, 2013

Make Borax Crystal Flowers

Why make borax crystal flowers?  Well, do you love the look of freshly cut flowers sitting in a vase?  I do.  But I never buy them because of my cursed black thumb.  While most people's cut flowers last for weeks, mine always start turning brown and wilting within a day or two.

Boo, black thumb!   

Last week our craft store had a sale on fake flowers.  I was so tempted to buy them, but they looked kinda cheesy and screamed, "I'm fake and I attract dust."

But I ended up getting the flowers anyway, because I wanted to make something pretty with them.  Here's what I came up with:  Crystal Flowers 

Make Crystal Flowers!


DIY Crystal borax flowers
Yes.  My fake flowers are covered with real crystals... that I grew from Borax.  Lovely, aren't they?

Would you like to make your own frosted-looking flowers?  Read on!
  
This post contains affiliate links. Thank you for your support!

Tuesday, January 29, 2013

Weird, wonderful snow dough

What does the weather look like in your area?  Around here it's been wet and cold.  Ick.  We had a bit of snow last week and then yesterday it ice-rained.  Ick ick ick.

As you can probably guess, Baby Chuck and I have been staying in quite a bit.  To battle the stir-craziness, I've been crafting and crapting things for him.

Feeling inspired by the snow, I made snow dough by mixing 2 C of cornstarch and 1/3 C of vegetable oil.*   The resulting dough was velvety soft and crumbly.  (Hubby described it as having the consistency of wet sand.... except that it's dry.)

Everyone had fun playing with it.  I enjoyed making "snow balls" and Baby Chuck liked crushing them with his tiny fists.  


Ooh.  I see a patch of sunshine.  Ok, we gotta enjoy it before it disappears.  Hope the weather is nicer where you are!

(*Sorry.  I had a brain fart and completely forgot where I found this recipe so I can't properly cite it.  Big thanks to one nice blogger.)  


Monday, December 31, 2012

How to make heart (and other) shaped bokeh Christmas lights

Ever wanted to make different shaped bokeh Christmas lights?  Inspired by our Christmas snowmen-light sunglasses, I thought I'd try my hand at making our Christmas lights look heart shaped.  And then, once I figured out how to do that, I had to make some other shapes as well...

How to Make Different Shaped Bokeh Photos

how to take heart, cat, star, arrow and different shaped bokeh photos
Heart, star, cat, and arrow shaped Christmas lights


Keep reading to see how I made different shaped bokeh!

Monday, December 10, 2012

Hand and feet salt dough ornaments

(Warning:  If your name is Nana, Pops, Gong-gong, Puo-puo, or Tita Tina- STOP!  Please do not read this post.  Please do not look at the photos.  Baby Chuck wants you to be surprised by the gifts he made you.)


Are they gone?  Good.  Now, for the rest of you-
This Christmas season I find myself crafting, and crafting, and crafting some more.  It's like someone opened up my blocked crafty gates.  My mind keeps churning and my hands making.  Mind you, not everything turns out the way it's supposed to (like the time I boiled cashmere for hours to felt it... big mistake... we just ended up a horribly smelly sweater), but it's just fun to make stuff.

Since Christmas (or as I now dub it "Craft-mas" get it?  Tee hee...) is just a couple of weeks away, I'm crafting more holiday items.  First I made the fortune cookie advent calendar and the geometric straw ornaments.  This week we tried our hand at making salt dough ornaments.  Patty from Make it Cozee posted such clear directions and cute photos that it was easy to get super cute results.  (Thanks, Patty!)

We painted the hand prints gold and we had a whole bunch of dough left so we made some tinier ornaments too.


Hopefully we can make this a yearly tradition.  Then we can see Baby Chuck growing.. and growing.. and growing... (Hmm... does this mean we need plate sized ornaments?  Oh well, we'll cross that bridge when we  get there.)

Tuesday, November 27, 2012

Hubby turns a sweater into a hat

Last winter hubby bought me a beautiful mustard yellow sweater.  I loved it so much.  Even though it was slightly too big for me, I kept it because I loved the color.

Fast forward one year later and I still had not worn it.  I tried pairing it with different things, but the fit was always slightly off.  Instead of giving the sweater away, hubby and I cut the sweater up and upcycled it into a hat.


We measured the circumference of my head, and then divided that number by 2 (a).  Then, we measured the distance from the top of my head to my ears (b*).  Using those two measurements we chalked out the outline of a hat (the width being "a" and the height being "b").  After some quick pinning, hubby sewed everything up and voila, I had a new mustard colored hat.


(Embarrassing fact: What? Is Leslie wearing a hat?  Yes, it is a strange sight.  I typically don't wear hats because my ginormous head is so large that it never fits any of the hats in the store.)

(*Side note:  I think the next time I would have made the hat a bit taller.  It just reaches my ears, so it would have been nice to have a bit more room up there.)


And since we had a bit of extra material hubby quickly whipped up another hat for a slightly smaller noggin.


Yup.  Because sometimes Baby Chuck and I like getting all matchy matchy like that.

(By the way-  Thank you all for voting for my crapty reindeer head!  I was one of the top 6 and moved onto the final round of the competition.  So, if  you have another spare moment, would you please vote for my reindeer head at the Totally Green Contest? Thanks so much for your support!)

Friday, November 23, 2012

Crapty Cat Wreath

Our aunt loves cats.  
And I like making wreaths out of crap.
So it was a natural fit for me to whip up this cat wreath for her.  


Materials:
- cereal boxes  (<--crap)
- scissors
- craft paint
- paint brush
- glue/tape/some sort of adhesive
- thin Sharpie marker
- pencil

Directions:
This was super easy to make, so I'll just show some photos from my crapty night.


Happy crapting (and black Friday)!

Wednesday, November 30, 2011

Yes, Virginia, Santa Claus goes to school

This year 115 Santa Clauses attended a three-day workshop at Charles W. Howard Santa Claus School, located in Midland, Michigan. Here, they learned various skills like beard bleaching, sign-language, and the art of responding to children's requests.  Boy, I'd give anything to see a hundred Santas ho-ho-ho-ing with their "little round bellies" shaking like bowls "full of jelly."   


Interested in learning more?  You can find the original photos and article here at the New York Times

Friday, October 7, 2011

Get psyched...

it's finally Friday!  I thought the weekend would never come.  We're definitely going to enjoy the outdoors before winter sneaks up on us again...

Excitement is clearly written all over Baby Norris's face.

Thursday, February 17, 2011

Frozen lake

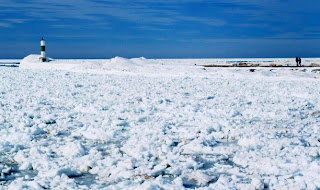
Lately it's been so cold that parts of Lake Michigan are frozen. Interested in seeing this phenomena, we visited our local state park and took some photos. 

Meet Big Red, our local lighthouse

Can you tell where the land ends and the water begins?

Rocks engulfed in ice


The lake's frozen beauty tempted us to walk out,  but fear kept our feet planted on solid ground 

Tuesday, February 1, 2011

Snow day

We just received an email saying that school is closed tomorrow.

Our reaction?
We're quietly celebrating.

Monday, January 31, 2011

Icicle farming

With the weather fluctuating on a daily (sometimes hourly) basis, we've noticed a large crop of icicles growing near our window.  Amazed by the size of these pointy beauties, here's a photo of my proud icicle-farming hubby:


Unsure how big this thing really is?  Here's a photo of Charlie lying next to it. 


*Note:  Sadly, our prized beauty snapped in two after this photo was taken. 

Tuesday, January 25, 2011

Five reasons

This past Christmas I took a day trip into Manhattan with family.  I completely forgot about these pictures till just recently.  Here are five reasons why I love New York City: 

I love the city's buildings.

I love the inhabitants' creativity.

I love the hubbub.

I love the culture.

And I love the food.  (A whole universe of flavors resides in this bowl.)

Sunday, January 9, 2011

Ice ice baby

Yesterday we visited a collegiate level ice sculpting competition with a friend.  It was amazing to see what these artists could do with a block of ice and various power tools.

Most competitors relied on their trusty chainsaw to create figures from ice.


Here, two teammates work together to join two forms.

The cold temperatures prevented us from staying for the entire event.  However, we were able to see several smaller already completed works.

Ice horse head


Ice ram


Ice fish

And our favorite, the ice-burger
Can you see where we took a bite?

Wednesday, December 29, 2010

It's the most de-li-cious...

time of the year...

One certainly cannot celebrate the holidays without feasting!  Below are some highlights from our aunt's holiday meal:

VIEWER BEWARE:  Looking at these photos will cause your salivary glands to become overly excited.  Drooling will probably occur.    

Welcome to the holiday table!


Let's take a closer look at some dishes:

Shrimp baked in butter and garlic, then sprinkled with salty parmigiano reggiano


Roasted prime rib covered in a delicious coating of garlic cloves, mustard, and crushed black pepper


Apple, walnut, and craisen salad with mustard and maple dressing:  a wonderful mixture of textures