Showing posts with label animals. Show all posts

Wednesday, October 8, 2014

Glow in the dark Kids Jellyfish Costume

Recently I received several containers of Tulip Glow Paint to try out.  As you know, I LOVE making costumes for Chuck. (Remember the spider costumeLightening McQueen Costume, and Mr. Potato head costume?  Yup.  Good times.)  So I was excited to somehow incorporate the glow in the dark paint into a costume idea.  Chuck really loves sea creatures right now, so I made him this easy, NO SEW jellyfish costume.

Oh yeah.  And it glows!

DIY Kids Jellyfish Costume (that glows!)

make a DIY glow in the dark jellyfish costume! Super easy and unique!


Adorable right? Just wait till you see it glowing.  It really looks like a jellyfish is sitting on top of his head!

Here's how I made it!

Thursday, October 2, 2014

DIY Hedgehog Ring Toss

Do you love hedgehogs?   I do!  They're such adorable animals.  So I'm super excited that my first contribution for MollyMoo will be this super cute DIY Hedgehog Ring Toss Game!  


DIY Hedgehog Ring Toss Game


It's made from an old moving box and didn't take very long to make at all.  (My kind of craft!)  So if you want to make one, I'm sharing directions over here!

Love forest-themed crafts?

Then you might also like these...


Let's keep in Contact!

Like this idea?  You can always find other fun ideas on my Pinterest, Facebook, Instagram, or Twitter accounts!


Happy Thursday!

Sunday, September 21, 2014

3D Paper Plate Lion Mask

One of the coolest things about having a 3 year old is that we've fully entered the wonderful world of imaginative play.  I love watching Chuck enact scenes with his toys or pretend to be something else.  So far we've made a couple of toys to help encourage his imaginary play like this toilet roll airplaneno sew super hero cape, or cardboard cash register.   Lately he's been really enjoying learning about animals, so I made him this lion mask!

3D Paper Plate Lion Mask

3D paper plate lion mask!


This mask was really easy to make AND it's 3D.  See how the whiskers, ears, and nose all stand up?  Cool, right?  If you'd like to see how I made this mask check out my tutorial on Handmade Charlotte over here!

Hope you're having a great weekend!

Friday, September 19, 2014

Origami Black Cat

Halloween is coming! Halloween is coming!  My favorite holiday is coming!  I love the candy!  I love the costumes!  I love carving pumpkins!  And I especially love the Halloween crafts!  So I'm starting off this year's Halloween crafts with this really cute origami Halloween black cat.

Origami Halloween Black Cat

how to make an origami Halloween black cat
This post contains affiliate links.  Thank you for your support!

The directions for this cat came from the book Horrorgami.  I'm definitely an origami newbie, so I wasn't able to do as many of the crafts as I would have liked.  But if you love folding paper, this book has a ton of great Halloween-inspired origami.

Ok.  Onto the cat craft!


Monday, September 15, 2014

DIY Piggy Bike Basket

When Chuck turned 3 a couple of weeks ago we got him his first 2 wheeler bike.  I wasn't sure if he would know what to do with it, but he took to it like a fish to water.  He just loves riding it!  However, there was just one problem.  He couldn't figure out a way to ride the bike AND hold his favorite stuffed pig at the same time.  So I told him I would make him a small bike basket.  After showing him a couple of designs, he selected a basket that resembled a pig.  And that's the story behind this DIY piggy bike basket.

DIY Piggy Bike Basket

Make your own DIY bike basket from cardboard!
This post contains affiliate links.  Thank you for your support!

Now I know there are tons of really affordable kid bike baskets out there.  But we have a TON of cardboard lying around from our move AND I enjoy making things.  So it was a win-win situation.  Plus, where else could we get a pig basket?

Ok, enough chatting.  Let's get making!

Friday, September 12, 2014

Paper Plate Toucan Craft

Have you ever felt like you were a circus performer trying to balance a whole bunch of plates at once?  That's how I've been feeling a bit lately.  These past two weeks have been quite crazy for us.  Chuck turned 3!  (Whoa.  Where did the time go?)  Hubby started work!  So we're trying to figure out how to share 1 car.  (Ack!)  Chuck and I are trying really hard to make friends, so we're now regulars at a weekly art class and library story time.  And I've been burning the late night oil completing some much-appreciated free-lance craft opportunities lately.  I love making things, but I just have to get more organized I think.  Oh yeah.  I'm also going to partner with a great company and do a giveaway next week!  *Fingers crossed that all the details work out.*  So definitely tune in for that.

Ok, onto today's craft.  Amidst all this excitement I wanted to share this super easy paper plate Toucan Craft that Chuck and I did at home one afternoon.   I know, I know, there are some awesome Toucan crafts out there (like this adorable one from I Heart Crafty Things.)  But I was just so pleased by this craft because we made the bird out of 1 paper plate.  Yup.  That's it.  So easy and simple, right?

Paper Plate Toucan Craft


Paper Plate Toucan Craft:  (Just need 1 paper plate!)

(Note:  This post contains affiliate links.  Thank you for your support!)

I love easy and fun crafts.  This one was inspired by our repeated reading of this book.   (Actually, if you're going to check that book out, you might as well check out the the whole series.  We love that cat.)


Ok.  Here's how we made our toucan!

Thursday, August 14, 2014

Make Egg Carton Bugs

I love a good egg carton craft.  We don't eat eggs too often here, so whenever we finish a carton, I'm always super stoked to make something with it.  Today's Egg Carton Insect Craft came about because ants have been on our minds a lot lately.  For some reason there seem to be ants EVERYWHERE in our new home.  Eeek.  Plus, we recently watched "Honey I shrunk the kids" and Chuck loved Anty the giant ant.   So that's why we had to make ourselves some egg carton bugs!

Let's Make Egg Carton Insects!


make egg carton insects (bees and ants)- easy and fun craft
(Note:  This post contains affiliate links.  Thank you so much for your support.)


Friday, August 8, 2014

Build a Bird's Nest

Lately Chuck and I have been going on a lot of nature walks.  Typically after lunch or dinner we'll just walk around our neighborhood and fly our toy planes, or pick up random rocks and twigs on the sidewalk.  Because Chuck loves collecting different objects, I thought it would be fun if we tried making something with the items that we found.  This time, we tried our hand at making a bird's nest.

Let's Build a Bird's Nest!

build a bird's nest using items gathered from nature walk


Monday, April 21, 2014

Make Easter Egg Weebles

This Easter we had a lot of fun hanging out with family and friends.  I kept meaning to take lots of photos.... but I was having too much fun doing activities with the kids.  I'll try to upload my one or two photos this week.  Today I just wanted to show you this really quick DIY Easter Egg Weeble Craft.  Yup, you read that right. I made Chuck a couple of cute little Easter Egg Weebles from plastic Easter Eggs.  They're weighted, so they don't fall down.  (Scroll down for a video of Chuck trying to run them over with a Jeep... yup... that's my kid.)

Cacti and Farm Animal Easter Egg Weebles

Make Plastic Easter Egg Weebles

If you still have your plastic eggs lying around, you might like making these little guys too.  Keep reading to find out more!

Friday, April 18, 2014

Australia Photos (Part 1)

Yikes!  I just realized that I hadn't posted any photos from our trip oversees.   (Hubby's from Australia and we recently flew there to visit family.)  Some of you were so keen on seeing them, so here are some highlights from our trip.  We had a really jam packed schedule, so we were able to travel all over.  First stop- The Beautiful Gold Coast!

(Special thanks to hubby and my sister-in-law for taking some of these photos!)

Pops takes Chuck to meet the ocean for the first time.

His reaction^^  Yup.  Apparently he isn't a big fan of the water and waves. Sand is much more his thing.

Our beautiful Gold Coast view  (Don't all the buildings look super modern?)

Nanna hanging out with her two favorite grandkids

One of the few rare shots where both boys are facing the camera. (I swear, kids at this age are just super squirmy.  Photographing two clear faces?  Fuggettaboutit!)

Sharks are so cool... and super scary looking.  Eeek.

Loved touching the starfish- these felt like lovely, bumpy rocks

Hee hee... Chuck loved feeding his cousin hot dogs.

Hubby holding the two cousins.  (Aren't their identical penguin hats adorable?  Sadly we lost them somewhere in Australia... Boo.)


And that's it for now.  I'll upload the rest next week.  ( But if you can't wait that long, you can always check out my Instagram feed for a couple more.)

Have a great weekend!

Tuesday, April 15, 2014

DIY Easter Bunny Bean Bag Toss

Tomorrow the theme is bunnies at our library toddler group.  We're going to make paper bag bunnies and play a bunny game too.  Since I already had this lovely large piece of cardboard, I made a really simple Cardboard Easter Bunny Bean Bag Toss game.... complete with... wait for it... carrot bean bags.  

DIY Easter Bunny Bean Bag Toss

DIY Easter Bunny Bean Bag Toss


Ack.  Too adorable.  Too adorable!  (Btw, is it strange that I swoon over large pieces of cardboard?)   Hrmm... anyway... hopefully the kids will have fun playing tomorrow.  But even if they don't, I'm just going to lug this guy home and prop him up against my wall.   His cheesy grin is just too cute. 

Keep reading to see photos of how I made it...

Wednesday, March 26, 2014

Make Pretend Play "Dirt"

Does your child love playing with construction toys too?  If so, today's post is just for you.  It's all about dirt, glorious dirt.  Since it's freezing cold outside (and we live in an urban environment), playing in real dirt just isn't an option for us.  But no worries, I whipped up a batch of Pretend Play "Dirt" and we had a blast playing with it inside. 

Make Pretend Play "Dirt"  


Make pretend dirt for kids to play with

The coolest thing about this recipe is that you only need three common household ingredients to make play "dirt."  (It was inspired by MollyMoo's Leprechaun slime recipe.)  So keep reading to see how you can whip up some play dirt at home too

Wednesday, January 29, 2014

Two Bird Feeder Crafts: Toilet Paper Roll Feeders and Ice Feeders

Earlier this week my posts focused on sending some lovin' to the special people in your life (Click herehere and here.)  Well, that's all well and good.  But what about sending love to others?  How about the birds?  With the freezing cold weather outside, our feathered friends are bound to need some loving too.  So why not try out these two bird feeder crafts?  Chuck and I made some toilet paper roll bird feeders and some heart shaped ice feeders.  Both were really easy to make and currently dangling on a tree outside our building.

Here's an up-close shot of our Toilet Paper Roll Feeder:
Toilet Roll Bird Feeder Craft

To see how I made the toilet paper roll feeders and ice feeders, keep reading!

Tuesday, January 28, 2014

Toddler Painted Valentine's Day Cards (for a Teacher and Parent)

(Hubby- Please don't read this post because the bottom card is for you.)

Illness + freezing cold temperatures = A LOT of time spent cooped up in a two-bedroom apartment

To help pass the time, Chuck and I have been doing tons of arts and crafts projects.  Luckily, he's got a new interest in painting and gluing. (Yes!  My son finally shows some interest in crafting with mommy!  Woo hoo!) Here are two Valentine's Day cards that we made together for Chuck's Sunday School teachers and hubby.

(So hubby, once again, do NOT read the bottom of this post...)

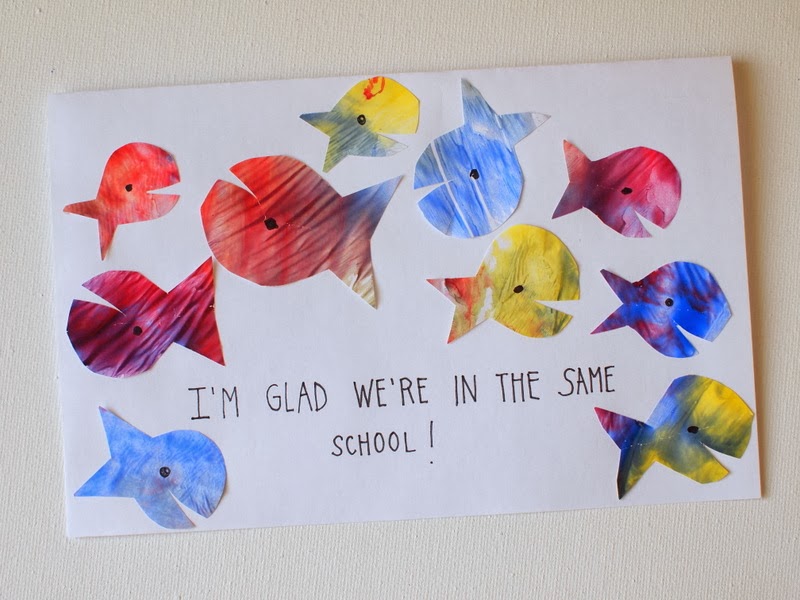
1.  Painted Fish Valentine's Day Card


Keep reading to see how we made this card (and to see hubby's card....shhh... it's a surprise)...

Monday, September 16, 2013

What's up Chuck?

Happy Monday, friend!
How was your weekend?

This past weekend we visited a friend's new digs in the city and celebrated a cousin's birthday at the Bronx Zoo.  Here are some photos from our zoo adventures...

Three cousins ready to start their zoo adventure!

Such a beautiful building-  love the carved animal heads

Chuck saw his cousin sitting on her daddy's shoulders, so he wanted to ride on hubby's shoulders too!

We almost caught this peacock, but he was a slippery fellow.

Some of Chuck's favorite animals

Seeing the cousins play together made me so happy


Wednesday, September 4, 2013

DIY Animal Nose Paper Cups

While looking around for animal themed party accessories for Chuck's birthday, I spotted these Pick Your Nose Paper Cups, Pick Your Nose Animal Cups, and Pig Nose Cup. 

Super cute, right? 

But being an uber cheapie, I figured I could just make similar looking cups for much less free.  All I used were a couple of paper cups (taken from Whole Foods- Thanks!), Sharpie markers, and crayons.

With only a couple minutes of doodling and coloring, I came up with these lovelies:


They're not as nice as the originals, but they were free and cute... so I didn't mind one bit!

Ultimately we ended up just using boxed juices and bottled water for the party.   So Chuck is currently getting a kick out of using the cups at home.  (His favorite one is the bird beak.)


Happy Wednesday!

Tuesday, July 23, 2013

Make a hockey stick hobby horse and dragon

Did I make a hobby horse from a hockey stick?

Yup.

And why stop there?  Why not make a hobby dragon too?

Rawr.


Thursday, March 21, 2013

Make a Cardboard Bunny Tissue Box Holder

With Easter just around the corner, bunnies, chicks, and carrots seem to be  popping up everywhere.  Since I had some practice crapting a whale tissue box holder, I thought I'd try making a bunny tissue holder for Easter.

Meet Pinky.  
This little rabbit is my newest cardboard animal creation.  
She's super girly and cute.

And bonus- her tail provides comforting tissues when you sneeze.
Chuck can't resist pulling on her tail...


Want to crapt your own?  Read on!

Materials:
- cardboard (not bent, in good condition)
- pencil
- exacto knife
- self healing cutting mat
- scissors
- packing tape
- ruler
- paint
- paint brushes
- Sharpie markers
- Mod Podge

Directions:
Step 1:  Measure and cut out your pieces from cardboard.  (See pdf below) You'll need:
a.  1 long rectangular piece (15 3/4 inches x 5 1/2 inches)
     - folded lengthwise every 5 1/4 inches
     - with two tiny, thin rectangular holes cut out from middle section (for ears)
     - with two rectangles cut out from each side (for feet)

b.  2 identical ear pieces (about 4 1/2 inches tall)
     - bent 1/2 inch from bottom
     - two tabs cut at bottom (tape tabs down to attach ears)

c.  1 bottom piece (5 1/4 inch x 5 1/2 inch)
     - sides will probably be trimmed down and corners rounded when you assemble pieces

d.  1 front and 1 back piece (5 1/4 inch x 5 1/4 inch)
     - rectangle cut out from bottom of both pieces (for feet)
     - circle (approx 1 1/2 inch in diameter) cut out from back piece (for tissue tail)

Bunny Tissue Holder Measurements

Step 2:  Bend the long piece into three equal 5 1/4 inch parts.  (I found that it helped if I first scored the cardboard with my ruler or scissors).

Step 3:  Carefully tape front piece in front of your bent piece  (It was easier to maneuver smaller pieces of packing tape.  Try your hardest to make sure that the tape sits right against the cardboard.)


Step 4:  Attach bottom piece with tape.  Before taping, make sure that your tissue box fits into your construction.  You may need to trim the edges of the bottom piece and round off some corners to make sure that it fits.  (Honestly, I wish I trimmed a bit more off my bottom piece.  It's still slightly too wide and it pushed the sides out in a funny way.  So, I ended up taping them down from the outside... which ruined the effect a bit... )


Step 5:   Place your tissue box into the cardboard container.  Then, attach the back piece with packing tape.  (First I taped the top of the back piece to the bent long piece.  This created a nice hinge effect and the back piece could open and close.  I could have left it like that, but with Chuck on the loose it was safer if I taped the feet portions together too.)


Step 5:  Paint your piece.  (Honestly, I liked the au natural look.  But, pink just felt more spring-y, so I went with it.) To protect the tissue tail, push a plastic bag into your hole.  Pull it out when you're done.  Don't forget to use Mod Podge to protect your paint job.

And there you have it- some bunny to hand you tissues when you need them.  (Har, har, har.... )

Tuesday, February 12, 2013

DIY Cardboard Whale Tissue Box Holder

Once again, I fell in love with something that I saw on Etsy:  a whale tissue box holder.  Although he was super cute, I couldn't justify spending the money.  So... I crapted my own.


Would you like to make your own whale tissue holder?  If so, read on!

Materials:
- Pen
- Ruler
- Exacto knife
- Scissors
- Tacky glue (I used Aleene's)
- Packing tape
- Paint
- Paint brushes
- Mod Podge
- Foam brush
- Cardboard  (<-- Crap!)

Directions:
1. Measure and cut out
2 pieces of rectangular cardboard, 3 3/4 inches x 9 1/2 inches 
- 2 pieces of rectangular cardboard, 3 3/4 inches x 5 inches

2.  Cut out the shape of a whale tail from a piece of cardboard.  Cut out a small slit at the end of your tail.  Cut out a similar slit in the center of one of your smaller cardboard pieces.  Make sure the tail slides snugly into the rectangle.  

3.  Glue your four rectangular pieces together to create the sides of your tissue box holder.   (I used tacky glue and packing tape to securely attach the pieces together.)  Then, slide the whale tale in and tape it down as well.


 4.  Measure the top of your creation and cut out another rectangular piece of cardboard to place on top.  Cut out a rectangle where your tissues usually come out.

(I made my top rectangle 5 inches by 9 1/2 inches.  It was slightly too narrow, but I used it anyway because I ran out of cardboard.)


5.  Paint your box.  Then, give it a couple of coats of Mod Podge to protect your paint job.

Enjoy!

Thursday, January 17, 2013

Crapty cardboard cereal box giraffe

So this is the adorable cardboard giraffe that I fell in love with.  
Meet Chloe. (Isn't she darling?)


And here she is au naturale:
This time I used a tissue box to make her.


I can't take any credit for this template.  My talented momma friend Vanessa made it up and let me share it with you.  This little giraffe was super easy to make and fun to decorate too.  (Polka dots... oooh la la!)

Best part is that little elephant Ella now has someone to play with...
Beasty besties

Just download this free giraffe template to make your very own Chloe the giraffe.

Happy making, friends!