
Do Halloween crafts rock your world? Yes!?
Awesome. They totally rock mine
too. Halloween is my favorite holiday of
the year. Costumes, magic, candy, gross
things, spooky things—I love it all!
Tomorrow is
the first day of October and I’m trying to squeeze in as many Halloween crafts
as I can before the month is over. Today
I’m sharing a really neat Halloween activity that also doubles as a STEAM (science, technology,
engineering, art, and math) activity too.
We’re making shrunken apple
heads!
Super Easy and Spooky Shrunken Apple Heads

This post contains affiliate links. Thank you for your support!
(Ha! My
husband was weirded out my this little guy, but I think he’s just adorable. Look at that toothy grin!)
Have you ever tried making shrunken apple heads before?
I’ve always
shied away from the activity because the directions either required me to bake
apples for a looong time (which isn’t feasible for us because we’re in the
middle of a terrible heat wave) OR they required me to leave apples lying out
the counter for a long, long time (also not possible because we’ve got major ant
problems here. I won’t get into details,
but let’s just say the word swarm comes into mind. Really gross.)
But I found
this set of directions in an old Chickadee Magazine and modified it to fit our
hot/ant-infested situation. And guess
what? It worked!
Here are the materials you’ll need:
- Apple (At least 2- one for making, one for snacking on!)
- Peeler
- Popsicle
Sticks (We used the Jumbo kind
)
- Googly eyes
- Corn Kernels
- Large plastic Bag
- Plastic container
- Baking Soda
- Measuring Cups
- Salt
- Tacky
Glue (We love this kind
)
- Sharpie Markers
Now Let’s Shrink Some Apples!
Step
1: Peel the apple. (We did one apple and cut up another for a snack.)

Step
2: Use a popsicle stick to carve out a
face. (This was the perfect tool for my
preschooler. He was able to dig into the
flesh and cut out various shape without cutting himself.)

Step
3: (Optional) If you want your shrunken
apple head to sit on a popsicle stick, take a stick and poke it in the bottom
of your apple. Now you’ll have the
perfect stick indentation for later.

Step
4: In a large plastic bag combine ½ C of salt and 1 C of baking soda together.
Mix them together well!
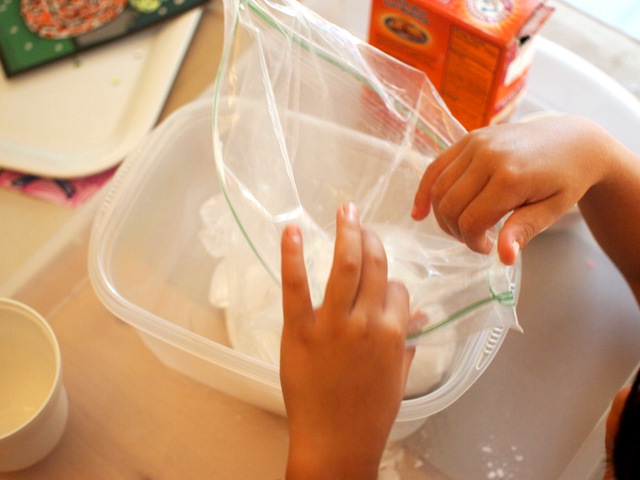
Step
5: Place your apple in the bag. (We placed ours in a plastic bin to make sure
the apple wouldn’t roll out.)
Step
6: Leave the bag open and place it
outside on the counter or in the fridge. (We left ours in the fridge.) Then, wait a week and see what happens!

Step
7: Pull your apple out of the
mixture. Dust off any excess baking soda
and salt. What do you notice? What’s the same about the apple? What’s different?

Now it’s
time to decorate your shrunken apple heads.
Use a dab of tacky glue to adhere eyes and teeth. To create a body, use sharpie markers to
decorate a popsicle stick and poke it into the bottom of the apple. (By the way, don't use hot glue. It just won't work. Trust me.)

And, I’m
sure this goes without saying, but please
don’t eat your shrunken apple head.
Whoa. Why does this work?
The salt
and the baking soda help the apple to shrink.
They absorb the moisture and dry the apple out. They also prevent the apple from rotting and
molding. Did you know the Egyptians used
a similar method when they mummified their dead? Yup. They covered the bodies in powder to dry them
out. Then, they wrapped them in
linen. They did such a good job of drying them out,
that the mummies bodies are still in great condition today!
Why did you put your apple head in the fridge?
The
original directions said to leave the apple out somewhere at home. I’m sure this would have improved the
appearance of our apple. They would have
dried out much nicer. However, we have
serious ant problems, so leaving food out just wasn’t an option for us. But, we were still able to see a change in
the apple’s appearance and talk about that.
I love this! Is there a way to extend this activity?
Sure
thing! Here are some really simple ways
to extend this activity with your kids:
- Fridge vs. Outside: Try making 2 shrunken apple heads and leaving one in the fridge and one outside. Wait a week. What differences do you see? Does one location result in a dryer apple?
- Baking Soda and Salt vs. Naked Apple: Make 2 shrunken apples. Place on in the salt and baking soda mixture. Place the other out without covering it in anything. Wait a week. Compare the differences in the two apples.
- What makes for a better drying agent? Which one works better at drying the apple out: baking soda only, salt only, or a combination of the 2?

I really
love how our shrunken apple heads turned out.
This was such an easy Halloween STEAM activity that got us creating
together and talking about different scientific ideas. We’ll definitely be repeating it in the
future!
Looking for more awesome Halloween STEAM activities?

- Halloween Pumpkin Brush Bots | Left Brain Craft Brain
- Halloween Creepy Crawly Search and Find Activity | One Time Through
- Glow in the Dark Layered Liquids | Babble Dabble Do
- Ghost Pumpkin Science | Little Bins for Little Hands
