Showing posts with label pumpkin. Show all posts

Wednesday, September 25, 2019

Easy Halloween Witch and Pumpkin Paper Chains

It's fall and you know what that means.... copious amounts of adorable Halloween crafts!! Halloween is MY FAVORITE holiday of the year! :) I love the costumes! The candy! The pumpkin carving! The magic! It's THE BEST.

To get fully into the Halloween spirit, I'm starting off with these super cute and easy to make witch and pumpkin paper chains! They're perfect to make at home with the kids, or with a larger group of kids too! Each child can decorate their very own pumpkin and witch to create a lovely paper chain.

Kid-friendly Halloween Paper Chains

how to make easy paper witch and pumpkin chains with kids for DIY Halloween decor


Today's craft was inspired by this adorable Halloween paper chain that I saw on Easy Peasy Fun. It had a black cat, monster, and pumpkin all in one paper chain. Super cute and I fell in love. Definitely check Andreja's site out because she has A ZILLION cute + easy crafts for kids!


Friday, September 6, 2019

Halloween Changing Paper Cup Faces

It's September! Which means it's time for the start of school, fall crafts... and Halloween crafts! Today's paper cup craft is such a fun one because you can change the faces of a witch, pumpkin, and ghost.... all with the turn of a cup!

(Not-so) Spooky Paper Emotions Cups

Super Cute Halloween Changing Paper Cup Faces- Such a fun craft for kids showcasing the full range of emotions

This post contains affiliate links.  This means I make a small portion off of any purchases made through the links at no additional cost to you.  Thank you for the grocery money!  For my full disclosure policy, click here.

Sunday, November 18, 2018

Easy Groovy Pumpkin Cheesecake Marbled Brownies

I've realized that I am a lazy baker.  That's the reason that I like kids crafts. They're easy and there's little pressure to make things perfect.  The act of making is the fun!  But baking?  Ugh. Completely other story. Exact measurements.  Specific ingredients.  And gluten-free baking?  (My eldest is allergic to wheat.)  Double ugh.  Forget about it.  It feels like I never have the right ingredients or flours...

So it's the holiday season and recently we were invited to Friendsgiving dinner.  I volunteered to bring a dessert... which seemed like a good idea because I wouldn't have to be in charge of the heavy cooking... But then I realized... eek! I only have 3 desserts in my current potluck repertoire- Rice Krispie treats, some variant of mochi cake, and boxed brownies.  Well, the brownies seemed to be the only viable option for this meal.  But I had just made my brownies a week ago so I figured I should at least jazz up my efforts somehow... and that's when I decided to try making something new:

Groovy Pumpkin Cheesecake Marbled Brownies

(They're so puuuuuurty?)

How to Make Groovy Pumpkin, Cheesecake Marbled Brownies- The Easy way to make a groovy fall dessert (with a boxed mix!)

This post contains affiliate links.  This means I make a small portion off of any purchases made through the links at no additional cost to you.  Thank you for the grocery money!  For my full disclosure policy, click here.

Monday, September 10, 2018

3D Optical Illusion Halloween Drawings

Have you seen those 3D hand drawings? They're amazing.  Awhile back I became really intrigued with them and made these 3D Optical Illusion Hearts using the same drawing technique.  Now that fall is in the air, I realized that this technique could be applied to Halloween too!  So here's a super easy Halloween activity to try out with your kids after school.  Doodle these 3D optical illusion pumpkins and kitties!

How to Draw 3D Optical Illusion Pumpkins and Cats

How to do 3D Optical Illusion Halloween Drawings- Such a fun and quick art challenge for kids!


Monday, October 17, 2016

Stapled Paper Pumpkins

Hi everyone! Sorry for the crickets around here.  We're in the midst of hosting family so things like crafting and blogging have taken a short hiatus.  Today I'm just popping in with this super easy Halloween Craft.  Simply grab staplers, hole punchers, markers, paper, and glue.  Then get to work making some funky paper pumpkins!   

Halloween Paper Pumpkin Open Process Art Craft


Tuesday, October 27, 2015

No-Carve Hardware Pumpkins

If you're not keen on carving a pumpkin this year, dig around the 'ol toolbox and try out this easy no-carve idea instead!

No-Carve Hardware Pumpkins!

Easy, No-Carve Hardware Pumpkins- Perfect Halloween craft for kids of all ages!

This post contains affiliate links.  Thank you for your support!

Saturday, October 3, 2015

Sparkly and Googly Eyed No-Carve Pumpkins

Are you feeling the Fall vibes?  Ready to do some easy pumpkin crafts?  If your little guy or gal isn't quite ready for carving pumpkins, then today's no-carve pumpkin option is for you!  Check out these sparkly and googly eyed no-carve pumpkins!

Sparkly and Googly No-Carve Pumpkins for Preschool Halloween crafting
This post contains affiliate links.  Thank you for your support!


Thursday, October 23, 2014

Halloween Art: No Carve Colorful Pumpkins

Looking for an easy way to colorfully decorate your Halloween pumpkins this year?  Then this no-carve method is right up your alley!  Here's one great way to make some fabulous, colorful Halloween art with the kids!

Halloween Art:  No Carve Colorful Pumpkins!

Halloween Art:  No Carve, Colorful Pumpkins, rocks, and pine cones!
This post contains affiliate links.  Thank you for your support!


Wednesday, October 15, 2014

Toilet Roll Pumpkins and Skulls

It's no secret that I LOVE toilet paper roll crafts.  I think I probably have about a dozen toilet roll crafts on the blog.  Yurp.  One of my friends recently commented, "Wow. You go through a lot of toilet paper."  Double yup.  We do.  We do.  (TMI?)  So anyway... eh hem... the toilet roll craft list is about to going to grow again!  Tada!  Here are my Halloween inspired toilet roll crafts!  


Toilet Roll Halloween Crafts

So we have some toilet roll pumpkins.....

Toilet Paper Roll Pumpkins craft for Halloween #creativepreschoolers #Halloween

and ...


Sunday, September 28, 2014

Origami Jack-O-Lantern Pumpkin

Can you tell that I'm really digging Halloween origami?  Last week I shared how to fold a cute origami black cat.  Today I'm continuing the theme and sharing how to fold an origami Jack-O-Lantern pumpkin!  


Origami Pumpkin

How to fold an origami Jack-O-Lantern Pumpkin for Halloween

This post contains affiliate links.  Thank you for your support!

I'm still an origami novice and I found these pumpkins to be much easier to fold than the black cat.  I just followed the original tutorial here.  It was shown with very few words and lots of arrows.  So I took photos of my process in hopes that these photos and descriptions will make things clearer.  (Although if you run into trouble, definitely check the original source!)

Let's get folding!

Wednesday, September 24, 2014

Recycled Pumpkin Sun Catcher Craft

Tis the season for Halloween crafting, fa-la-la-... Oh wait.  Wrong song.  Well, you get the point. The season for Halloween crafting has begun!  Last year we made of ton of Halloween crafts (see bottom of post for links).  This year we've folded an origami black cat and made a cardboard pumpkin with a changeable face.   Today we're going to make another recycled Halloween craft.  This time we made these milk jug pumpkin sun catchers!


DIY Milk Jug Pumpkin Sun Catchers


DIY Milk Jug Pumpkin Sun Catcher Craft!

(This post contains affiliate links. Thank you for your support!)

I really liked this craft because the pumpkins were SO easy to make with my 3 year old.  And we didn't have to spend a ton of time on prep or a ton of money for materials.  (That's a definite win win in my book.)  Ok!  Let's get making!


Monday, September 22, 2014

Faith, Generosity, and a Cardboard Pumpkin Face

Note:  This post contains affiliate links.  Thank you for your support!

You're probably confused by the title... and I apologize.  Today's post is quite special to me and I just wanted to make sure everything important was included.

Now if you've peeked over at my About Me page, you'll see that my Christian faith means quite a bit to me.  It shapes how I view the world, pulled me out of a tough spot when I quit my PhD program, and even influences how I view creativity and crafting.


My friend Amy Sullivan (who you might remember was the mastermind behind the #riskrejection challenge that encouraged me to publicly "come out my crafting closet")  recently wrote a book When More is Not Enough - How to Stop Giving Your Kids What They Want and Give Them What They Need.

I received a copy of this book to review... and I was pretty nervous.  A whole book focused on being generous and serving others like Jesus? Ehhh...  I worried that I'd finish the book feeling super guilty because my family and I weren't doing enough.

After reading the very first page, I saw how wrong my fears were.

Amy is honest, funny, and humble.  She shares her own family's struggles with generosity, and how God slowly changed their views of service.  She also offers some really great ways the whole family (including the kids!) can serve and love their communities and the world.


You can check out this video book blurb below for more details:


(Psst- Did you catch how she's donating 100% of the proceeds of the book to Transformation Village ?  Wow.)

After reading her book I felt really encouraged to rethink my views on service and generosity too.  I didn't need to be a missionary or the president of a non-profit to make an impact and help out my community.  I could do small things with love.


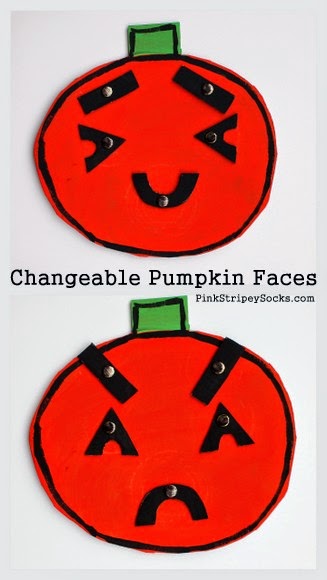
And now here's where the pumpkin face comes in.  I initially made Chuck this changeable cardboard pumpkin face (inspired by Halloween and this face from Mr. Printables) as a way to help him learn about his emotions.


Make a changeable cardboard pumpkin face to help teach children about feelings and empathy


See how the facial features change?  As we played with the toy, Chuck began relating to the pumpkin as his friend.  It kind of took on a life of its own.  We talked about how Mr. Pumpkin looked sad, happy, surprised, or scared.  We then also starting having conversations about how we could help friends that might be scared or upset.

And that's when a light bulb went on in my head.  These small, everyday conversations were also equipping Chuck to have compassion for others... and do small things with love.  Chuck's only 3, but he too can have compassion and serve others too.

Whoa.  That was definitely a "wow" moment for me.


Changeable faces from a DIY Cardboard Pumpkin


So if you have a chance, I definitely recommend you reading Amy's book When More is Not Enough.   You can read her thoughts on writing a book, or find her on her blogTwitterFacebookInstagram or Pinterest.  

(And in case you want to make your own changeable pumpkin face, simply cut out the facial features and pumpkin from corrugated cardboard.  Then, paint them.  Then, drill holes through the pieces and use fasteners to attach everything together.)

Happy Monday friends!

Thursday, October 10, 2013

Two Toddler approved Fall Crafts

Even though I really enjoy crafting, sometimes it takes a bit of persuasion to get Chuck to join in.  Currently he's much more into playing with toy cars than crafting with mom.  Go figure! :)  But I'm a persistent bugger, so I keep encouraging him to make stuff with me.

So far several of my craft plans flopped, but here are two crafts that Chuck actually participated in. (Hooray!) 

1.  Paper Bag Pumpkins:


Materials:
  • Lunch bags
  • Tissue paper squares
  • Glue stick
  • Marker 
  • Googly eyes (optional)
  • Pipe Cleaner
  • Newspaper

Directions:
  1. Glue your tissue paper squares onto your lunch bag.
  2. Add a face
  3. Crumple up newspapers and stick them into your bag.
  4. Use a pipe cleaner to seal up the bag.

And here are some pumpkins made during our toddler craft time:


2.  Contact Paper Leaves
 
Materials:
  •  Leaves
  • Contact paper
  • Scissors
  • Tape
  • Tissue paper (optional)

Directions:

  1. Place leaves in a heavy book to flatten them.
  2. Tape down contact paper, sticky side up.
  3. Stick leaves and tissue paper squares onto your contact paper.
  4. Place a piece of contact paper(sticky side down) on top of your first piece of contact paper.
  5. Trim the edges and tape your leaves onto a window.


Have a great weekend!