Showing posts with label Jewelery. Show all posts

Tuesday, September 23, 2014

Cardboard "Bead" Necklaces

I recently saw this fabulous post on painted bead necklaces by fellow Rockin' Art Mom ArtBar Blog.  Her students painted such beautiful wooden bead and cardboard necklaces.  I was really intrigued by the idea of using corrugated cardboard to make "beads," so I thought I'd give it a try myself.  Last weekend our town held its annual Lemon Festival, so I painted myself a lemon necklace to wear there.  And since Halloween is always on my mind, I painted myself a skull and bones necklace too.  Here are the results!

Let's Make Some Cardboard Beaded Necklaces!


Make Cardboard Beaded Necklaces!

This post contains affiliate links.  Thank you for your support!


Aren't they cute?   Let's get making!


Saturday, July 19, 2014

DIY Fish or Fruit Perler Bead Stretch Bracelet

Awhile back I had the wonderful opportunity to do a post swap with Allison from Dream a Little Bigger. (She's a serious crafting all-star, so I definitely recommend checking out her blog if you want to get seriously inspired.)   While packing the other day I found my collection of DIY Perler Bead Bracelets  (see the bottom of the post for pictures.)  And then I realized that I never shared my tutorial here.  So tada!  Here's a post from the archives.  Today we're going to make these lovely "fish" and "fruit" perler bead bracelets. 

Make "Fish" and "Fruit" Perler Bead Bracelets


how to make fish and fruit perler bead woven bracelets


(This post contains affiliate links.  Thank you so much for your support.)

Aren't they both so colorful and summery?  Don't you just want to make one? It feels like summer camp all over again...  Let's get stringing!

Sunday, March 9, 2014

Pi Day Activity- Make Pi Day Bracelets!

This Friday (3/14) is Pi Day!  Pi is a mathematical constant referring to the ratio of a circle's circumference to its diameter.  It's an irrational number, which means that it goes on forever and never shows a repeating pattern.  Every year it's celebrated on 3/14 because the first three digits of Pi are 3,1, and 4.  Now if you're looking for an easy way to celebrate Pi day, we've got a great collection of Pi Day Inspired Activities.  Today I'm sharing these nifty Pi Day Bracelets!  What makes this a great Pi Day Activity?  Well, the beads are strung according to Pi's digits. (Cool, right?)   It's a great way to combine math, art, and crafting!

Pi Day Craft Activity Make Pi inspired bracelets
Interested in making your own set of Pi Day Inspired bracelets?  Keep reading!

Wednesday, September 25, 2013

Candy Corn inspired Perler Bead Bracelet 2


Yesterday I shared how I made a  candy corn inspired perler bead bracelet.  Today I'll share how I made this slightly more complicated version.

While both bracelets were inspired by candy corn, the second one is my favorite.  It's graphic and quirky, just perfect to wear this upcoming month.

Materials:
  • Perler beads
  • Scissors
  • Elastic Cord (I used a thin 0.5 mm elastic cord for these bracelets, but a thicker cord would have been better to use because it's easier to string the beads with and the finished bracelet feels sturdier.)
Directions:

1.  Cut out about 40 inches of cord.  (It really doesn't matter what length you use.  You'll just end up tying on more cording later.)  Tie on a bead to act as a stopper.  (Again, it doesn't matter what color you choose because you'll end up removing this bead at the end.)


2.  String on six black beads.  I labeled the beads with numbers to help out with steps 3 and 4.   These six will be your first column of beads.

3.  Now you're going to add your second column of beads.  Add on a yellow bead (#7).  Then,slip your string through your #5 bead.  Add another black bead (#8).  Then, slip your string through your #3 bead .  Then, add another black bead (#9).  Then, slip your string through your #1 bead.   Then, pull tight.

These two columns are the basis for the rest of your bracelet.  See how some portions of the bracelet jut out and some portions of the bracelet don't?  As you continue to build your bracelet, you'll alternate between adding a bead to fill in a gap, and stringing your cord through the next bead that juts out.


4.   Now we're going to string one candy corn.   Remember to pull your string tight after stringing each column of beads.

Column 3: Add a black bead, string through  #9 black bead, add a  black bead, string through #8 black bead, add a yellow bead, string through #7 yellow bead 

(From now on, I'll just tell you what color beads to add.  But remember to alternate between adding a new bead and stringing through a bead that's jutting out.)

Column 4: Yellow, orange, black
Column 5: Black, orange, yellow


Column 6:  Yellow, orange, orange
Column 7: White, orange, yellow
Column 8:  Yellow, orange, orange


Column 9:  Black, orange, yellow
Column 10:  Yellow, orange, black
Column 11 :  Black, black, yellow


Column 12:  Yellow, black, black
Column 13:  Black, black, black

 Now you've got your first candy corn strung.  High five!  Keep going and continue to follow the pattern.  If you run out of cord, no worries!  Just tie on another strand.

Soon you'll get a long bracelet like this:  (The ending section contains more black because I knew I wouldn't be able to add on a whole candy corn.)


5.  Now make sure that (1) it fits your wrist and (2) both ends fit together like zipper teeth.  Then, string your cord through both sides of the bracelet and pull tight.  Remove the stopper bead and tie your beginning and ending cords together. 


And you're done!  Happy beading!

Tuesday, September 24, 2013

DIY Candy Corn Perler Bead Bracelet 1

Are y'all going Halloween crazy yet?  (Or is it just me?)

Last weekend I took Chuck to Target and we had a blast seeing all the costumes and decorations.   Doesn't matter how many times I've seen a dancing skeleton or singing skull, this stuff never gets old.  I guess I'm a kid at heart because Halloween is my very favorite holiday.

So that's why I'm super excited to share this craft with you.  I went a bit crazy with my perler beads and designed two candy corn inspired bracelets.  Today I'm sharing the simpler design with you.  If you like this one, head on back tomorrow to see how I made the more complicated one.  

Here's a photo of my candy corn inspired bracelet: 


Materials:
  • Perler beads
  • Scissors
  • Elastic Cord (I used a thin 0.5 mm elastic cord for these bracelets, but honestly a thicker cord is better to use because it's easier to string the beads with and the finished bracelet feels sturdier.)

Directions:
1.  Cut out about 40 inches of cord.  (Honestly, it doesn't matter what length you initially use.  You'll just end up tying on more cording later.)  Tie on a bead to act as a stopper.  (I used a black bead.  It doesn't matter what color you choose because you'll end up removing this bead at the end.) 

2.  String on 
  • white bead (#1 bead) 
  • white bead (#2 bead)
  • orange bead (#3 bead)
  • orange bead (#4 bead)
  • yellow bead (#5 bead)
  • yellow bead (#6 bead)
(I labeled the beads with numbers to help out with step 3.) These six will be your first column of beads.


3.  Now you're going to add your second column of beads.  Add on a yellow bead (#7).  Then,slip your string through your #5 yellow bead.  Add an orange bead (#8).  Then, slip your string through your #3 orange bead .  Then, add a white bead (#9).  Then, slip your string through your #1 white bead.   Then, pull tight.


 Now you've got the basis for the rest of your bracelet.  See how some portions of the bracelet jut out and some portions of the bracelet don't?  As you continue to build your bracelet, you'll alternate between adding a bead to fill in the gaps, and stringing your cord through the beads that jut out.

4.  Let's add the fourth and fifth columns. 
  • Column 4:  Add a white bead.  Slip your string through the jutting out white bead.  Add an orange bead.  Slip your string through the jutting out orange bead.  Add a yellow bead. Slip your cord through the jutting out yellow bead.  Pull tight.
  • Column 5:  Add a yellow bead.  Slip your string through the jutting out yellow bead.  Add an orange bead. Slip your string through the jutting out orange bead.  Add a white bead. Slip your string through the jutting out white bead.  Pull tight.

Keep going and continue to follow the pattern.  Add a bead and then slip your string through a bead that's jutting out.  Keep pulling your string tight after adding each column of beads.  If you run out of cord, no worries!  Just tie on another strand.

Soon you'll get a long bracelet like this:
Now make sure that (1) it fits your wrist and (2) both ends fit together like zipper teeth.  Then, string your cord through both sides of the bracelet and pull tight.  Remove the stopper bead and tie your beginning and ending cords together.


Tada!  Done. And that's how you make a simple candy corn inspired perler bead bracelet.  Like it?  If so, come back tomorrow to see how I made a slightly more complicated candy corn bracelet.

Happy beading! 


Monday, September 2, 2013

DIY Watermelon Perler Bead Bracelet

That's it.  
Summer is over.
No more vacation, no more white shoes.

Want to keep the good time summer vibes going?  
 Check out this watermelon bracelet I made out of Perler beads.
It's my second craft post for Handmade Charlotte.  

Happy belated Labor Day!

 DIY Watermelon Bead Bracelet
 

Tuesday, August 27, 2013

Spiked and Braided T-shirt Bracelet

I can't believe that September is just a week away.  Eeek!  Is it just me, or does every store sign seem to scream "Back to School?"

Growing up, I loved this time of the year for two reasons.  1)  I loved school. (Yeah, nerds!) and  2)  I loved back to school shopping.  New blank notebooks?  Swoon.   New clothes and shoes?  Double swoon. (Was anyone else like this as a kid?)

But, buying a ton of new items gets costly quite quickly. 

Fueled by my thrifty nature, I made these spiked and braided t-shirt bracelets.  They came out pretty cute. I like to imagine some creative, quirky gal wearing them to the first day of school. 

The colors are quite girly, but the spikes show that you've got some spunk!


Materials:
  • Multicolored T-shirt
  • Fabric scissors
  • Spikes with screwbacks
  • Pen (Optional)
  • Needle and thread
  • Tacky Glue

Wednesday, August 21, 2013

Perler Bead Zip Tie Statement Necklace

Ok, ok.  I'm still on the Perler bead kick.

I can't help it!  The jar is still practically full of beads.... and it mocks me whenever I walk by.  I tried hiding them in a craft drawer, but it didn't help.  I hear tiny colorful voices crying  "Leslie, Leslie.  Use us.  Use us!"

So like any crafter, I caved in to their siren calls.

Inspired by Mark Montano, I used zip ties to make these quick and easy Perler bead statement necklaces.  Tada!


I think the right one looks really cute and fresh.  I was on the fence about the left one... but it was a hit with Chuck.  He decided to wear it to church on Sunday (along with a backwards basketball cap, purple exercise shorts, and sneakers.....oi!) 

So if you too find yourself taunted by Perler beads, you could try making these necklaces too.  Let's begin!


Wednesday, August 7, 2013

Perler Bead Safety Pin Bracelet

And so the Perler bead craze continues!

(You know how they have "Shark Week" on tv?   Maybe I should have called this "Perler Week..."  Hmm...)

Last night while watching tv, I strung a whole bunch of black and white Perler beads onto some safety pins.  Why?  Well, because I wanted to make this bracelet...


The black and white design makes it quite graphic, the Perler beads make it fun, and the silver safety pin bits make it a bit edgy.  When I wear it, I imagine that I'm a hip preschool teacher going out to a club.  (Wow.  I really need to get out more....)


Tuesday, August 6, 2013

Perler Bead Statement Necklace

Yes.  I'm still on a Perler Bead kick.  I'm sorry.  I can't help it.  I'm the kind of person that likes to finish things off... and so far I've been thwarted from doing just that.  Boo.  Even after all this crafting, I still have like a billion beads left.

A billion!  Ack!  What do people do with all these beads anyway?

So today I'm going to share how I made this statement necklace using Perler beads.  But, full disclaimer here... honestly, I'm on the fence over the results.  Cute?  Or kind of crappy?  I'll let you decide....


Materials:
- 1/8" wide ribbon, cut at 72 inches
- Scissors
- Masking Tape
- Perler beads
- Ruler

Tuesday, July 30, 2013

Melted Perler bead braided bracelet

Maybe you're like me.

You rushed out to buy a huge tub of Perler beads because you had to make an awesome Perler bead bowl.

But now you find yourself staring at a huge tub of tiny colorful cylinders, wondering what you're going to do with all of them.

Well, how about making a braided Perler bead bracelet?

Oooh.  Arm Candy.


Materials:
- Colored hemp cord
- Perler beads
- Wax paper
- Baking pan
- Scissors
- Tape (or clipboard, or you could just use your foot)
- Button
- Ruler


Tuesday, July 9, 2013

Make Popsicle Bracelets

When I saw Mama Miss's Washi tape Popsicle bracelets, I was completely smitten.  Bracelets... made out of Popsicle sticks?  Super neat-o.  Count me in.

So today I present my version of Popsicle bracelets.  They were really fun to make and brought me back to my summer camp days.


Materials:
- Popsicle sticks
- Craft paint
- Paint brush
- Glasses
- Tupperware
- Water
- Painter's tape
- Drill
- String
- Scissors
- Fine sand paper
- Mod Podge
- Foam Brush

Wednesday, April 24, 2013

String art thread and milk jug necklace

Spring is here!

I love feeling the warmer temperatures and seeing the trees bursting with delicate pink and white blooms.  And I don't know about you, but I can't wait to exchange my dark, winter wardrobe for a lighter, more colorful one.

Inspired by the warmer weather and this gorgeous necklace from Modcloth, I welcomed the new season by crapting a wearable, string art necklace out of two materials:  a milk jug and embroidery thread. 

Materials:
- empty milk jug, cleaned and dried
- scissors
- hole puncher
- 2 colors of embroidery thread
- Sharpie marker


Thursday, March 14, 2013

Make an eggshell mosaic pendant

Don't toss out your eggshells!  Today's craft shows a really unique way to turn them into beautiful pieces of art!

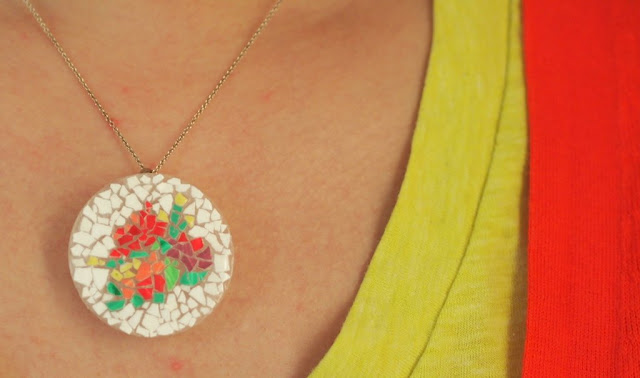
I love vintage micro mosaic jewelry, but being a huge cheap-o, I never allow myself to buy it.  So, yesterday, armed with a bunch of eggshells and milk jug caps (thanks Tita Tina for the stash!), I made my own version of micro mosaic jewelry.  Here are my two finished pendants:

Eggshell Mosaic Pendants


make yourself an eggshell mosaic pendant- great kids craft!
What a lovely piece of crapt


This post contains affiliate links. Thank you for your support! 

Monday, February 25, 2013

Make a Mosaic Bean Pendant

Hi everyone!

How was your weekend?   We had a pretty quiet Sunday, but our Saturday was full of fun activity.  I attended a bridal shower while hubby and Toddler Chuck visited family.  (I'll post up photos from the bridal shower later on this week.) I thought I'd start off the week with this crapty (and slightly crappy?) pendant that I made.

I think mosaics are lovely.  There's something quite special (and dare I say, possibly mathematical?) about laying pieces of varying shapes and/or colors together so that they fit a space and create a desired image or pattern.

Wanting to make a wearable mosaic of my own, I used some household materials to create this mosaic bean pendant:


Yeah.  I know what you're thinking.  Girl, that's a lot of look.  And my reply? Girl, I know.  But really, what does one wear with beans anyway?

Erm.... I'm not sure if I like the result, but I did have fun making it.  And who knows?  If you ever find yourself trapped at home with a couple of bored children, then perhaps you could whip these up for fun.

Materials:
- dried beans
- cereal box cardboard <--crap!
- craft paint
- paint brushes
- Tacky glue (I used Aleene's)
- String
- Felt
- Scissors


Monday, September 24, 2012

DIY Felt Flower Lapel Pin / Boutonniere

It's official!  Fall is now upon us.

With cooler temperatures rolling in, Hubby, Baby Chuck, and I are changing up our wardrobes.  We're putting on long sleeve shirts and pants, no longer shaving our legs (oh wait, that's just me- tmi?), putting on shoes instead of sandals (goodbye sandal tan), and wearing jackets.

Hubby been looking forward to fall ever since we've moved back east because he loves wearing jackets to work.  As a serious lover of all things stylish, he's also hinted that he'd love some small flowers to adorn his lapel (as seen here.)  I peeked around the internet for inspiration and then set out to make him some felt flower lapel pins.      

Here are the materials I used:
- freezer paper
- good scissors
- pencil
- felt in an assortment of colors  (*See note below) 
- iron
- hot glue gun
- bobby pin(s)
- needle and thread

*Note:  I bought cheap polyester felt from the craft store.  (30 cents a piece?  You just can't beat that price.) You would definitely get a more polished look if you purchased nicer wool felt.  We initially created these pins as mockups, thinking that we'd create real ones with wool felt later on.  But, the pins came out so nice that we just decided to use them.  How long will the pins last?  Will they quickly look ratty?  I'm not sure.  Let's see what happens once hubby starts wearing them to work.


Step 1:  I created a flower pattern that was kind of Van Cleef & Arpels meets Orla Kiely.  I traced that pattern onto freezer paper and ironed it (waxy side down) to adhere the paper to my felt.  This process make it easier to cleanly cut my tiny felt shapes out.  (Special thanks to Make It Cozee for the tip!)
Step 2:  I cut out my flower shapes, circle shapes (flower centers), and square shapes (flower backs).

Step 3:  I used a hot glue gun  (it was my first time using one!!!) to glue the squares onto the flowers.  I did this so that my flowers pins would feel a bit more substantial, since I used cheapy felt.  Plus, I didn't want my stitches (step 4) to be visible. 

Step 4:  After the glue dried, I sewed a bobby pin to each square, making sure to not sew through the front of the flower.

Step 5:  I hot glued a circle to each flower to complete my little garden of felt flower lapel pins.

Here's how the pin looks on hubby's jacket.  I just slipped the bobby pin through the lapel buttonhole.  (Note:  I had to cut the hole first because it was sewn shut.)


I think the pins came out super cute and add just the right touch of whimsy.  They'll definitely spruce up hubby's work outfit.  Hmm, but why stop at just work outfits?  I bet these little guys would also look really cute as wedding boutonnieres too... don't you think?