Showing posts with label summer. Show all posts

Friday, May 23, 2014

Make Homemade Body Paint

A couple of days ago my sister came over to visit.  Chuck and I were super excited for her to come.  She also enjoys making things so I wanted to try Paging Fun Mom's homemade body paint with her.  I ended up not following their recipe and just winging it.  It still came out and we had lots of fun painting homemade body paint on ourselves.

Make Homemade Body Paint

how to make homemade body paint

 (Note: This post contains affiliate links.  Thanks for your support!)

You just need three ingredients to make this creamy (and very moisturizing) body paint.  Just FYI- it has a completely different consistency then real body paint and it's not meant to stay on.  But that was ok with us.  We ended up painting our pictures, wiping off our artwork, and then painting something else.  Interested?  Let's get making!


Thursday, May 15, 2014

Corn Syrup Paint

Are you looking for a paint that's super pigmented and remains glossy looking when it's dry?  Well then this corn syrup paint is for you.  Chuck and I whipped up a batch of this glossy paint the other day in our kitchen.  Then we had loads of fun trying it out.  The paint is edible (although you probably don't want to eat it), has a consistency  thicker than regular paint, and looks like shiny enamel when it dries.  Intrigued?  Check out the results!

Make Glossy Corn Syrup Paint


how to make glossy corn syrup paint
(This post contains affiliate links. )

Oooooh.  Pretty.  So far we've made homemade sidewalk paint, homemade watercolor paints, and cornstarch toddler paint ... but none of those stand up to the gorgeous results of this homemade corn syrup paint.  The bright colors and gloss are fabulous.   (Yes.  I used the f-word.)  And ready for the best thing?  You could probably whip up a batch of this stuff tonight with ingredients and materials already found at home.  Let's get painting!


Thursday, May 1, 2014

Build a toy car that moves

I love painting things with Chuck, but sometimes I yearn to make things that actually move or do things.  So when a mommy friend suggested that we build cardboard toy cars that actually move, wowzers, I had to say yes.  She found the directions in an old kids' science book (that I don't remember the name of... sorry).  And that's how we spent an awesome play date with five kids- eating pizza and then building and racing some cardboard racing cars

Kid Science: Let's Build a Car that Moves!

how to build a cardboard car that moves
Today's craft is awesome for 2 reasons:

1.  The cars really move.  Really.  You just twist the tin can and then let go.  Bam.  The rubber bands store the potential energy and then once released, they turn the can... and your car moves by itself!

2.  You don't need any expensive materials.  In fact, you probably have most of the items already at home.  

Have I whet your appetite enough?  Ok.  Let's build! Vroooom!

Thursday, March 20, 2014

DIY Flying Whirly Copter Toy

Lately Chuck and I have been infatuated with things that fly. That's why we made our cardboard space shuttle a couple of days ago.  So today I took things one step further to create a handmade toy that actually did fly.  Modeled  after a plastic toy that hubby brought back from one of his trips, here's our version of a DIY Flying Whirly Copter Toy.

DIY Flying Whirly Copter Toy

DIY Flying Whirly Copter Toy


It's pretty neat that the toy actually does fly.  You simply spin it between both hands and the copter flies out and floats to the ground.  Keep reading to see how we made it (and a video of it flying!)

Wednesday, February 26, 2014

Make a square and cube bubble

We are definite bubble lovers over here.  With the colder weather outside, we've just been blowing them at home over a beach towel.  Recently I learned that bubbles didn't have to just be spherical shaped.  They could also look like squares and cubes too. What? No way! 

Yes way!  Behold!  A cubic bubble!
Make a cube bubble

Whoa.  It's bubble play for us older folks! Keep reading to see how we made different shaped bubbles:

Tuesday, February 4, 2014

Make Shaving Cream Clouds and Paint the bathtub walls

With all the crazy weather that's been happening around these parts, I thought Chuck and I could try creating some of our own crazy weather... indoors!  So we made a shaving cream cloud and watched it rain rainbows...

Oooh.  Isn't it pretty?
Make shaving cream clouds and rainbow rain

Keep reading to find out how we made it rain rainbows!

Friday, September 20, 2013

Cardboard Spaceship Climbing Toy

Currently Chuck and I have been reading books about the moon and space travel.  He loves the Berenstein Bears "On the Moon" book and Eric Carle's "Papa, please get the moon for me." 

So with that in mind, I made him a little cardboard spaceship climbing toy.  I found some lovely examples online and one of the mommies in our toddler group made a very simple version out of paper.  So, I based my design off of these.        


To operate the toy, you simply attach the moon to the wall or a doorknob.  Then, you pull the two brown tabs apart and your spaceship shoots straight to the moon.


Materials:
  • Cardboard box
  • Scissors
  • String
  • Paint and paint brushes
  • Mod Podge and brush (to protect your paint job)
  • Packing tape
  • Straw 


Directions:
This was a really quick and simple toy to make.
1.  Cut out your spaceship, moon, and two small rectangular stopper pieces out of cardboard.
2.  Paint your spaceship and moon.
3.  Once the paint dries, protect your paint job with Mod Podge.
4.  Cut your straw in half.  Tape it to the back of your spaceship.
5.  Fold your long piece of string in half.  Tape the middle of the string to the back of your moon.  Then, string your two strands through the two straws.  Tape the ends of  string to your cardboard rectangles so that the spaceship doesn't fall off.

Here's a shot of the mechanics: 

And that's it.  Simple to make, and simple to use.  You don't even have to make a spaceship and a rocket.  What about an alien spaceship and earth?  Or a basketball player and a basket?  The possibilities are endless.

We went this route, and Chuck got a kick out of sending his cardboard rocket to the moon.


Cardboard Rocket Ship sent to the moon from Pink Stripey Socks on Vimeo.


And then, since I was working with cardboard already.... I figured I'd make Chuck some cardboard food as well.  All that flying sure gives an astronaut a hearty appetite. 


Have a wonderful weekend!  See you back on Monday.


Psst-  If you've got a ton of cardboard lying around... check out these fun kids' crafts that use cardboard:

Monday, September 2, 2013

DIY Watermelon Perler Bead Bracelet

That's it.  
Summer is over.
No more vacation, no more white shoes.

Want to keep the good time summer vibes going?  
 Check out this watermelon bracelet I made out of Perler beads.
It's my second craft post for Handmade Charlotte.  

Happy belated Labor Day!

 DIY Watermelon Bead Bracelet
 

Tuesday, August 27, 2013

Spiked and Braided T-shirt Bracelet

I can't believe that September is just a week away.  Eeek!  Is it just me, or does every store sign seem to scream "Back to School?"

Growing up, I loved this time of the year for two reasons.  1)  I loved school. (Yeah, nerds!) and  2)  I loved back to school shopping.  New blank notebooks?  Swoon.   New clothes and shoes?  Double swoon. (Was anyone else like this as a kid?)

But, buying a ton of new items gets costly quite quickly. 

Fueled by my thrifty nature, I made these spiked and braided t-shirt bracelets.  They came out pretty cute. I like to imagine some creative, quirky gal wearing them to the first day of school. 

The colors are quite girly, but the spikes show that you've got some spunk!


Materials:
  • Multicolored T-shirt
  • Fabric scissors
  • Spikes with screwbacks
  • Pen (Optional)
  • Needle and thread
  • Tacky Glue

Wednesday, August 7, 2013

Perler Bead Safety Pin Bracelet

And so the Perler bead craze continues!

(You know how they have "Shark Week" on tv?   Maybe I should have called this "Perler Week..."  Hmm...)

Last night while watching tv, I strung a whole bunch of black and white Perler beads onto some safety pins.  Why?  Well, because I wanted to make this bracelet...


The black and white design makes it quite graphic, the Perler beads make it fun, and the silver safety pin bits make it a bit edgy.  When I wear it, I imagine that I'm a hip preschool teacher going out to a club.  (Wow.  I really need to get out more....)


Tuesday, July 30, 2013

Melted Perler bead braided bracelet

Maybe you're like me.

You rushed out to buy a huge tub of Perler beads because you had to make an awesome Perler bead bowl.

But now you find yourself staring at a huge tub of tiny colorful cylinders, wondering what you're going to do with all of them.

Well, how about making a braided Perler bead bracelet?

Oooh.  Arm Candy.


Materials:
- Colored hemp cord
- Perler beads
- Wax paper
- Baking pan
- Scissors
- Tape (or clipboard, or you could just use your foot)
- Button
- Ruler


Wednesday, July 24, 2013

Contact paper and cellophane stained glass windows

Our weekly baby and toddler music class has now morphed into a music and craft class.  The kids are getting more mobile now, so we figured it was good to give them something to make and do with their hands.  (Otherwise, they go straight to grabbing the lovely books on the shelves or pushing the furniture around.  Cute, but slightly disruptive to the library.)

But what kinds of activities could the kids do?  Well, the activity had to be
- Suitable for children from 1-3
- Easy to prep
- Easy to set up
- Super easy and quick to clean up
- Made from cheap materials
- Fun!!! (Of course.)

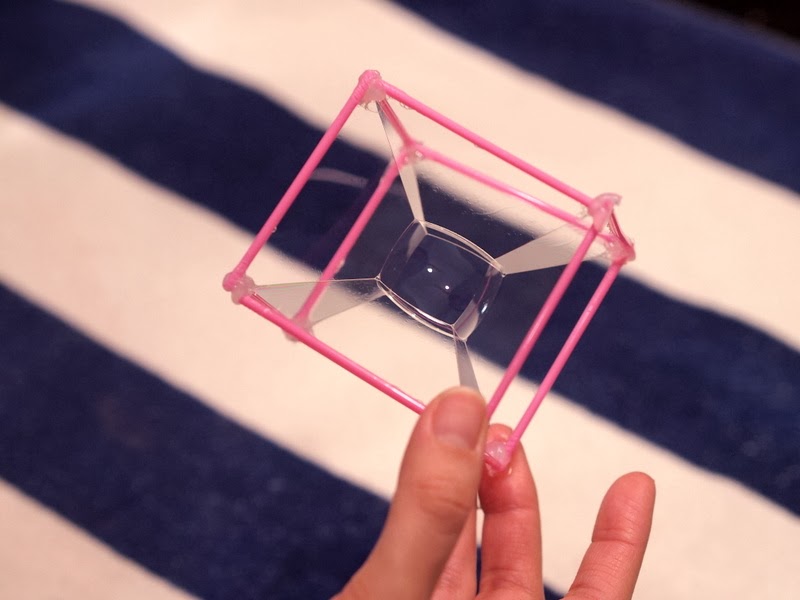
Because of my love for stained glass, I wanted to try a simple stained glass activity with the kids.  Instead of using glue (too messy for the younger kids), we used contact paper to attach our colored cellophane.


Materials:
  • Two identical rectangles of contact paper (I just bought a small roll from the Dollar store instead of buying the expensive large roll from the department store)
  • Masking tape and clear tape
  • Frame cut out from a cereal box (Note:  Make the opening of the frame smaller than your contact paper rectangles)
  • Different colored pieces of cellophane cut into small rectangles

 
Directions:
1.  Carefully remove the backing from one contact paper rectangle and use masking tape to tape the sheet sticky side up to your table. 

2.  Let your child stick the cellophane rectangles onto the contact paper. (Chuck loved this part.)

3.  Remove a portion of the backing from another sheet of contact paper.  Then, slowly stick the second sheet of contact paper on top of the first (sticky side down), smoothing it, and removing the rest of the backing as you go.  (This was the toughest part. When we got bumps or bubbles, we just lifted up the top sheet of contact paper and tried again.)

 4.  Tape your contact paper rectangle onto your frame.   Decorate the frame however you want.


Results:

Here are some of the mommy and children's actual work (My sample item is in the one on top in the middle.)


Review:
They were fun to make and came out super colorful and cute.

We struggled a bit with the contact paper, but I didn't care because some of the 2 year olds actually sat still for a couple of minutes and stuck the colored cellophane onto the contact paper.  What?  A couple minutes of concentrated effort?  Awesome.  I'll take it!

One very pregnant mommy even said that this was the longest time that her almost-2 year old sat still.   She didn't want to leave because he was behaving so nicely.

Ahh, music to my ears.  Her comment just made my day.

I love seeing moms and children engaged in an activity and enjoying time together.

Happy crafting!

Tuesday, July 9, 2013

Make Popsicle Bracelets

When I saw Mama Miss's Washi tape Popsicle bracelets, I was completely smitten.  Bracelets... made out of Popsicle sticks?  Super neat-o.  Count me in.

So today I present my version of Popsicle bracelets.  They were really fun to make and brought me back to my summer camp days.


Materials:
- Popsicle sticks
- Craft paint
- Paint brush
- Glasses
- Tupperware
- Water
- Painter's tape
- Drill
- String
- Scissors
- Fine sand paper
- Mod Podge
- Foam Brush

Monday, June 10, 2013

Make a sailboat out of a shampoo bottle

((Thank you to everyone for entering my Kiwi Crate Giveaway.  Before I talk about today's crapt, let me just announce that the winner of the giveaway is Mel!  Congratulations!  Please email me your mailing address so I can send you a Kiwi Crate straight away.))


Hi everyone!  Today I'm going to share how I made this shampoo bottle sailboat after being inspired by this DIY boat kit found here:

Materials:
- empty shampoo bottle <-- crap!
- 2 rubber bands
- wine cork <-- crap!
- drill
- stirrer <-- crap!
- straw <-- crap!
- pair of scissors
- triangle from a potato chip bag <-- crap!
- tape (packing tape is best, but I only had clear plastic tape)

Here are the boat's main components:

Directions:
1.  Cut your cork in half lengthwise.  Then, drill a hole through the middle.  The hole should be big enough to hold your stirrer (aka the mast) up.

2.  Your straw is going to be the horizontal bar holding up your sail (aka, the boom).  Cut your straw to the desired length.  Then, make two triangle cutouts on each side of the straw, so that your stirrer (aka the mast) can slide into the straw.  Both your stirrer and straw will support your plastic bag sail.  


3.  Cut your plastic chip bag into a triangle sail shape.  Tape the plastic bag onto your stirrer and straw to create a sail.


4.  Use two rubber bands to attach your cork to your shampoo bottle.  Then, stick your stirrer into the cork's hole and voila, instant sail boat.

The boat sails nicely in your bathtub, but Chuck and I took it one step further and sailed the high seas (eh hem... a nearby lake.)  We just tied a ribbon to it so that it wouldn't float away.

Hope you and your little one enjoy this crapt!


Thursday, April 11, 2013

Make pipe cleaner bubble wands and big bubbles

Currently Chuck only knows a couple of words.  One of them happens to be "bubbles."  This kid of ours really loves bubbles.  He'll point outside and say "bubbles."  He'll point to round objects and say "bubbles."  He'll point to the bathtub and say "bubbles."  He'll even point to birds and say, "bubbles."

Given his obsession with soapy spheres, I thought it would be fun to make our own bubble wands and bubble solution.  These pipe cleaner and straw wands make larger bubbles than the wands you typically buy in the stores.

To make the straw and string wand:  String together two straws with some yarn.  Slide the knot into one of the straws. If you have problems getting the string through the straws, try sucking it through.  You'll get a mouthful of string, but it works!
We dunked these wands in our homemade bubble solution and had some messy fun. At first it was difficult to make the larger bubbles, but I soon got the hang out of it and created some lovely large spheres.

(Psst- Here's the recipe for the bubble solution that we used.  I combined 5 C warm water, 1/2 C Dawn dish detergent, and 1/4 C glycerin.  I gently mixed the liquids together and made sure not to create suds.   Then, I let the solution sit overnight.   Even though this recipe made fairly large bubbles, I really didn't like the way the Dawn smelled.  Yuck.  Plus, Chuck tried to rub his face with soapy hands, so I worried that the soap stung his eyes.  Next time I'll find a recipe using baby shampoo.  This way the solution won't smell so detergent-y and Chuck's eyes won't sting.  )

Here are some photos from our first big bubble making adventure:


I found that the bubbles didn't pop as quickly if I made them by moving the wand through the air instead of blowing it.

Another bubble created by the wind.   


All in all, not a bad start.  We managed to make large bubbles, but they popped really easily.  Hrmm... Next time we'll try a different solution and we'll make one of those giant bubble blowing wands.  Oooh! I can't wait!

Tuesday, February 19, 2013

Make a bubble snake

We don't drink much soda so when hubby finally brought a Pepsi home I snatched up his empty bottle quicker than a hungry child grabbing at freshly baked Christmas cookies.

Why?  Well, I had been dying to make a bubble snake blower. And honestly, could you blame me?  Look at the long foamy chain of bubbles I was able to blow.

Wowzers.  This photo makes my inner child squeal with delight

To blow awesome foamy snake-like bubble chains, I just needed a couple of materials:

Materials:
- empty plastic bottle
- wash cloth
- scissors
- rubber band
- dish detergent
- water
- plastic container

Directions:
1.  Cut off the bottom of the bottle.
2.  Cut a circle out of the wash cloth that's about 1-2 inches larger than the bottom of the bottle.
3.  Use a rubber band to attach your washcloth circle to the bottle.  That's it!
4.  Dip the bottle (wash cloth bottom) into dish detergent that's been mixed with a bit of water.
5.  Blow.  A foamy bubble snake will appear before your eyes.

(Warning:  Do not inhale, only exhale. Otherwise you'll end up drinking dish detergent like I did. Yuck.)

Here are some photos of Baby Chuck and I playing with our bubble snake blower.  (You may be wondering why we're in the bath tub.  Or why my bathtub is so dirty.... Hmm..  Well, we fully intended to blow bubbles outside, but it was just too cold.  The bath tub served as a nice place to try the activity out, since the bubbles created quite a sticky mess on the ground.  As for why my bathtub  is so dirty... I've neglected to clean it.... eek.)


Let me know if you try this out with your kids.  I can't wait till the weather gets warmer.  We'll definitely try blowing more bubble snakes outside.