

Wait, what does this shirt have to do with Easter? Well, kids seem to wear cute, colorful outfits on Easter. (See last year's DIY I heart Peeps Shirt.) A friend graciously donated a bunch of clothes to us and one of the items was a blank white shirt. It screamed "Paint me, paint me." And so Chuck and I used it to make this year's Easter shirt together. Keep reading to see how we made it!
Materials Needed to Make Sharpie Tie Dye Shirt
- Shirt
- Sharpie Markers
- Cardboard
- Baking pan
- Rubbing alcohol (or Nail Polish Remover)
- Spray bottle (or dropper)
- Iron
- Hair Tie
Directions to Make Sharpie Tie Dye Shirt
1. Stretch your shirt over a piece of cardboard. (The cardboard will prevent the markers from bleeding through.)2. If you don't want the arms drawn on, hide them (or tape them) underneath the shirt. Then, give your child markers and watch him work.
Chuck's only 2, so I took a lot of precautions
- I sat by him the whole time he worked on his shirt.
- He was only allowed to use one marker at a time.
- I repeatedly reminded him to be careful and NOT draw on his skin.
- I capped the markers right after he finished with each color.
- We also worked in a well ventilated area because permanent markers really smell.
Here's his initial artwork-
(He chose the colors because they reminded him of his favorite Plane characters.)

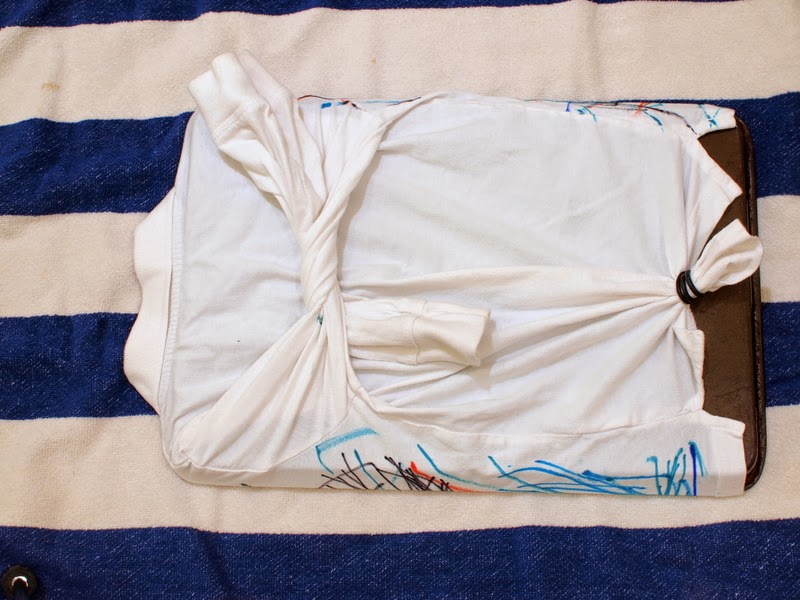
3. After he finished, I stretched his shirt over a baking pan so that it would catch all the alcohol. I also tied the arms and a portion of the shirt back so that the front of the shirt would be nice and tightly stretched over the pan.
4. Chuck LOVES spraying with spray bottles. So, instead of using a dropper and dripping the alcohol onto the shirt, I filled up the bottle part way with rubbing alcohol and let him spray. (Again, I took a lot of precautions. I warned him to not spray anything else except for the shirt. We also worked in a well ventilated area.) Even though it was super stinky, he really enjoyed spraying and watching the colors bleed together. (Sorry I didn't take a photo of this step, I had my hands full managing the artist!)
5. Once the shirt completely dries, remove it from your baking pan. Then, iron it to help preserve the colors. (I totally didn't do this, and when I went to hand wash my shirt a lot of the lovely colors ran. Boo. See Fun At Home With Kids' link below to see her ideas for how to best preserve colors.)
And that's how we made our new Easter shirt:

It was really cute seeing the little guy so proud of his work.

With its
lovely watercolor-like colors, I think this will make for a cute and modern Easter
outfit.

Interested in learning more about Sharpie Tie Dying?
Check out these other tutorials below:- Babble Dabble Do's Embroidery Hoop Sharpie Tie Dye Shirt
- Fun at Home With Kids' Sharpie Tie Dye Shirt (She has excellent directions for washing the shirts)
- Crown Hill's Cheetah print Sharpie Tie Dye Shirt
- My first attempt at Sharpie tie dying my clothes
Happy tie dying, friends!