Showing posts with label mosaic. Show all posts

Tuesday, March 29, 2016

Window process art (and our favorite 25+ art books!)

There is something about process art that really appeals to me.  When my son and I are free to just explore materials, there's more room to be creative (and a whole lot less pressure on both of us to make things "look right.")  We get to explore, create, and talk with each other.  Now, I will always love cute kids' crafts.  (Googly eyes and glitter will always hold a special place in my heart!) But lately I've just had enough time (and energy) to put out open-ended projects for us to do.

Here's a recent window process art activity that we recently did together...

Family Window Process Art


window process art with preschoolers
This post contains affiliate links.  Thank you for your support!  For my full disclosure policy, click here.


Friday, November 21, 2014

Candy Mosaic Art with Kids

Do you still have leftover Halloween candy?  Eeek. We do.  This week's Creative Preschooler theme is food!  With Chuck's current aversion to painting, I thought it would be fun to use our excess candy and make art with it!  So we made ourselves some lovely, colorful candy mosaic art!

Make Candy Mosaic Art with Kids!

kid Art- Make candy Mosaic craft


It's always special to make art with non-traditional materials.  Some of my favorite food-art projects include our colored salt arttortilla art,  gumdrop flowerscornstarch sidewalk paint, and homemade watercolor paints!


Wednesday, September 24, 2014

Recycled Pumpkin Sun Catcher Craft

Tis the season for Halloween crafting, fa-la-la-... Oh wait.  Wrong song.  Well, you get the point. The season for Halloween crafting has begun!  Last year we made of ton of Halloween crafts (see bottom of post for links).  This year we've folded an origami black cat and made a cardboard pumpkin with a changeable face.   Today we're going to make another recycled Halloween craft.  This time we made these milk jug pumpkin sun catchers!


DIY Milk Jug Pumpkin Sun Catchers


DIY Milk Jug Pumpkin Sun Catcher Craft!

(This post contains affiliate links. Thank you for your support!)

I really liked this craft because the pumpkins were SO easy to make with my 3 year old.  And we didn't have to spend a ton of time on prep or a ton of money for materials.  (That's a definite win win in my book.)  Ok!  Let's get making!


Tuesday, March 11, 2014

Stained Glass Craft with Aluminum foil and Cellophane

Are you looking for another take on kids' stained glass window crafts?  Instead of using contact paper, why not use aluminum foil!  Glue pieces of cellophane on top of aluminum foil to create a lovely stained glass effect.  The colorful cellophane really stands out against the shiny aluminum foil background. 

Oooh!  And it's spring themed! Spring.... glorious spring....
Stained glass craft with aluminum foil and cellophane


Not sure if you can tell, but the black outlined tulip stands up against the aluminum foil.  Yup, it's my faux leading.  Nice, right?  Keep reading to see how we made these aluminum foil and cellophane stained glass panels.


Thursday, February 27, 2014

Cellophane Stained Glass Windows

Who's up for a little color?  Anyone? Anyone? Everything's looking pretty grey here, so Chuck and I made some cellophane stained glass windows.  I cut up pieces of cellophane and then we stuck them to our windows using a mixture of dish soap and water.   

Ahh, don't these hearts just brighten your day?
Cellophane stained glass heart windows

Keep reading to see how we did this activity...


Sunday, October 27, 2013

Make Sugar Skull Sun Catchers and Crystallized Sugar Skull Ornaments

Alright everyone... the countdown is on.  It's just a couple of days till Halloween.  Are you excited?  Or, are you over all the orange and black?

I'm in the first group and still SUPER excited for Halloween.  I just finished Chuck's costume this past weekend, so he's ready to go.  I'm not sure if he'll appreciate the idea of trick-or-treating (plus his allergies prevent him from eating a lot of the candy out there), but I think he'll enjoy seeing other kids in costumes and all the spooky decorations.

I'll upload some photos of his costume later on this week... but today I just wanted to share the last of my sugar skull crafts.

So, we already made DIY sugar skull candle holders and DIY sugar skull luminaries and Allison shared her lovely tutorial for DIY sugar skull shoes.  Today's sugar skull crafts were designed with kids in mind.  They're easy to make and the resulting products look great.

1.  Sugar Skull Window Clings

Colorful and fun, these two skulls will float happily on your window.


Materials:
  • Contact Paper (Buy the cheap stuff from the Dollar Store)
  • Black paint pen (You could also use a Sharpie marker, but the lines won't be as dark.)
  • Scissors
  • Cellophane 
  • Tape

Wednesday, July 24, 2013

Contact paper and cellophane stained glass windows

Our weekly baby and toddler music class has now morphed into a music and craft class.  The kids are getting more mobile now, so we figured it was good to give them something to make and do with their hands.  (Otherwise, they go straight to grabbing the lovely books on the shelves or pushing the furniture around.  Cute, but slightly disruptive to the library.)

But what kinds of activities could the kids do?  Well, the activity had to be
- Suitable for children from 1-3
- Easy to prep
- Easy to set up
- Super easy and quick to clean up
- Made from cheap materials
- Fun!!! (Of course.)

Because of my love for stained glass, I wanted to try a simple stained glass activity with the kids.  Instead of using glue (too messy for the younger kids), we used contact paper to attach our colored cellophane.


Materials:
  • Two identical rectangles of contact paper (I just bought a small roll from the Dollar store instead of buying the expensive large roll from the department store)
  • Masking tape and clear tape
  • Frame cut out from a cereal box (Note:  Make the opening of the frame smaller than your contact paper rectangles)
  • Different colored pieces of cellophane cut into small rectangles

 
Directions:
1.  Carefully remove the backing from one contact paper rectangle and use masking tape to tape the sheet sticky side up to your table. 

2.  Let your child stick the cellophane rectangles onto the contact paper. (Chuck loved this part.)

3.  Remove a portion of the backing from another sheet of contact paper.  Then, slowly stick the second sheet of contact paper on top of the first (sticky side down), smoothing it, and removing the rest of the backing as you go.  (This was the toughest part. When we got bumps or bubbles, we just lifted up the top sheet of contact paper and tried again.)

 4.  Tape your contact paper rectangle onto your frame.   Decorate the frame however you want.


Results:

Here are some of the mommy and children's actual work (My sample item is in the one on top in the middle.)


Review:
They were fun to make and came out super colorful and cute.

We struggled a bit with the contact paper, but I didn't care because some of the 2 year olds actually sat still for a couple of minutes and stuck the colored cellophane onto the contact paper.  What?  A couple minutes of concentrated effort?  Awesome.  I'll take it!

One very pregnant mommy even said that this was the longest time that her almost-2 year old sat still.   She didn't want to leave because he was behaving so nicely.

Ahh, music to my ears.  Her comment just made my day.

I love seeing moms and children engaged in an activity and enjoying time together.

Happy crafting!
Sunday, June 16, 2013

Painted Mosaic Styrofoam Tile Picture Frame

June is the month of Father's day and birthdays.  Chuck and I wanted to make gifts for hubby and my parents, so we made these mosaic picture frames out of painted Styrofoam plates and cardboard.


I'm so glad with how they turned out.  They're happy and colorful and made out of stuff that we had right at home.


Sunday, May 12, 2013

Make a stained glass house using cellophane

A while ago, a cousin sent me a beautiful faux stained glass panel that her friend made using colored cellophane and a picture frame.  I've since lost the photo, but every so often I keep thinking back to that image and wanting to make my own faux stained glass using cellophane.

Here's a fun kids' craft that I came up with:  a 3D stained glass house constructed out of cellophane and plastic containers:
Materials:
- paper
- pencil
- scissors
- clean and dry plastic lids (sturdier plastic works better than flimsier plastic)
- Mod Podge
- foam brush
- different colored cellophane (you could probably substitute colored tissue paper too)
- clear tape

Directions:
1.  Cut out your six house pieces. (I cut them out of paper first to make sure everything fit and then traced my paper shapes onto plastic lids.)  You'll need two same-sized "house" shaped pieces for the front and back, two rectangles for the roof,  and two rectangles for the side of your house.  (I ended up making the two side and two roof pieces four identical squares so that I wouldn't have to worry too much about measuring.)

2.  Cut out random small pieces of cellophane.  I chose to cut out hearts and rectangles.

3.  Cover your work area.  Use your foam brush and Mod Podge the cellophane onto your house pieces.  Don't worry if the cellophane dangles off the edges.
 4. After the Mod Podge dries, trim any excess hanging cellophane pieces.  Your cellophane will dry crinkled, but that's ok.
 5.  Tape your pieces together to create a house.  (I first taped the pieces into the flat arrangement below.  Then, I bent and taped the pieces into their final 3D house shape.  I also made sure that the Mod Podged cellophane pieces were facing inside my stained glass house.  I figured this way the cellophane wouldn't rub off as easily.)

 Voila!  Done.  I think this would be a really fun craft to do with kids.  It's a different take on the traditional stained glass or sun catcher craft.    Let me know if you try it out!


Thursday, March 14, 2013

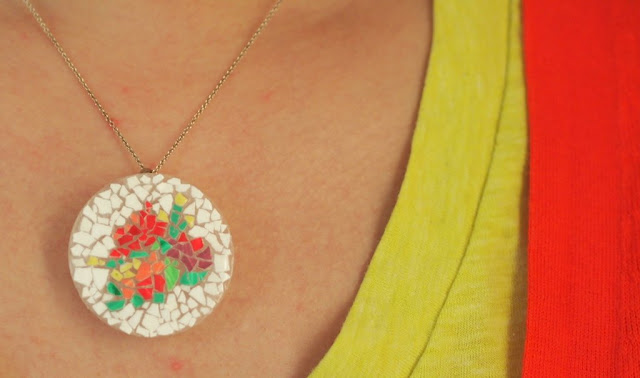
Make an eggshell mosaic pendant

Don't toss out your eggshells!  Today's craft shows a really unique way to turn them into beautiful pieces of art!

I love vintage micro mosaic jewelry, but being a huge cheap-o, I never allow myself to buy it.  So, yesterday, armed with a bunch of eggshells and milk jug caps (thanks Tita Tina for the stash!), I made my own version of micro mosaic jewelry.  Here are my two finished pendants:

Eggshell Mosaic Pendants


make yourself an eggshell mosaic pendant- great kids craft!
What a lovely piece of crapt


This post contains affiliate links. Thank you for your support! 

Tuesday, February 26, 2013

Make Eggshell Mosaic Pots

Can you feel spring in the air?  

In honor of the warmer weather and my love for mosaics, today's post is all about decorating tiny pots with eggshell mosaics.

Mosaic Eggshell Pots


mosaic eggshell pots- fun kids craft idea for Easter
This post contains affiliate links.  Thank you for your support!

Monday, February 25, 2013

Make a Mosaic Bean Pendant

Hi everyone!

How was your weekend?   We had a pretty quiet Sunday, but our Saturday was full of fun activity.  I attended a bridal shower while hubby and Toddler Chuck visited family.  (I'll post up photos from the bridal shower later on this week.) I thought I'd start off the week with this crapty (and slightly crappy?) pendant that I made.

I think mosaics are lovely.  There's something quite special (and dare I say, possibly mathematical?) about laying pieces of varying shapes and/or colors together so that they fit a space and create a desired image or pattern.

Wanting to make a wearable mosaic of my own, I used some household materials to create this mosaic bean pendant:


Yeah.  I know what you're thinking.  Girl, that's a lot of look.  And my reply? Girl, I know.  But really, what does one wear with beans anyway?

Erm.... I'm not sure if I like the result, but I did have fun making it.  And who knows?  If you ever find yourself trapped at home with a couple of bored children, then perhaps you could whip these up for fun.

Materials:
- dried beans
- cereal box cardboard <--crap!
- craft paint
- paint brushes
- Tacky glue (I used Aleene's)
- String
- Felt
- Scissors