Showing posts with label Crapty Fridays. Show all posts

Tuesday, December 3, 2013

Make mini Christmas trees from Pipe Cleaners and Cardboard

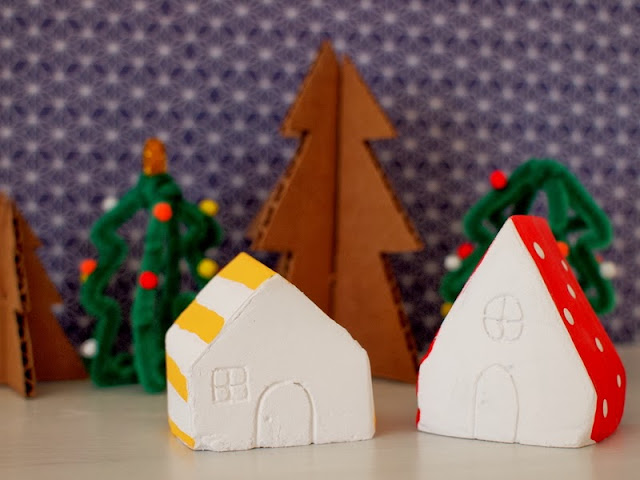
Yesterday I shared how I made a miniature Christmas village out of plaster of paris.  Today I just wanted wanted to show how I quickly made these uber cute cardboard and pipe cleaner Christmas trees for my village.

(And if you like these trees, check out my tutorial for mini paint chip trees!

mini cardboard and pipe cleaner trees tutorial


Cardboard Christmas Trees

mini cardboard Christmas trees tutorial
Materials:
  • Cardboard
  • Cutting Mat
  • Pattern (see below)
  • Pen/pencil
  • Exacto knife
  • Scissors

Directions:
  1. Print out the template to make one large and one small tree. 
  2. Cut out the Christmas tree parts. 
  3. Trace them onto cardboard.
  4. Cut our your parts with an exacto knife.
  5. Slide both pieces together and you've got yourself a mini tree!


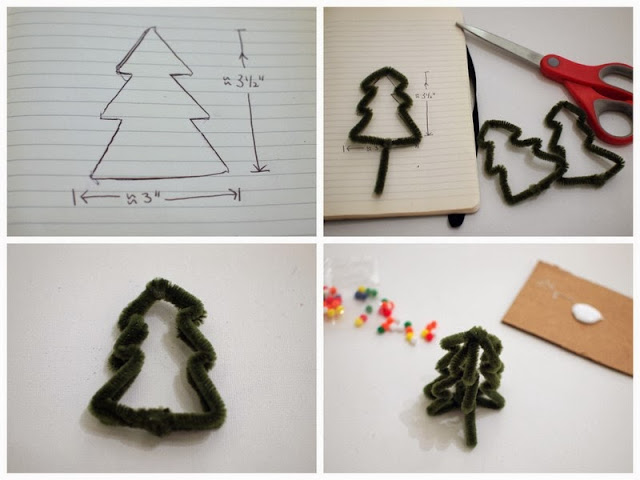
Pipe Cleaner Christmas Trees
mini pipe cleaner trees tutorial

Materials:
  • Paper
  • Pen
  • Scissors
  • Pipe cleaners (three per tree)
  • Pom Poms
  • Tacky glue

Directions:
1.  Doodle out a tree on a piece of paper.
2.  Bend a green pipe cleaner around your doodle.  Wrap both ends together to secure your tree.  Trim excess bits off.  Repeat this for all three tree shapes. 
3. Tie the three trees together by wrapping the tops and bottoms together with pipe cleaner.
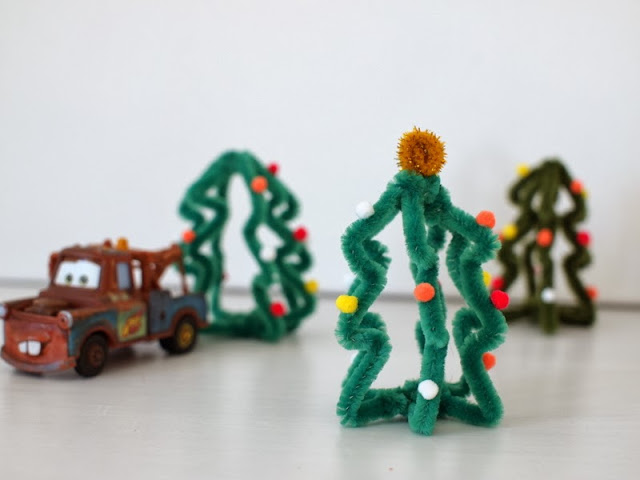
4.  Gently separate the branches and glue small pom poms on with tacky glue.

That's it!  Happy crafting!  (Chuck was the artistic director for this photo shoot.  Can you tell?)
make mini Christmas trees tutorial


Monday, December 2, 2013

DIY Mini Plaster of Paris Christmas Village

I've always loved Christmas.  It's the time of year when twinkly lights decorate the dark nighttime sky.  And, it's the time of year that I'm reminded to hope because of God's great love for us.

Nowadays, Chuck and I love looking at the miniature Christmas village on display at our local craft store.  We always walk around oohing and ahhing over the little houses, ferris wheel, and tiny dog playing in snow.  It's magical.

So that's why I made us our own miniature Christmas village out of materials that we had lying around our apartment.

Let's Make a DIY Mini Christmas Village!


DIY Mini Plaster of Paris Christmas Village
This post contains affiliate links.  Thank you for your support!

(Psst- Click here to see see how I made the pipe cleaner and cardboard trees.)


Thursday, November 21, 2013

DIY Crapted Wrapping paper (Plastic Bag Printing and Cat Stencils) and DIY Washi Tape

Alright, this post's title is rather crazy.  In my defense, I just put everything up there because I couldn't figure out a better way to incorporate all the ideas into one slick title.

Hrmm... let's take a step back and start again.

*Breathes*

My sister's birthday is coming up next week.  I already bought her a gift and thought it would be nice to crapt the wrapping paper.  So, I cut up a paper bag (the kind that you get from a store when you buy stuff) and made these two crapty wrapping paper patterns:

The design on the left was made using this Plastic Bag printing method.  It was inspired by my sister's love of turtles.  (That's what the green blobs are.)

The design on the right is made using cereal box stencils.  It's a bit more modern.  (Psst- Can you tell that it's a bunch of golden cat faces?)

Would you like to see how I printed the patterns?  If so, read on!  If not, you can always eat some ice-cream. Yum.

How to make cat stenciled wrapping paper:
Materials:
  • Cereal box
  • Pen
  • Pencil
  • Exacto Knife
  • Scissors
  • Cutting mat
  • Paint
  • Sponge brush
  • Paper towel

Directions:

1.  Doodle your cat face on a piece of cereal box.  Cut the face out.

2.  To keep your design even, first use a pencil to lightly mark where you want your cat faces.  (I used my stencil as a guide.)  Then, stencil your design over your pencil marks.  When you're stenciling, don't load too much paint onto your sponge brush and keep your hand steady as you hold down the stencil so you don't smudge your design.  If you're worried, you can always do a couple of trial runs on a piece of scrap paper first.

3.  Let your design dry and you're done!  Meow!


How to make a plastic bag printed wrapping paper design:
Materials:
  • Sandwich bag
  • Paint
  • Paint brush
  • Q-tip
  • Paper Towel

Directions:

1.  "Ink" your plastic bag by painting over a portion of it.  (If you're a clutz like me, only paint in the middle of your bag.  This way your hands won't smear the paint when you flip the bag over.)
2.  Use a Q-tip (or the back of your paint brush) to remove bits of paint and create a design.
3.  Flip your bag around and press the painted side on top of your wrapping paper.  Rub your hand over the design to make sure it transfered.
4. Repeat this step to add other blocks of colors or designs.  (I used the same bag throughout and simply wiped off excess paint with a paper towel.)

You can also paint little shapes onto your bag and then use those to make prints too.


As you can see, I added some turtles and yellow flowers to complete the print.

And since I was already making the wrapping paper, I figured I might as well make fake washi tape out of masking tape.  I simply took pieces of masking tape, stuck them to parchment paper, and then doodled on them with Sharpie markers.  The ends of the tape don't completely adhere to the parchment paper, but that's ok because I used the tape up right away.


Did you make it this far?  Phew.  *High five.*  This was a long post.  Here's a photo of the final product.  (I chose the cat design because it looked cooler.  Plus, my sister really loves her cat.)


Here's a photo of the back.  Yurp.  I went crazy with my fake washi tape because the patterns were just too cute.

Happy Thursday!

Thursday, October 24, 2013

DIY Sugar Skull (Day of the Dead) Milk Jug Luminaries


Currently my college friend Kim is visiting us for the week.  It's been really nice having someone else here while hubby is away.  Time just passes by much quicker when you're having fun with a friend.

And just how have we been having fun?  Well, we've been playing with Chuck... and eating... and watching tv... and crafting... a lot... a whole lot...  Halloween and Dia De Los Muertos are right around the corner, so all of our crafts have been centered around those two holidays. 

I'm currently on a sugar skull kick.  I just love the way they look.  So when I was staring at an old milk jug the other day, an idea dawned on me.  Ding!  Why not use them to make some sugar skull luminaries?  So tada, here's what I came up with:


I'd seen tons of posts for ghost milk jug luminaries for awhile, so I figured this was a nice twist on that craft.  It uses skulls and colorful lights instead of ghost faces and white lights.   I just love how this little guy turned out.  He's so cute and smiley... and gosh darn it, I've just got a big ol' soft soft for any craft that involves twinkly, colorful lights.


Friday, September 20, 2013

Cardboard Spaceship Climbing Toy

Currently Chuck and I have been reading books about the moon and space travel.  He loves the Berenstein Bears "On the Moon" book and Eric Carle's "Papa, please get the moon for me." 

So with that in mind, I made him a little cardboard spaceship climbing toy.  I found some lovely examples online and one of the mommies in our toddler group made a very simple version out of paper.  So, I based my design off of these.        


To operate the toy, you simply attach the moon to the wall or a doorknob.  Then, you pull the two brown tabs apart and your spaceship shoots straight to the moon.


Materials:
  • Cardboard box
  • Scissors
  • String
  • Paint and paint brushes
  • Mod Podge and brush (to protect your paint job)
  • Packing tape
  • Straw 


Directions:
This was a really quick and simple toy to make.
1.  Cut out your spaceship, moon, and two small rectangular stopper pieces out of cardboard.
2.  Paint your spaceship and moon.
3.  Once the paint dries, protect your paint job with Mod Podge.
4.  Cut your straw in half.  Tape it to the back of your spaceship.
5.  Fold your long piece of string in half.  Tape the middle of the string to the back of your moon.  Then, string your two strands through the two straws.  Tape the ends of  string to your cardboard rectangles so that the spaceship doesn't fall off.

Here's a shot of the mechanics: 

And that's it.  Simple to make, and simple to use.  You don't even have to make a spaceship and a rocket.  What about an alien spaceship and earth?  Or a basketball player and a basket?  The possibilities are endless.

We went this route, and Chuck got a kick out of sending his cardboard rocket to the moon.


Cardboard Rocket Ship sent to the moon from Pink Stripey Socks on Vimeo.


And then, since I was working with cardboard already.... I figured I'd make Chuck some cardboard food as well.  All that flying sure gives an astronaut a hearty appetite. 


Have a wonderful weekend!  See you back on Monday.


Psst-  If you've got a ton of cardboard lying around... check out these fun kids' crafts that use cardboard:

Saturday, August 31, 2013

Cereal Box Party Hats


Hi everyone! 

I don't normally post on weekends, but I just had to make this exception.  Guess what?  Guess what?

I'll give you a moment.

Ok, time's up.   I'm going to be a craft contributor at Handmade Charlotte

*Insert girly-high-pitched squeal here.*

Handmade Charlotte is a lovely DIY, craft, and design blog.  I'm so thankful for this opportunity to try something new.  Here's my first contribution:  A Cereal Box Party Hat.

DIY Recycle Cereal Box Party Hat

Cereal boxes and packing tape make up the backbone of this cute bear visor. If you'd like to make yourself one, click here for the instructions and template.

Have a great weekend!

Tuesday, August 20, 2013

Make Party Blowers

When we go out to eat, one of Chuck's favorite things to get is bubble tea. 

It's so cute watching him order.  Too short to reach the counter, Hubby has to lift Chuck up so that he's eye level with the cashier. 

Of course, it's the same lady behind the counter every week.  Even though she already knows what he's going to say, she always asks Chuck what he wants.  And without fail, he gives the same response:  bubble tea with a blue straw.  (Blue is his favorite color.)

The lady then giggles when she hears his little voice.  When she's done, she hands over the drink and a couple extra straws.  (He loves straws.)  Typically, Chuck just blows and chews on the extras... but this time he generously gave them to me so that I could craft with them.  

I saw how much he loved blowing on party blowers at another child's birthday party.  So, of course I had to try making them for him at home.  


 Materials:
  • Magazine paper (Cut into 5x9" rectangles)
  • Bubble tea straws cut in half
  • Scissors
  • Tape


Directions:
1.  Fold your paper in thirds lengthwise.   Tape your paper where the two sides meet. 

2.  Fold over one end of the paper and tape that down too.  (Make sure your tape all the openings closed.  You want your party blower to be air tight.) 

3.  Starting from the sealed end, tightly wrap your magazine paper around a pen.   (Do this a couple of times with the pen and then without the pen to make sure that the curl stays.  I've also seen some other bloggers, like Design Mom, wrap their rolls with rubber bands to help the curl to stay better.)


4.  Now stick your straw in the open end of the paper.  Fold your paper over the straw and tape it down.  (Again, make sure that everything is air tight.) 

And that's it!  Hand your party blowers over to your kid and watch them have fun!


We just used magazine paper, so our blowers only lasted for about a couple of minutes before they stopped recoiling or ripped.  But not to worry!  I washed, dried, and cut up the straws to make some "beads."  Chuck then enjoyed stringing them onto some pipe cleaners. 

Happy crafting!

Sunday, July 28, 2013

Voting for Earth911's "Stash your cash" Design Challenge

Let's imagine that you're traveling somewhere and you wanted a sneaky and DIY way to hide your cash from would-be robbers.  What would you make?  How would you make it? 

Go on, take a moment to think about it.  I'll just twiddle my thumbs and wait.  *Twiddle, twiddle* 

Why do I ask?  Well, about a month ago, I was posed this exact question by the staff of Earth911, a neat website providing people with information and ideas for reducing everyday waste. (Can you tell?  These are definitely my kind of people.)

They invited a couple of bloggers to participate in their "Stash your cash" design challenge.  Each blogger had to think up one sneaky way to hide money.  We were allowed to make whatever we wanted, but our solution had to incorporate upcycled and recycled materials.  

Here's my entry:  The Chocolate Bar wallet.
Very crapty... and pretty sneaky.   All the materials were destined for the garbage and now they get a second James Bond-esque life hiding some cash.

If you have a free moment, I'd love for you to vote for your favorite entry here.  The other challengers came up with pretty great ideas, so they're definitely worth checking out.

Hope you have a great start of the week.  We're still battling illness here, but things seem to *hopefully* be on the mend.

Monday, July 22, 2013

Tin can stilts

What do you do if you're stuck at home all weekend?

That's the question we were faced with this weekend since we were all under the weather.  Blech.


With a couple of empty cans, duct tape, scissors, and string, we made ourselves some tin can stilts.  (I removed the labels and then washed and dried the empty cans.  Then, hubby drilled two holes on each side of the can to fit the string through.  I covered the bottoms and the holes with duct tape just to make sure that Chuck's fingers wouldn't get hurt on any scratchy edges.  Then, we poked the strings through and tied them tight.)


The tiny tuna fish cans were for Chuck to try out.  He still doesn't quite have the coordination to actually move the stilts by himself, but he seemed to enjoy trying and copying mama.

Tin can stilts one day.... real stilts the next?  Maybe Chuck will be a circus performer when he grows up.....


Happy crapting!


Tuesday, July 16, 2013

Make a Cardboard Taxi Bank

The last time we visited New York, Chuck got the chance to ride around Manhattan in a taxi.

He absolutely loved it.  Not only did he not have to sit in a baby seat, but he got to ride alongside mom and dad.  Whoa!  Too much coolness.

Now whenever we see a taxi (or really, any yellow car), he calls out, "Taxi! Taxi"

His love for those yellow vehicles and the ever growing pile of cardboard diaper boxes in our apartment prompted me to make him a small taxi bank.

Beep Beep! 
It was a pretty simple craft to make.  Older kids can help with making or assembling the pieces and younger kids can help paint the car once it's built.

Materials:
- Cardboard <-- crap!
- Scissors
- Exacto knife
- Masking Tape
- Packing Tape
- Paint
- Paint brushes
- Mod Podge
- Foam Brush
- Black Sharpie Marker

Directions:
1.  Cut out two identical car pieces and two long rectangular strips out of cardboard.  The strips should be identical widths.  Cut out a small slit in one cardboard rectangle for a place to insert your moola.

3.  Slowly bend and tape the rectangular strips to the edge of one of your car pieces.  Use packing tape to tape the cardboard together.  When you reach the point to where you want the trunk to be, cut out a small opening (for coins to escape.)  (Note:  I kept the non-printed brown side on the outside of the car because I thought it would be easier to paint later.)


4. Now you'll have to be dextrous and tape the other cardboard car piece on top of your structure.  (I used packing tape and tried to tape everything on the inside.)  Then, use masking tape to cover your edges.  (The masking tape gives the piece a less crapty, cleaner look.  Plus, it helped to keep everything attached together.)

5.  Paint your car white.  (This will make sure your colors pop.)  Then, paint your taxi.  You can also use a Sharpie marker to outline shapes or write out the license plate numbers. 

6.  Cover your car with Mod Podge to protect your lovely paint job.  Voila!  Now you're done.

Hmm.... looking back I probably would not have made cardboard wheels.  Instead, I would have made them out of milk caps so that they could really turn.

I added a small rectangular piece to the trunk to give Chuck something to grip.  Eh... he ended up ripping it right off.. so I'm not sure if that was too important to do....

Taxi, taxi!  (Don't worry.  Chuck's leg isn't hurt, he's just likes wearing hubby's leg band.)


Right now Chuck has about five cents in the bank.  Hey, you gotta start somewhere, right?  We're hoping that by the end of the year, he'll have enough to buy something from the 99cent store.  :)

Happy crafting!

Tuesday, June 25, 2013

Make Colorful Coffee Filter Pinata-inspired Letters

I don't know about you, but I've been feeling so inspired by all the warm weather lately.  It seems like everything around us is bursting with life, light, and color.  To bring some of that happy, airy, summer feeling inside, I made these fun pinata-inspired letters to decorate our bedroom wall.


Materials:
- coffee filters
- markers
- spray bottle
- shallow pan
- cardboard box
- tape
- double sided tape
- pencil
- exacto knife
- scissors
- white paint
- paint brush
- plastic bags

Directions:
1.  Cut out your letters from cardboard.  (I found that using an exacto knife was much easier than using scissors.)  Paint the letters white to help your colors stand out.

2.  Use markers to doodle on your coffee filters.  (Have fun with it!  It really doesn't matter what you doodle.  All your designs are going to be washed away anyway.)

3.  Spray your coffee filters to make the colors run.  Then, let the coffee filters dry.  (I placed ours on some plastic bags and waited overnight.)

Here's what the coffee filters looked like after they dried:

4.  Cut out strips from your coffee filters and tape them onto the horizontal sides of the letters to cover them.  (This way you won't see the raw cardboard edges.  The vertical edges are going to be covered by fringe.)
Oops.  I missed one edge on the "L."

5.  Cut out similar sized strips from your coffee filters and turn them into pinata fringe.  Use your double sided tape and normal tape to stick them onto the cardboard letters.  Be sure to work from the bottom upwards.  Also, wrap the strips around the letters to cover the exposed cardboard sides.


Here's what a finished letter looks like:


And here's what the fringe looks like up close:
And that's it.  Now we have a lovely set of pinata-inspired letters.  I placed them right above our bed.  I think they look nice there, don't you?


Thanks for reading!
(Psst-  If you liked this pinata-inspired craft, you can check out my number pinata or snack bag pinata.)

Tuesday, June 18, 2013

Make "quill pens" out of straws (and dye paper with coffee and tea)

When we visited Williamsburg a couple of weeks ago (click here or here to see photos), hubby and I purchased a quill pen to try out.  After writing with it for a bit, we were inspired to make our own crapty "quills pens" out of straws and use food coloring as ink.


To make our straw "quill" pens, we sampled several different types of straws:  a bubble tea straw, a normal straw, and a stirrer.  We cut the tips at an angle to mimic the quill pen.


I also used coffee and tea to age some watercolor paper.  To do this, I let the paper sit in cooled black tea (or coffee) for a couple of minutes.


Then, we set the paper out to dry on some pieces of paper towel.


Here are the results of our paper dying.  Left- Original paper,  Middle- Tea dyed,   Right- Coffee dyed
As you can see, coffee made our paper quite brown.


And how did our  homemade "quills" work out?  Check them out below.  I first used all four writing instruments to write in print and then to write in cursive.

Top line- Written with a real quill
Second line- Written with bubble tea straw
Third line- Written with normal straw
Fourth line- Written with a stirrer  (Eek!  Please excuse my scary monster handwriting.  It was really hard to get the ink to flow out.)


 Happy crapting!