Showing posts with label toddler. Show all posts

Wednesday, December 4, 2013

Homemade gift: DIY Felt Board

Do you remember playing with felt boards as a kid?  (Is that too old school?  Maybe kids nowadays play with fancy touch screens instead ... hrmm....)  Anyway, I remember using a felt board in school and LOVING it.   So I thought I'd try making a homemade felt board for Chuck. After consulting a couple of tutorials online, here's what I came up with:

Let's make a DIY Felt Board

how to make a DIY Felt Board


(This post contains affiliate links.  Thank you for your support!)

Now, in full disclosure, I wish I could say that Chuck loved it and played hours and hours with it while I took a nap on the couch.  Errrm.....  It didn't quite turn out that way.  He played with the car parts for a bit, but then seemed much more interested in rolling around real cars.

But I won't call this a craft fail just yet.  I'm hoping (cross your fingers!) that he'll grow to love the felt board as much as I did.  But if not, no big deal.  The entire thing only cost about 4 dollars to make because I already had most of the materials lying around the apartment.  Score!

Now if you have a felt-loving child in your life, you can try making your own felt board too!  (I bet it would make a great Christmas gift.)  Here's how I made mine:

Materials to make a DIY Felt Board:


Directions to make a DIY Felt Board:

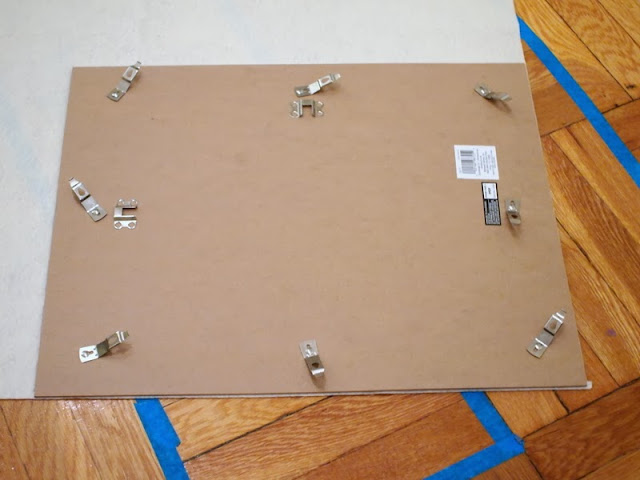
1.  Clean your work area.  Felt attracts stuff.  (I worked on the floor, so I swept it first.)

how to make a DIY Felt Board
2.  Take out the back of your photo frame.  Discard the glass.  Place the back on your piece of felt and trace it.  Cut the rectangle out.

3.  Optional:  If your felt is a bit wrinkly, carefully iron it.  (I turned my iron to a lower setting and placed one of those protective ironing pressing pads over my felt before ironing it so I wouldn't melt or burn the felt.)

Glue on your felt
4.  Place your piece of felt directly over the photo frame back.  Make sure the sides all line up.  To help with the gluing, fold one side of the felt over the other.  Then, use your sponge brush and brush a bit of Mod Podge right next to the fold.   Press the fabric down over the glue.  Then, spread a little more Mod Podge next to your new fold and press the felt down again.  Keep repeating this procedure until one side is fully glued down.  Then, repeat the procedure with the other side.  

5.  Once the Mod Podge dries, put your board back into the frame.  That's it!

Now comes the fun part- making your felt pieces.  Doodle your designs onto paper.  Then, trace them onto felt and cut them out.  I chose to make a set of Christmas tree felt pieces and a set of car part pieces.
Homemade Felt Board Tutorial
Happy crafting!

DIY Felt Board Tutorial

Wednesday, November 27, 2013

Happy Thanksgiving!

Hi everyone! I'm so sorry that posting has been a bit sporadic this week.  I've been feeling a bit down, so I just haven't had the heart to make cute stuff.  But not to worry though!  We're going to hang out with family this week, so hopefully things will perk up.

In the meantime, happy thanksgiving!  I know that I have a lot to be thankful for.... and one of those things is definitely you.  If you're reading this post right now, thank you.  Thank you for visiting and supporting this little corner of the internet.  You make blogging even more fun. :)   

On a side note, my friend Lisa from About Proximity posted some cute photos of kids showing things that they were thankful for.  (You can see her posts here and here.)  I asked Chuck to draw something that he was thankful for, and he drew this photo:


I then asked him what he drew and was surprised by his answer.  Instead of saying "Cars," or "Lightening McQueen" (which are the topics of most of our conversations nowadays), he said, "Mommy, me, daddy."  What?  Our kid was thankful for us?  That really warmed my heart.

And lastly, here's a short poem that I wrote last year.  Rereading it now, the same sentiments apply.

Happy Thanksgiving!  I'll see you on Monday (hopefully a couple of pounds heavier, yum!)

Monday, November 25, 2013

DIY Double-sided Popsicle Stick Puzzles

I'm not sure when it happened... but Chuck went from being a "sparkly-pink-bracelet" wearing boy to being a "rough-and-tumble-loves-cars-and-trucks" kind of boy.

It happened so suddenly.  *Sigh*   (Strange, I'm humming "Sunrise, Sunset" right now...)

Anyway, with Chuck's new love for cars with eyes and Bob the Builder, I made him this set of popsicle stick puzzles. There are tons of tutorials out there for these things, but I used the one from Repeat Crafter Me because she made double-sided puzzles.  (Two puzzles for the price of one?  Love it!)

Here's a photo of one puzzle set.  It's got Bob the Builder on one side and Scoop on the other.  (Yup, I know the names of the machines.  I can't remember what day it is sometimes, but I can name most of the characters on that show by heart....weird.)

Let's get crafting!  Can we build it?  Yes, we can!  (Tee hee, I couldn't help it.)

Materials:
  • Popsicle sticks
  • Images (two of each)
  • Sandwich bags
  • Packing tape
  • Clear tape or masking tape 
  • Mod Podge*
  • Sponge brush
  • Cutting Mat
  • Exacto knife
  • Scissors
  • Optional:  Markers / Crayons
 *Note:  Some people just use Elmers glue.  I had a ton of Sparkle Mod Podge, so I just used that.  That's why they came out rather.... sparkly.... Next time I'll just use normal Mod Podge.

Directions:

1.  Print and cut out two of each image.  One copy will go on your puzzle and another will go on your sandwich bag. (I don't own a colored printer, so I had to color my images in by hand.  I don't really recommend that because it was pretty time intensive...)

2.  Figure out how many Popsicle sticks your image will need.  Then, line up your sticks against something straight.  Tape the sticks together so that they'll stay together for step 3.


3.  Turn your sticks over so that the taped side is on the bottom.  If you'd like, label the sticks with numbers.  Use Mod Podge to glue your images onto the non-taped side of your Popsicle sticks.

4.  Let your images dry.  (I moved mine to parchment paper so that the Mod Podge wouldn't stick to my work area.)

5.  Once your Mod Podge dries, turn your puzzle over so the taped side is facing up.  Take off the tape and use an exacto knife to cut the sticks apart.  (Make sure to work on a cutting mat and cut from the back/ non-image side.)

6.  Optional:  To make a double-sided puzzle, tape the sticks together again, Mod Podge another image on the backs of your puzzle, and then cut the sticks apart again.


7.   Use packing tape to label sandwich bags with the images.  This will make clean-up easier and help the user to put together the puzzle.

Happy crafting!

Friday, November 22, 2013

Super easy DIY Toddler Dominos

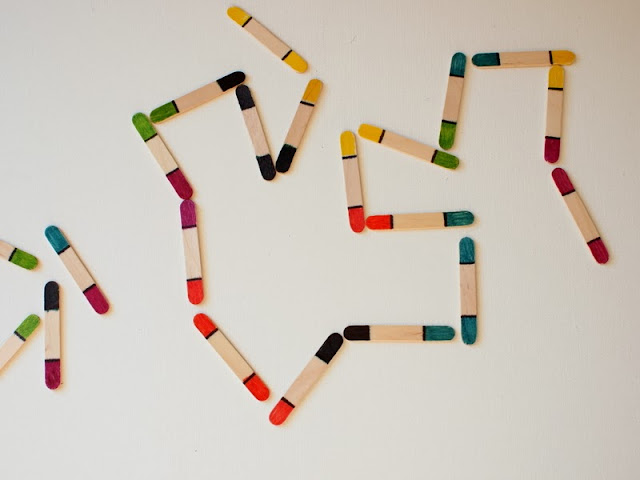
Do you love dominos?  With the daylight hours getting shorter, sometimes Chuck and I find ourselves twiddling our thumbs, wondering what to do to pass the time.  Lately I've been making him new playthings out of random stuff that's lying around the apartment.  Here's one super easy toy that was made using mini craft sticks and Sharpie markers.  

Super Easy DIY Toddler Dominos


super easy popsicle stick toddler dominos


Materials Needed to make DIY Dominos Game:

  • Mini Craft Sticks (I used 21)
  • Distinctly Different Colored Sharpie Markers (I used 6 colors)
  • Plastic Sandwich bag
  • Scrap paper

Directions to Make DIY Dominos Game


DIY Sharpie and Popsicle Stick Dominos
1.  Cover your work area with a piece of scrap paper so the Sharpie markers won't stain it.

2.  Color the ends of your craft sticks different colors.  (I used 6 different markers to color 21 craft sticks.  I tried to make sure that each color was used the same number of times.  So, each marker colored one end of 5 mini craft sticks and both ends of 1 craft stick.  Does that make sense?  Erm... there must be a mathematical equation to explain that....)

3.  Place your sticks in a plastic bag until you're ready to play!

Yurp.  Suuuuuper easie peasie.

Make your own set of popsicle stick dominos

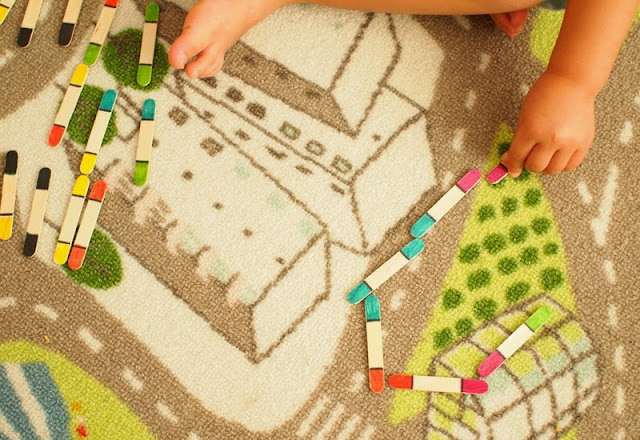
To make it easier for my 2 year old, I first placed the sticks in rows, colored sides up.  I wanted him to be able to see all of his choices as we played.  Once I explained the game, I had to do quite a bit of prompting to get him to find matching colors.

At first he didn't seem to understand that we had to place our sticks a certain way.  But once I told him that the two matching colors had to "kiss" each other, he got it.  (Not sure why, but he got a big kick out of making his two sticks "kiss.")

Overall, our game lasted a couple of minutes... and then he ended up using the sticks to make a house for... you guessed it, one of his beloved cars.     

Happy toddler toy crafting!
how to play with DIY toddler popsicle stick dominos kids craft


Thursday, November 7, 2013

DIY Kids' Portable Stove top

Sometimes when I'm cooking in the kitchen, Chuck pretends to cook alongside me.  It's pretty cute.  I'll give him one of my unused pots and a large plastic spoon, and he'll whip up something for me to try.

Lately he's been cooking for his toy cars.  With this new interest in entertaining, I thought it was high time he got his own stove.  Taking inspiration from this Pack-n-Go Kids Play Stove, I made him a mini portable stove top.

DIY Portable Kids Stove Top Toy


DIY Kids' Portable Stove Top

Since we live in a small apartment, I'm always hesitant to purchase large toys for Chuck.   I loved this simple DIY toy because it supports his imaginative play and doesn't take up too much space!  The storage container's lid becomes the "stove top" and all his cooking toys are stored inside.


Materials:
  • Plastic storage container
  • Sharpie Marker
  • Scissors
  • Contact Paper

Directions:
1.  Doodle some burners and knobs onto your contact paper using your Sharpie marker.
2.  Cut out your doodles.
3.  Stick them onto your plastic storage container.

That's it!  Now you've got an easy-peasie DIY stove for cooking.  Pretty awesome!

How to make a toy stove top for kids


Happy crafting!

Thursday, October 31, 2013

Happy Halloween from a little Lightening McQueen

Happy Halloween everybody!  

Hope you have a wonderful and magical day!  
As promised, here are some photos of Chuck in his Lightening McQueen costume at a church party.
(And if you want to see my matching Mack costume, click here.)


(Did you see shoes?  Click here to see how I painted his Lightening McQueen Shoes.)

And here are a couple of photos showing how I made it. 

Wednesday, October 30, 2013

Painting Lightening McQueen Shoes


Here's a fun fact- In the past couple of months, I've watched the movie Cars probably twenty or so times.  By now, I know all the characters' names and I could probably recite 50 to 75 % of the movies' lines from memory.

Why this sudden and intense interest in cartoon vehicles?  Well, it's Chuck.  We're a Cars household because he just loves the movie.  If you ever visit our home, you'll probably find him either (1) racing around on his bike, pretending to be Lightening McQueen, or (2) playing with his toy cars.

This Halloween, Chuck's going to dress up as Lightening McQueen.  I thought it would be fun to try painting him some shoes to go along with his costume.  It was my first time painting shoes. Here's how they came out: 


At first I wanted to get white or red canvas shoes, but they only had black ones at Walmart. Overall I'm pretty pleased with how they turned out.  They're super cute.  But, I'm not sure how long (or how well) the paint will last.... so the jury's still up about that.   I'll probably update this post in a couple of weeks to include some notes about wear and tear.... but for now here are some photos of my process in case you wanted to see what I did.

Materials:
  • Canvas shoes
  • Chalk
  • Acrylic paint
  • Thin paint brushes
  • Pencils
  • Paper
  • Q-tip
  • Paper towels
  • Jar with water
  • Tray to hold paint


1.  First I placed a piece of paper on top of my shoe and traced the top of the shoe to see how big to draw my images.  Then, I drew and cut out my Lightening Mcqueen.

2.  I briefly lamented not having white canvas shoes because I wasn't sure how to transfer my image to the shoes. (Seasoned crafters out there- do you know of a good way to do this?)  I ended up just tracing my image onto my shoe with sidewalk chalk (way too big, I know... but this was the smallest chalk I had) and sketching out the details.  (There's gotta be a better way, right?)


3.  I pulled out my paint and started painting my images.  After I filled in all the colors (see right shoe), I outlined my images using a pencil dipped into my black paint.  The black outline made my images much sharper and nicer to look at (see left shoe.)  Then, I just cleaned off my chalk marks with a wet q-tip.

And that's all!  Ka-chow!


Chuck's really enjoyed wearing these bad boys around town and I'm just glad that I got to craft something useful and cute.   

How are you getting ready for Halloween?  Happy crafting! 

Sunday, October 27, 2013

Make Sugar Skull Sun Catchers and Crystallized Sugar Skull Ornaments

Alright everyone... the countdown is on.  It's just a couple of days till Halloween.  Are you excited?  Or, are you over all the orange and black?

I'm in the first group and still SUPER excited for Halloween.  I just finished Chuck's costume this past weekend, so he's ready to go.  I'm not sure if he'll appreciate the idea of trick-or-treating (plus his allergies prevent him from eating a lot of the candy out there), but I think he'll enjoy seeing other kids in costumes and all the spooky decorations.

I'll upload some photos of his costume later on this week... but today I just wanted to share the last of my sugar skull crafts.

So, we already made DIY sugar skull candle holders and DIY sugar skull luminaries and Allison shared her lovely tutorial for DIY sugar skull shoes.  Today's sugar skull crafts were designed with kids in mind.  They're easy to make and the resulting products look great.

1.  Sugar Skull Window Clings

Colorful and fun, these two skulls will float happily on your window.


Materials:
  • Contact Paper (Buy the cheap stuff from the Dollar Store)
  • Black paint pen (You could also use a Sharpie marker, but the lines won't be as dark.)
  • Scissors
  • Cellophane 
  • Tape

Thursday, October 10, 2013

Two Toddler approved Fall Crafts

Even though I really enjoy crafting, sometimes it takes a bit of persuasion to get Chuck to join in.  Currently he's much more into playing with toy cars than crafting with mom.  Go figure! :)  But I'm a persistent bugger, so I keep encouraging him to make stuff with me.

So far several of my craft plans flopped, but here are two crafts that Chuck actually participated in. (Hooray!) 

1.  Paper Bag Pumpkins:


Materials:
  • Lunch bags
  • Tissue paper squares
  • Glue stick
  • Marker 
  • Googly eyes (optional)
  • Pipe Cleaner
  • Newspaper

Directions:
  1. Glue your tissue paper squares onto your lunch bag.
  2. Add a face
  3. Crumple up newspapers and stick them into your bag.
  4. Use a pipe cleaner to seal up the bag.

And here are some pumpkins made during our toddler craft time:


2.  Contact Paper Leaves
 
Materials:
  •  Leaves
  • Contact paper
  • Scissors
  • Tape
  • Tissue paper (optional)

Directions:

  1. Place leaves in a heavy book to flatten them.
  2. Tape down contact paper, sticky side up.
  3. Stick leaves and tissue paper squares onto your contact paper.
  4. Place a piece of contact paper(sticky side down) on top of your first piece of contact paper.
  5. Trim the edges and tape your leaves onto a window.


Have a great weekend!

Tuesday, September 3, 2013

What's up Chuck?

Hi everyone! How was your week?  Did you have a good Labor Day?

Before you read on, I gotta warn you. This post is FULL of photos because last week was chock full of activities. 

Early in the week, Hubby had to go out of town for a couple of days.  We missed him a lot.  It was tough holding down the fort without him around.  Fortunately, my sister came to visit one day.  Having her around sure helped me out. 


Then hubby came back and we visited a bike show in Brooklyn.  (It was a pretty easy going night, so I took a lot of photos.)


Beautiful custom bikes at the show

I've never seen such a tall bike before!

Delicious Mexican food

Whoever lives in this apartment has such a quirky sense of style.  Love the birds!


I can't take credit for this outfit.  Chuck is now picking out his own clothes.

Then, hubby and I celebrated our anniversary with a trip into Manhattan to see Pippin and eat Korean food.  Yurmmy.  (Thanks Tita Tina and Tito Ric for babysitting!)


And then we celebrated Chuck's 2nd birthday with a trip to the zoo.  (Wow.  I can't believe that two years passed by so quickly.  He's no longer a baby anymore!)

Chuck really enjoyed seeing the animals, especially the sea lion.  He and his cousins had fun trying to talk to them through the glass wall.

Phew.   And that's what happened last week.  Time to take a nap. 

Thursday, August 22, 2013

Fancy shmancy massage

For all those hard-working, long suffering, bone weary people out there.... I recognize you... and I salute you.  You are doing a wonderful job.   

And with this week's epic potty training battle, I join you.

To celebrate the end of the hard week, I decided to treat myself to a massage.  What fancy spa did I go to?  What masseuse did I hire?  Ehhh... well... see for yourself.

"Just relax mom.  I'm working out a knot right here."

"Ok lady, time's up.  Now you massage me."

Hope you have a great weekend!  I'll see you next week.

Tuesday, August 20, 2013

Make Party Blowers

When we go out to eat, one of Chuck's favorite things to get is bubble tea. 

It's so cute watching him order.  Too short to reach the counter, Hubby has to lift Chuck up so that he's eye level with the cashier. 

Of course, it's the same lady behind the counter every week.  Even though she already knows what he's going to say, she always asks Chuck what he wants.  And without fail, he gives the same response:  bubble tea with a blue straw.  (Blue is his favorite color.)

The lady then giggles when she hears his little voice.  When she's done, she hands over the drink and a couple extra straws.  (He loves straws.)  Typically, Chuck just blows and chews on the extras... but this time he generously gave them to me so that I could craft with them.  

I saw how much he loved blowing on party blowers at another child's birthday party.  So, of course I had to try making them for him at home.  


 Materials:
  • Magazine paper (Cut into 5x9" rectangles)
  • Bubble tea straws cut in half
  • Scissors
  • Tape


Directions:
1.  Fold your paper in thirds lengthwise.   Tape your paper where the two sides meet. 

2.  Fold over one end of the paper and tape that down too.  (Make sure your tape all the openings closed.  You want your party blower to be air tight.) 

3.  Starting from the sealed end, tightly wrap your magazine paper around a pen.   (Do this a couple of times with the pen and then without the pen to make sure that the curl stays.  I've also seen some other bloggers, like Design Mom, wrap their rolls with rubber bands to help the curl to stay better.)


4.  Now stick your straw in the open end of the paper.  Fold your paper over the straw and tape it down.  (Again, make sure that everything is air tight.) 

And that's it!  Hand your party blowers over to your kid and watch them have fun!


We just used magazine paper, so our blowers only lasted for about a couple of minutes before they stopped recoiling or ripped.  But not to worry!  I washed, dried, and cut up the straws to make some "beads."  Chuck then enjoyed stringing them onto some pipe cleaners. 

Happy crafting!