Friday, April 5, 2013

Embroidery Thread Wrapped cable

Is it just me, or are the USB cables for Apple products kind of flimsy?  Within a couple months of use, our cord's outer plastic coating tore, exposing the wires inside.  Now, I'm not an electrical engineer or anything... but I figured that exposed wires weren't too safe.  After using electrical tape to fix the tear several times, our resulting cord looked less and less attractive.

So when I came across Brit + Co's tutorial to wrap cables in embroidery thread and Flax and Twine's   tutorial for embroidery thread wrapped earrings, I turned to embroidery thread as a stylish and fun way to solve my problem.
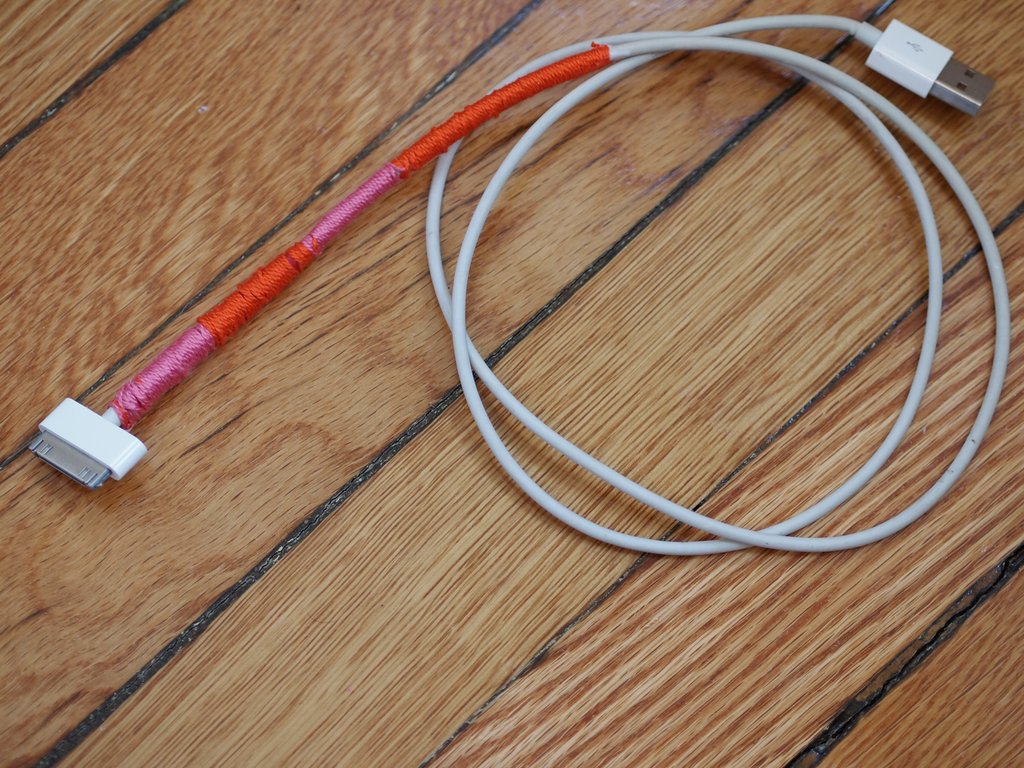
Geek chic?
Here are the materials that I used:
- Tacky glue
- Scissors
- Embroidery thread
- Broken Cable
Directions:
1.  Cut all of your embroidery threads five times the length you want wrapped.

2.  Tie a knot at the base of your cable.  This is where you will start wrapping.  Put a drop of glue to secure the knot in place.

3.  Begin your design by wrapping one thread around the other embroidery thread and cable.  (In this case, I started by wrapping my pink thread around my orange thread and cable.)  To switch colors, simply switch threads and continue wrapping.  At any point in time you'll have one thread being displayed while the other thread color is hidden.   (Note:  I found it helpful to use my foot to hold down the other end of the cable I wrapped. I would have taken a photo of this... but I figured you didn't want to see my large pale foot.)

4.  When you've wrapped as much cable as you wanted, tie a knot and snip off any excess thread.  Once again, add a drop of glue to secure that knot in place.  

Now we'll see if that tear appears again...muah ha ha ha ha ha.

Thursday, April 4, 2013

DIY Studded leather gloves

Guess what I made while Chuck took a nap yesterday?
A pair of studded black leather gloves for a tough chica friend


Although Spring is right at our doorstep, I had been meaning to make these leather gloves for quite awhile.  Last winter, one of my college friends came into town and we did a little window shopping.  She found a pair of black leather gloves at Urban Outfitters and debated whether or not to get them.  In the end, she left them behind.

I kept thinking about her studded gloves for the next couple of months.  When the weather got warmer, tons of stores had winter sales to clear out their merchandise.  Once I saw this pair of black leather gloves on sale, I snatched them right up.

Here are the materials that I used:  
- Black leather gloves
- Sharp pair of fabric scissors
- Chalk
- Golden cone spikes


The spikes contained two parts:  The sharp spiky cone and the screw 
Directions:
1.  Use chalk to mark where the spikes will go.

2.  Use the pointy part of your fabric scissors to pierce the top of your gloves.  (Make sure not to pierce through the bottom as well!)  Poke your screwback through the leather and screw the cone on.


 And that's basically all you need to do to make a pair of tough girl gloves.  The spikes are surprisingly easy to screw on and the screwbacks didn't bother my hand one bit.

What do you think?  Rock star fashion statement?  Or, tough chic weapon? 


Wednesday, April 3, 2013

Tattoo a banana

Got a banana?  Got a safety pin?  Great.  
Now you can tattoo a banana.

 Materials:
- banana
- safety pin
- pencil
- refrigerator

Directions: 
1.  Use a pencil to sketch a design on a banana.  (If you don't feel comfortable sketching straight on the banana, you can sketch your design on a piece of paper first.  Then, tape your design to the banana to guide your poking.)

2.  Use your safety pin to poke holes in the banana.  Watch your tiny dots turn black.

3.  Place the banana in the fridge for a couple of hours.  Pull it out to reveal a new tattooed banana.

4.  Place the banana in your kid's lunch box.... or sneak it back into the pile of bananas at the grocery store to surprise shoppers.

Happy tattooing!

(I first spotted this idea on the excellent How About Orange blog.)