Showing posts with label painting. Show all posts

Wednesday, May 8, 2013

Homemade watercolor paints

Yesterday it rained a whooole lot.

Luckily, my homemade watercolor paints finally set (after two days of waiting), so Chuck and I spent the morning painting.

Overall, the directions I used were pretty good, but I made two changes:
1.  I only used half of the materials recommended... and I still had plenty of water color paints.
2.  I added drops of food coloring to each of the ice cube trays.  (Looking back, maybe I should have compensated for the extra liquid by adding a bit more cornstarch to shorten my drying time.)


As you can see, Chuck enjoyed painting.  He also enjoyed repeatedly dipping the Q-tips into the water... and sneakily trying to drink the dirty water.  (Ick.)  I probably had more fun painting than he did because I was so delighted that the paints actually worked.

Here are our two joint paintings:

The paints weren't chalky when they dried.  We'll probably cut up the cards to make a birthday card for a niece.  Right now the leftover paints are sitting in the fridge.  We'll keep using them throughout the week because I'm curious how long they'll last.    

UPDATE:  5/24- I pulled the paints out of the fridge yesterday and they were rock hard.  I was worried, but after I didn't need to be.  After adding a couple drops of water into each well, they became paints again.  The colors didn't seem as vibrant as before, so Chuck and I ditched the q-tips and just used our fingers to paint. We got some lovely results.  Now they're back in the fridge again, and I'll pull them out in another couple of weeks to see if they last.

Have you ever tried to make homemade watercolors before?

Thursday, May 2, 2013

Freezer paper stenciled "dreaming of you" pillow cases


One of the cutest wedding gifts I got was a set of pillowcases from my friend Kim.  
(image from here)

I love how the two pillowcases go together.  So when I saw that Justine from Kerr-afty Creations designed her own set of pillowcases that went together, I had to copy the idea.  (Thanks Justine!)

The pillows are designed so that it looks like one person is dreaming of the other.  I thought the pillowcases would be a nice wedding gift to S and A.  I have pretty shaky hands, so instead of directly painting the images on I used the freezer paper stencil technique.  Here are some photos of my work:  


The end result was pretty cute.  But warning- If you try this design out, make sure that you carefully iron the cloud on.  I wasn't so careful and paint seeped through one of the edges.  Eek!

Tuesday, March 26, 2013

I heart peeps (freezer paper stencil)

Ok, ok, you got me.  I have a thing for freezer paper stenciling... but it's just so easy to make cute, customizable shirts for the holidays.

Take this "I heart peeps" shirt, for example:


I just used the same freezer paper technique that I used for St. Patrick's day and my "left" and "right" pants.  The results are always so clean and neat.  Here are some photos of the process:


Hooray! Now Chuck has something to wear for Easter.

Hrmm... and since we're talking about peeps, now I've got a hankering for a large pink rice krispy peep treat... yumm...


Thursday, March 14, 2013

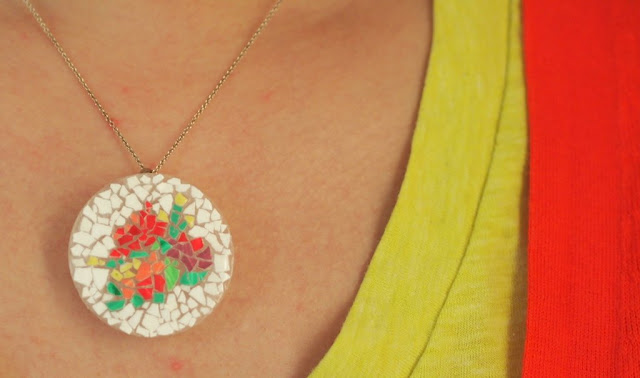
Make an eggshell mosaic pendant

Don't toss out your eggshells!  Today's craft shows a really unique way to turn them into beautiful pieces of art!

I love vintage micro mosaic jewelry, but being a huge cheap-o, I never allow myself to buy it.  So, yesterday, armed with a bunch of eggshells and milk jug caps (thanks Tita Tina for the stash!), I made my own version of micro mosaic jewelry.  Here are my two finished pendants:

Eggshell Mosaic Pendants


make yourself an eggshell mosaic pendant- great kids craft!
What a lovely piece of crapt


This post contains affiliate links. Thank you for your support! 

Wednesday, March 13, 2013

Freezer paper stencil "left" and "right" pants

Nowadays when things get stressful, I get a craftin'.  Last night I freezer paper stenciled a pair of Chuck's pants.

Who knew?  Apparently I have a thing for typography on clothes.

First I stamped "hello" on a pair of pants, then I stenciled a "lucky charm" shirt, and now... well... it just felt like a good time to make some "left" and "right" pants.

Hmm... whose left and whose right? . 

They were pretty easy to make because I used the same freezer paper stencil technique from before.  Here are some photos of the process:


Hrmm... what should I make next?

Sunday, February 17, 2013

Make glow in the dark paint (using glow sticks)

Have you ever had one of those "I wonder if..." moments?  A couple of nights ago hubby and I opened a canister of glow sticks to play around with them and take photos.

In the midst of playing, I found myself wondering if I could use their lovely glowing innards to make glow in the dark paint.  Now, the label on the glow stick canister clearly said that we shouldn't "puncture" the tubes... but it also said that the glow sticks were nontoxic.  So... I figured that as long as we didn't let the paint touch our skin, eyes, or clothes we should be ok.   Here's what my glow in the dark painting looked like:


Update 5/29/13-  Several concerned readers brought up valuable points regarding possibly dangerous chemicals and glass inside the tubes.  Be sure to read the comments below and think twice before attempting this activity...

Materials:
- Scissors
- Disposable container (to hold paint)
- Paint brush
- Paper towel
- Newspaper
- Gloves
- Corn starch

Directions:
1.  Cover your area with newspaper and wear gloves  (I didn't do this... but looking back I think it would be a good idea since you are working with chemicals.)

2.  Crack your glow stick so that the entire stick glows

3.  Open up your glow stick.  To do this, I held the glow stick vertically over my disposable container.  I cut the top bottom end of the glow stick.  The liquid inside didn't flow out very quickly.  So, I turned the glow stick upside down (so that the cut end was now on top and the uncut end was on the bottom).  Then, I cut the bottom uncut end.  (We cut it this way so that the tip wouldn't go flying in the air.  Plus, the liquid flowed much quicker if both ends were cut.)

3.  I added a bit of corn starch to the glowing liquid to thicken up the paint.

4. Use your paint to paint pieces of paper towel placed over newspapers.

Now, I'm sure you already could guess this... but sadly the images don't glow forever.  So enjoy their beauty while they last.


Oh yeah- here are some other photos of our glow stick play:


Wednesday, November 14, 2012

Turkey Paper plate hat

Turkey Paper Plate Hat

This Friday, Baby Chuck (wait, should I call him Toddler Chuck since he's now older than one? Hmm...)

Back to what I was saying... this Friday our local library is holding a special Thanksgiving party for the babies and toddlers.  Last month they put together such a nice Halloween party, so we're really looking forward to seeing what surprises are in store.

I wanted to help contribute to the festivities.  After finding this great paper plate hat tutorial from Alphamom, I made a whole flock of turkey paper plate hats for the kids.

turkey paper plate hat
Note:  This was like the only good photo that we got of Baby Chuck wearing the hat.  It's a miracle that he sat still and din't rip it off.


Friday, October 19, 2012

Crapty Fridays- Make a Halloween garland out of an egg carton

Before we talk about today's crapt, let me just begin with this short poem about crapting: 

Crap is destined for the garbage
and therefore it is free.
When I use crap to make my crafts,
a-crapting I will be.

Today's crapting project is a Halloween inspired one.  Our apartment desperately needs Halloween-y decorations.  (We currently only have a pair of Day of the Dead candle holders)  So, I whipped up a super easy Halloween garland out of an egg carton and string.      

Materials:
- egg carton
- string
- craft paint
- paint brushes
- craft knife
- scissors
- newspaper/scrap paper/paper bag
- Sharpie marker


Directions:
1. I cut out all the little egg holders in my egg carton.  (Is there a name for those things?)


2. I painted the little egg holders orange and green.  
This is probably as close as I'll ever get to growing pumpkins


3.   Once my paint dried, I drew faces on my tiny pumpkins.
Doesn't this look like a school photo?  Can you spot the naughty pumpkins in the back row?


4.  I cut two slits on the top of my pumpkins.  Then I strung my pumpkins together.


Right now they're just smiling and dangling away above our table. Seeing their cute faces when I eat cereal in the morning makes me happy.

Happy crapting!

Monday, October 15, 2012

DIY Faux Stained glass

I love stained glass. There's something so beautiful about seeing sunlight shine through all those brightly colored panels.  I think my dream house would have a room filled with tons and tons of stained glass windows. (A girl can dream, right?)  

Since we're still living in a small apartment, I'm putting my dreams for that stained glass room on hold.  But what can I say?  The heart wants what it wants.  So this gal is going to craft some stained glass while she waits. 

Armed with this awesome faux stained glass tutorial, I brought forth my inner glass artisan.

Materials:
- full bottle of glue
- clear glue
- pencil and paper
- Sharpie marker
- thin, blunt paintbrushes
- craft paint in various colors
- mini muffin tin/ mini cups (to hold paint)
- craft knife
- picture frame
- skewer

Steps:
Step 1:  I took the glass panel out of my picture frame and cleaned it. 


Step 2:  I pulled out the white sheet of paper inside of my frame and used that to draw my stained glass design on.  (If you're missing that sheet, you could also just tape several pieces of paper together and draw on those.)
I really wanted a groovy and tasty pattern.


Step 3:  I created the "lead."  To do this, I emptied out a bit of glue from my bottle.  Then, I added several drops of black craft paint into the bottle.  I used my skewer to stir the paint and glue together.  (Note:  It didn't take very much black paint to turn the glue black.  I tried not to put too much paint into the glue bottle because I didn't want my  "lead" to get very watery and not dry nicely.)


Step 4:  I put the lid back onto my glue bottle and did some practice strokes.  When I had a good feeling for how quickly the glue flowed, I started tracing my design onto the glass panel.  (Note:  I still had some problems with the glue spreading.  But I took care of that in step 5...)
See how the seeds on the left ended up black?  It's ok... I fixed that in step 5.


Step 5:  I let the "lead" dry overnight.  Then, I used my craft knife to carve and peel away any the messy bits.
See? The seeds are fixed!


Step 6:  I poured clear glue into my mini muffin tin container.  Then, I put drops of craft paint into each of my containers to create different colored "glass paint." (Again it didn't take very much paint to color my clear glue.)  I used this paint to paint my glass.  (Note:  Make sure your paint fills in every nook and cranny.  Otherwise you'll end up with clear glass bits.)

Step 7:  After my paint dried overnight, I noticed that I had painted over my "lead."  No worries, I used my trusty Sharpie marker to re-color my "lead."   Then, I placed my glass back into my frame.   Tada!


Happy crafting!

Friday, October 12, 2012

Crapty Fridays- Day of the Dead candle holders out of baby food jars

Last year hubby, Baby Chuck, and I went to our first Day of the Dead Celebration (click here to see photos).  Feeling inspired by the colors and festive atmosphere of the holiday, I made two skull candle holders out of saved baby food jars.