Thursday, April 11, 2013

Make pipe cleaner bubble wands and big bubbles

Currently Chuck only knows a couple of words.  One of them happens to be "bubbles."  This kid of ours really loves bubbles.  He'll point outside and say "bubbles."  He'll point to round objects and say "bubbles."  He'll point to the bathtub and say "bubbles."  He'll even point to birds and say, "bubbles."

Given his obsession with soapy spheres, I thought it would be fun to make our own bubble wands and bubble solution.  These pipe cleaner and straw wands make larger bubbles than the wands you typically buy in the stores.

To make the straw and string wand:  String together two straws with some yarn.  Slide the knot into one of the straws. If you have problems getting the string through the straws, try sucking it through.  You'll get a mouthful of string, but it works!
We dunked these wands in our homemade bubble solution and had some messy fun. At first it was difficult to make the larger bubbles, but I soon got the hang out of it and created some lovely large spheres.

(Psst- Here's the recipe for the bubble solution that we used.  I combined 5 C warm water, 1/2 C Dawn dish detergent, and 1/4 C glycerin.  I gently mixed the liquids together and made sure not to create suds.   Then, I let the solution sit overnight.   Even though this recipe made fairly large bubbles, I really didn't like the way the Dawn smelled.  Yuck.  Plus, Chuck tried to rub his face with soapy hands, so I worried that the soap stung his eyes.  Next time I'll find a recipe using baby shampoo.  This way the solution won't smell so detergent-y and Chuck's eyes won't sting.  )

Here are some photos from our first big bubble making adventure:


I found that the bubbles didn't pop as quickly if I made them by moving the wand through the air instead of blowing it.

Another bubble created by the wind.   


All in all, not a bad start.  We managed to make large bubbles, but they popped really easily.  Hrmm... Next time we'll try a different solution and we'll make one of those giant bubble blowing wands.  Oooh! I can't wait!

Wednesday, April 10, 2013

Decorate a "rain, rain, go away" umbrella with fabric paint

Let's Paint an Umbrella!


They say that April showers bring May flowers.  
So, I updated an old umbrella with some fabric paint.  
Now we'll look cute while staying dry.


(This post contains affiliate links.  Thank you for your support.)

Tuesday, April 9, 2013

Make two crapty kites: Newspaper Kite and Plastic Bag kite

With temperatures soaring higher and higher, I'm looking forward to spending more days outside with Chuck.  In anticipation of the nicer weather, we tried flying two homemade kites last weekend.  (I never actually flew a kite before, so I was way too extremely excited to try the activity out.)  To cover all my crapty bases, I crapted one kite out of newspaper and another kite out of a plastic bag.

Two notes before we start:
-  I'm not an expert in kites or kite flying.  But, I thought I'd post up our experiences in case someone out there wanted to try making kites with their kids.  Both were easy to make.  And guess what?  *Gasp*  Even though it wasn't very windy outside,  the newspaper kite actually flew!

- When flying these kites, be sure to bring out extra supplies like string, packing tape, scissors, plastic bag,  and newspaper.  We found that we had to do some quick taping and tweaking to fix broken skewers and lengthen tails.

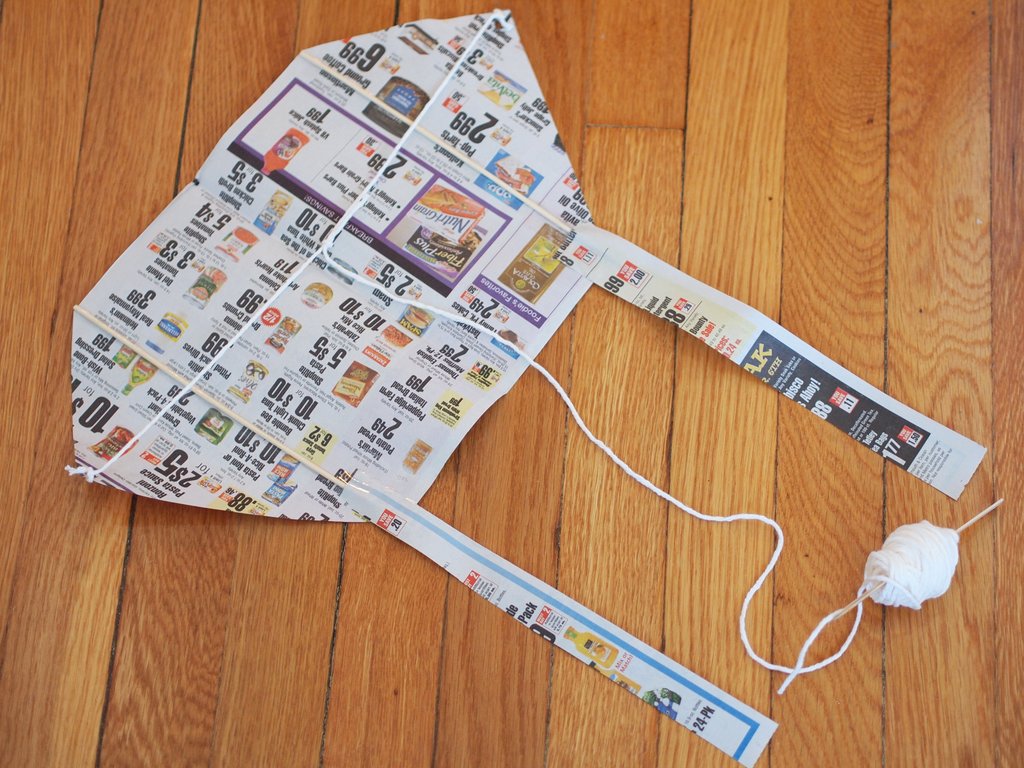
Kite 1:  Newspaper Kite
This kite was made out of a grocery store flyer, skewers, yarn, packing tape, and a Popsicle stick.  It's hexagon shaped and super light.  (I modeled my design after this newspaper kite found on Instructables.)


Materials:
- Newspaper flyer  (or wrapping paper)
- Yarn (about 25 feet)
- Popsicle stick (or piece of cardboard, or pencil, or random stick you find on the ground)
- 2 skewers
- Scissors
- Packing tape
- Hole Puncher
- Ruler

Directions:
1.  Trim the sharp points off your skewers.  Make your skewer the same width as your grocery store flyer.

2.  Fold the flyer in half and cut off the corners from your flyer.  Make your cuts in such a way that the skewer (lined up parallel to your fold) forms a triangle with your two cuts.  (Here's another way to think about it:  You want the height of your resulting hexagon to be the same length as the skewers.)  When you open the flyer, you should have a hexagon with two symmetrical sides.


3.  Tape down your skewers with packing tape.

4.  Cut out two thin rectangle tails out of newspaper.  Tape them to your kite.  (Kite tails are pretty important.  They stabilize the kite.  I made our tails pretty short, but you could try cutting out different lengths and testing how the tail length affects flight.)

4.  Place tape on both sides of your hexagon.  (This will ensure that the newspaper is strong enough to take the hole punch.)  Hole punch both sides.  Then, string a piece of yarn across your hexagon.


5.  Wind about 22 feet of yarn onto your Popsicle stick.  Tape down the beginning of your string to the stick so that the yarn doesn't fall off your stick.  Tie the other end of your yarn to the middle of your horizontal string.


Enjoy your newspaper kite.  As you can see on the photo, this kite actually flew even though we only had a bit of wind.


Kite 2:  Plastic Bag Kite
This kite was made out of a plastic bag, four skewers, packing tape, yarn, and a Popsicle stick.  It has the lovely traditional diamond kite shape, but sadly... it didn't really fly.  (I blame the lack of wind.)  There are a lot of great instructions online, but in the end modeled my design after this plastic bag diamond shaped kite from My Best Kites.


Materials:
- Plastic bag
- Yarn (around 30 feet)
- Ruler
- 4 skewers
- Scissors
- Pen
- Packing tape
- Popsicle stick (or cardboard strip, or pencil, or random stick you find on the ground)

Directions:
1.  Cut open your bag and decide how big you want your kite.

2.  Cut off the points from your skewers.  Use packing tape to tape your skewers together.  (It's better if you use longer sticks, but I just used what I had.  The points where the sticks were taped together were a bit flimsy, so take that into account if you have super strong winds in your neck of the woods.)

3.  Lay your sticks on your plastic bag and mark where the corners of your diamond kite shape should be.

4.  Use ruler and pen to connect the points, creating a diamond kite shape.  Cut that shape out.

5. Use packing tape to tape the skewers to the corners of your kite.  Then, pierce two holes through the center of the kite so that you can use a piece of yarn to tie the skewers together and to the kite.

6. Wind the rest of your string around your Popsicle stick (making sure to tape the beginning to the stick).  Then, tie your string to the lower end of the vertical stick and to the piece of yarn that you previously used to tie the skewers together. 
7. Tie together strips of plastic bag to create a tail.  (We initially made our tail 16 inches long, but after trying the kite out, we added several more strips to better stabilize the kite and keep it right side up.)  Attach your tail to the kite with packing tape.

Voila.  Now you have a plastic bag kite.  And since you made it to the end of this very long post,  I thought I'd treat you to a short video showing me huffing and puffing as I try to fly the kite.


P4063100 from Pink Stripey Socks on Vimeo.

Monday, April 8, 2013

What's up, Chuck?

Here are a mish-mash of photos from the past couple weeks:
Celebrating a friend's birthday

Making crafts for Chuck

Welcoming spring by germinating beans

Entertaining a furry house guest

Hubby's favorite pair of socks


Friday, April 5, 2013

Embroidery Thread Wrapped cable

Is it just me, or are the USB cables for Apple products kind of flimsy?  Within a couple months of use, our cord's outer plastic coating tore, exposing the wires inside.  Now, I'm not an electrical engineer or anything... but I figured that exposed wires weren't too safe.  After using electrical tape to fix the tear several times, our resulting cord looked less and less attractive.

So when I came across Brit + Co's tutorial to wrap cables in embroidery thread and Flax and Twine's   tutorial for embroidery thread wrapped earrings, I turned to embroidery thread as a stylish and fun way to solve my problem.
Geek chic?
Here are the materials that I used:
- Tacky glue
- Scissors
- Embroidery thread
- Broken Cable
Directions:
1.  Cut all of your embroidery threads five times the length you want wrapped.

2.  Tie a knot at the base of your cable.  This is where you will start wrapping.  Put a drop of glue to secure the knot in place.

3.  Begin your design by wrapping one thread around the other embroidery thread and cable.  (In this case, I started by wrapping my pink thread around my orange thread and cable.)  To switch colors, simply switch threads and continue wrapping.  At any point in time you'll have one thread being displayed while the other thread color is hidden.   (Note:  I found it helpful to use my foot to hold down the other end of the cable I wrapped. I would have taken a photo of this... but I figured you didn't want to see my large pale foot.)

4.  When you've wrapped as much cable as you wanted, tie a knot and snip off any excess thread.  Once again, add a drop of glue to secure that knot in place.  

Now we'll see if that tear appears again...muah ha ha ha ha ha.

Thursday, April 4, 2013

DIY Studded leather gloves

Guess what I made while Chuck took a nap yesterday?
A pair of studded black leather gloves for a tough chica friend


Although Spring is right at our doorstep, I had been meaning to make these leather gloves for quite awhile.  Last winter, one of my college friends came into town and we did a little window shopping.  She found a pair of black leather gloves at Urban Outfitters and debated whether or not to get them.  In the end, she left them behind.

I kept thinking about her studded gloves for the next couple of months.  When the weather got warmer, tons of stores had winter sales to clear out their merchandise.  Once I saw this pair of black leather gloves on sale, I snatched them right up.

Here are the materials that I used:  
- Black leather gloves
- Sharp pair of fabric scissors
- Chalk
- Golden cone spikes


The spikes contained two parts:  The sharp spiky cone and the screw 
Directions:
1.  Use chalk to mark where the spikes will go.

2.  Use the pointy part of your fabric scissors to pierce the top of your gloves.  (Make sure not to pierce through the bottom as well!)  Poke your screwback through the leather and screw the cone on.


 And that's basically all you need to do to make a pair of tough girl gloves.  The spikes are surprisingly easy to screw on and the screwbacks didn't bother my hand one bit.

What do you think?  Rock star fashion statement?  Or, tough chic weapon? 


Wednesday, April 3, 2013

Tattoo a banana

Got a banana?  Got a safety pin?  Great.  
Now you can tattoo a banana.

 Materials:
- banana
- safety pin
- pencil
- refrigerator

Directions: 
1.  Use a pencil to sketch a design on a banana.  (If you don't feel comfortable sketching straight on the banana, you can sketch your design on a piece of paper first.  Then, tape your design to the banana to guide your poking.)

2.  Use your safety pin to poke holes in the banana.  Watch your tiny dots turn black.

3.  Place the banana in the fridge for a couple of hours.  Pull it out to reveal a new tattooed banana.

4.  Place the banana in your kid's lunch box.... or sneak it back into the pile of bananas at the grocery store to surprise shoppers.

Happy tattooing!

(I first spotted this idea on the excellent How About Orange blog.)

Tuesday, April 2, 2013

I love New York

Every time I venture into Manhattan,
I eagerly soak up all the sights and sounds.
Oh New York City,
you intoxicate me.


Monday, April 1, 2013

Easter egg crafts

Hi everyone!

I hope you had an egg-cellent Easter.
We had a really nice time eating and celebrating with our egg-stended family.
I think I went a bit overboard with this Easter's egg-related crafts:

Inspired by Krokotak's egg carton hens, I made my own chicken and ladybug egg holders.

I also blew out a bunch of eggs, colored them, and then turned them into confetti eggs for our family Easter egg hunt.

Blowing out the eggs:  
I used a safety pin and pricked the top and bottom of the egg.  Then, I used the safety pin to enlarge the bottom hole.  Then, I placed my mouth over the smaller top hole and blew the egg out over a bowl.  Once the egg was emptied, I rinsed the shell out and left it to dry on a paper towel.

Marbleizing eggs with nail polish:
Once the eggs were hollowed out, my sister and I marbleized some of the eggs using Camille Styles' instructions.  (Note:  Her eggs came out beautifully!  As you can see, I had a lot of trouble getting even results. Maybe it's because my nail polish was the cheap 2 dollar kind... or too old?  Or, perhaps my water wasn't the right temperature?  Hrmm...  Did anyone else have trouble making these eggs?)


Designing with masking tape  and dying eggs:
I had much better luck dying the rest of my eggs.  Hubby and I used masking tape to first create designs and then we dyed them.  To create each color, we simply combined 1 cup of boiling water, 20 drops of food coloring, and 2 teaspoons of vinegar in a large mug.  Then, we held our eggs in the dye until they took on the hue that we liked.


Filling the confetti eggs:
Once all the dye dried (and the nail polish smell dissipated... yuck), I filled the hollowed out eggs with  rice krispy treats (poured through a simple funnel made from rolling a piece of paper) and sealed up the holes with masking tape.

The kids had fun finding these special eggs and stomping on them to reveal the rice krispies within.


Although these eggs were fun to make, it was even more fun to see the kids smile each time they found a special "stomping egg."

Happy Monday!

Sunday, March 31, 2013

Happy Easter


In the midst of dying Easter eggs and making crafts, this chorus kept repeating itself in my head.

"Because He lives, I can face tomorrow,
Because He lives, all fear is gone;
Because I know He holds the future,
And life is worth the living,
Just because He lives!"

Hope you had a good and restful Easter weekend.