Tuesday, January 1, 2013

Hello 2013

"Tomorrow, is the first blank page of a 365 page book.  Write a good one."  ~ Brad Paisley

Happy New Year!  
Here's how we celebrated the beginning of 2013:

Baby Chuck tried to open our sparkling apple cider
We were pleasantly surprised by the fireworks outside


Monday, December 31, 2012

How to make heart (and other) shaped bokeh Christmas lights

Ever wanted to make different shaped bokeh Christmas lights?  Inspired by our Christmas snowmen-light sunglasses, I thought I'd try my hand at making our Christmas lights look heart shaped.  And then, once I figured out how to do that, I had to make some other shapes as well...

How to Make Different Shaped Bokeh Photos

how to take heart, cat, star, arrow and different shaped bokeh photos
Heart, star, cat, and arrow shaped Christmas lights


Keep reading to see how I made different shaped bokeh!

Sunday, December 30, 2012

A few Christmas photos

Let me just start this post by saying that I had intentions to take tons and tons of photos during Christmas.  But, I didn't touch the camera once.

Surprised?  Me too.

I just enjoyed spending time with family.

I was also so happy to see Baby Chuck surrounded by people who loved him.  Seeing him laughing and smiling and giving sloppy wet kisses to his relatives?  Those were definitely my favorite Christmas memories from this year.

Now for those of you who still want to get a glimpse of our Christmas, hubby luckily snapped some shots of our yummy meal.  Here's what he captured:


Oh yeah, here's one more funny memory.  Our aunt and uncle also gave us a pair of glasses that would create snowmen shapes out of Christmas lights.  You just put on the glasses and stare into the Christmas lights.  Then, presto!  The lights magically turn into snowmen ligths.  Cool, right?   

Left:  Normal Christmas lights           Right:  Christmas lights transformed into snowmen


Wow.   What will they think of next?

I'm such a dork.  I spent at least half an hour staring  into the Christmas lights and rocking my head back and forth just to make the snowmen dance.  Ah-maaaa-zing I tell you.  Ah-maaaa-zing.

The lights also gave me an idea for a craft that I wanted to try...so stay tuned.

And now I will conclude this post with a quote from my very wise friend Alice-
"May this season be bright and lovely as we celebrate the God who sees fit to greet us as a child and to send angels and songs to us on all our dark nights."

Hope you had a wonderful relaxing, and refreshing holiday break as well.

Thursday, December 27, 2012

Crapty DIY 2013 New Year's Glasses

Every year I keep meaning to get a pair of 20-whatever glasses, but I always forget.  This year, I combined my desire for glasses and crapting by making two pairs of 2013 glasses.  Hubby and I'll be wearing these as we ring in the new year.  (I tried making a tiny pair for Baby Chuck, but he ripped up my initial models.  Maybe next year?)


If you'd like to make your own pair of glasses, you can use the printable below.  I think this would be a fun activity for a party or crafty kids.  I cut the pieces out, traced them onto cereal boxes, cut the shapes out, decorated them, and then taped the pieces together.

2013 printable New Year's glasses pattern
And because Baby Chuck went to sleep early tonight, hubby and I had a bit of fun shooting some photos with the glasses.


Let me know if you try making these for yourself. :) I'd love to see photos.
Happy New Year!  See you in 2013.

DIY Birdseed ornaments


Today I'll be sharing how we created these lovely DIY Birdseed ornaments.

DIY Birdseed ornaments
Back in Michigan, hubby and I put up a small bird feeder to feed the birds during the winter.  Now that we live in the city, we don't have space to put a bird feeder up.  (Plus, even if we did figure out a way to do it we'd probably just attract pigeons or rats.  Ew and double ew.)

So, you might say that I was feeling a bit nostalgic after seeing this lovely tutorial from Saltwater Kids showing how to make birdseed ornaments.  Luckily we have several family members that live in nearby tree-filled suburbs, so I made a bunch of these as small Christmas gifts.  I don't know about you, but I could really just spend hours watching birds hopping or flying around.  Hopefully this gift will keep the kids (and adults) entertained as they enjoy nature.


If you'd like to make them yourself, let me just first make two notes:
(1)  The Saltwater Kids tutorial contains really lovely photos and clear directions.  I totally copied their recipe.  I'm a copycat.  I fully admit it.
(2)  I tried to be neat, but the birdseed got everywhere.  Be prepared to sweep and wipe up lots of tiny seeds and sticky birdseed mess.


Still want to make them?  Ok, here's how I did it:

Materials Needed to make DIY Birdseed Ornaments:

-3/4 C flour
- 1/2 C water
- 1 envelope unflavored gelatin (Knox)
- 3 T corn syrup (I used dark... but I'm not sure if that matters)
- 4 C birdseed
- muffin tins/ molds (or cookie cutters)
- nonstick cooking spray
- drinking straws/ stirrers
- wax paper
- ribbon

Directions to make DIY Birdseed Ornaments:

1.  Combine flour, water, gelatin, and corn syrup in a large bowl.  Stir until everything is combined and resembles sticky goo.

2.  Add birdseed.  Stir until birdseed is covered.

3.  Spray muffin tins / molds with cooking spray.

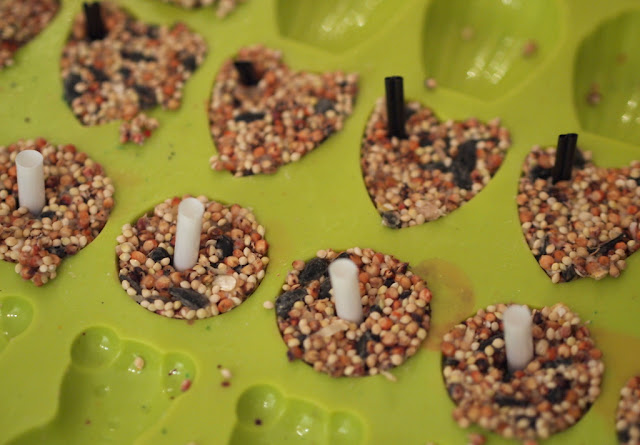
4.  Pack birdseed mixture into the molds.  Use a measuring cup to pack and smooth everything down.   (I had a bit of trouble with this, which resulted in rough edges.)

5.  Push straws or stirrers through the birdseed.  (Make sure to push them all the way through so that you have a hole to string the ribbon through.)

fill molds with birdseed to make ornaments

fill birdseed into silicone molds to make ornaments

6.  Let your birdseed mixture sit there for three hours.  Then, take out your straws and slide/pop out the hardened ornaments out onto wax paper.  (They easily popped out of the silicone molds, but I had to use a fork to pop them out of the muffin tins.)  Flip the ornament upside down so the bottom gets a chance to harden as well.  Let them sit out overnight.

7.  Put ribbon or string through the holes and enjoy!

Merry Christmas feathered friends!

Update-  I wanted to hang up ornaments with Baby Chuck around town, so I stored some in our apartment for about a week.  Bad idea.  When I finally remembered them, I saw that they had grown fuzzy with mold.  So, make sure you use them as soon as you make them!  Otherwise you'll end up with fuzzy black ornaments.  Ick.

DIY Birdseed ornament recipe


Interested in other ways to create birdseed feeders?

Create your own toilet paper roll bird feeders and ice bird feeders.

Toilet Roll Bird Feeder Craft ice bird feeder craft