Showing posts with label Home. Show all posts

Monday, July 22, 2019

Easy DIY Boho Yarn Wall Hangings

Looking for a super easy and fun summer craft for the kids? Today I'm sharing a fabulous yarn craft that's perfect for artsy playdates, ladies craft nights, or family craft time. We're making pretty and simple boho wall hangings on the blog today. All you need is a stick, different color + texture yarns, scissors, and masking tape! So go on a walk with the kids, find some sticks, and let's get crafting!

Pretty DIY Boho Yarn Wall Hangings


easy diy boho yarn wall hangings- super fun craft to make with the kids- all you need are sticks, yarn, and beads

This post contains affiliate links.  This means I make a small bit of money for any purchases made through the links at no additional cost to you.  Thank you for your support.  For my full disclosure policy, click here.


Wednesday, November 28, 2018

Anthropologie Inspired Painted Placemat Art

Today's post takes a detour from kids crafts.  We're venturinging into the land of home decor.  Have you seen Anthropologie's selection of basket wall artI fell in love with their modern, geometric, and graphic designs.  But, the prices are a bit steep for me.  So I put on my DIY cap and tried creating my own inspired wall art using thrifted items.  Here's how the project out  Pretty cool, right? 

Anthropologie Inspired Painted Wall Art


Anthropologie Inspired Place Mat Art- A fun DIY craft for crafters who love African woven basket wall art

This post contains Amazon affiliate links.  This means I make a small portion off of any purchases made through the links at no additional cost to you.  Thank you for the grocery money!  For my full disclosure policy, click here.

Monday, August 13, 2018

How To Make Bottle Cap Art

We've been collecting bottle caps for what seems like FOREVER. Why?  Well, to make some DIY Bottle Cap Art!  (We love making recycled crafts.)  This summer we finally finished the collection (woot woot!) and we made two pieces of cool bottle cap art (one for my son's room and one for downstairs.)  Here's how we made it!

DIY Bottle Cap Art


How to make bottle cap art- Super Easy Recycled, DIY Home Decor


 Note:  This post contains affiliate links.  This means I make a small bit of change when you purchase items through the links.  Thank you for your support and the grocery money! For my full disclosure policy, click here.


Friday, February 27, 2015

Easy Tissue Paper Art

Ah tissue paper.  It's colorful, cheap, and I've recently discovered, also great for making art!  Recently Chuck and I both used it to create some new tissue paper artwork for his room.

Easy Tissue Paper Art

Can yon tell which one Chuck made?

easy tissue paper artwork to be made with the kids

Thursday, January 15, 2015

Simple Heart Decal Wall

Last weekend I kinda went bonkers and made myself a heart accent wall.  

DIY Valentine's heart decal wall
This post contains affiliate links.  Thank you for your support!


Monday, August 25, 2014

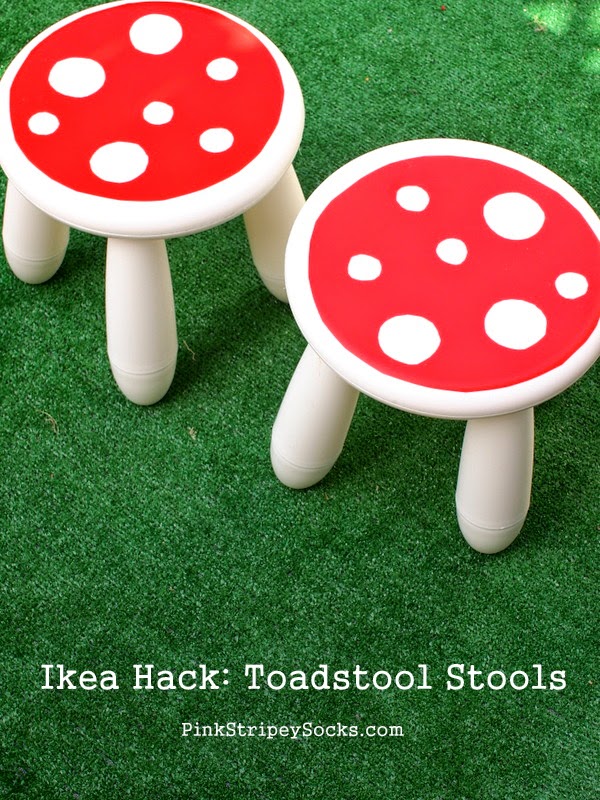
DIY Toadstool Stool (Ikea Hack!)

When we moved into tour new home, I really wanted to get Chuck his own little table with chairs.  After looking around, we found some really affordable options at Ikea.  So we brought them home.  I love them, but then thought I could spruce them up a little bit.  Since I have a soft spot for red mushrooms, I did a super easy Ikea Hack and turned them into...

Toadstool Stools!


DIY Ikea Hack:  Turn a stool into a cute toadstool seat!  Super easy and cute results!

(This post contains affiliate links.  Thank you so much for your support!)

Hee hee hee. Whoa. Super Mario super mushroom flashback!

 Ok. I've snapped out of it.  Yup.  They're pretty darn cute and they were super easy to make.  Let's get mushroom making!


Tuesday, August 12, 2014

DIY Astro Turf Rug

So... what are your thoughts on astro turf?  Hate it?  Love it?  I think it's really fun and provides a super affordable way to cover a lot of space for a small price.  You're probably asking why I have a sudden interest in the green stuff.  Well, after living in apartments for most of my adult life, hubby and I finally have a place that has a .... wait for it.... small outdoor patio.  Woo hoo!  Chuck was so excited to see our tiny "backyard" that he literally ran around the area for about half an hour when we first moved in.  The space is really a blessing and I love that we can just open the door and enjoy some private outdoor space whenever we want to.  And that brings me to today's craft post- our backyard DIY Astro Turf Rug.

DIY Astro Turf Rug

DIY Astro Turf Rug for Kids
(There are affiliate links in this post.  Thank you so much for your support.)


We don't wear shoes inside the house, so it's a hassle for Chuck to have to put on and take off his shoes every time he wants to quickly pop outside.  So we made this super easy astro turf rug to act as a very large door mat.   We love it so much because it's a cute area where Chuck can play or go barefoot without tracking too much dirt into the house.


Thursday, February 27, 2014

Cellophane Stained Glass Windows

Who's up for a little color?  Anyone? Anyone? Everything's looking pretty grey here, so Chuck and I made some cellophane stained glass windows.  I cut up pieces of cellophane and then we stuck them to our windows using a mixture of dish soap and water.   

Ahh, don't these hearts just brighten your day?
Cellophane stained glass heart windows

Keep reading to see how we did this activity...


Wednesday, February 19, 2014

Jasper Johns Inspired Wall Art

When I saw this lovely artwork that an elementary student made in the style of Jasper Johns, I was utterly entranced.  I loved how the letters seemed to swirl in colors.  So armed with my trusty craft paints, I painted my own Jasper Johns inspired wall art. But, instead of writing out a series of letters or a random assortment of words, I included four words that had special meaning to me.  Here's what I came up with: 


If you'd like to see how I painted this artwork, keep reading!

Friday, February 14, 2014

DIY Magazine Strip Silhouette Heart Art

Hrmm.. magazine strip silhouette art?  Sounds kind of naughty, but I promise you this recycled craft is anything but that.  Take a look!


DIY Magazine Strip Silhouette Heart Art
See?  Totally PG and totally cute.  I'm always on the lookout for easy and affordable DIY artwork.  This silhouette heart looks great and BONUS uses recycled materials. Keep reading to see how I made it!

Sunday, January 12, 2014

Reveal hidden lampshade silhouettes


Before I start today's post, I just wanted to say thank you for all the kind words, support, and love you sent my way after my last post.  *Gulp*  Sharing my dream was a bit REALLY scary.  I kept waiting for the rotten fruit and pies to be thrown, but nothing came by.  So, thank you.

Ok!  Now onto today's post. We own two lamps that are covered with ho-hum white shades.  I kept wanting to do something to the lamps to give them a bit more pizazz, but couldn't settle on a permanent solution.  Then, I saw this nifty decorating idea at How About Orange, and had to try it out. 

Look!  When the light is off, you just see a white shade.  But when the light turns on, a secret silhouette is revealed! 

 Magic?  Nope.  Keep reading to see how it was done...

Friday, December 27, 2013

Christmas Photos

Warning!  This post contains a lot of photos!  But, I figure it's ok since Christmas only happens once a year.  

This year we went to two family get-togethers.  We had lunch at one aunt's place and dinner at a cousin's house.  Fortunately for us, both houses were only 5 minutes apart.  We had a lot of fun hanging out with family and stuffing ourselves silly.  Here are some photos from our Christmas adventure:

(Thanks hubby for taking most of these while I played with the kids!)

Hubby, Chuck, and I wearing our Christmas headbands, ready to party (thanks Tito Ric for the photo!)


Click below to see more photos...

Sunday, December 15, 2013

What's up Chuck? Weekend Recap

This weekend we had plans to go into the city to see the train show at Grand Central Terminal. Unfortunately, it snowed all day Saturday (eep!) and I was battling a cold, so we ended up hanging out at home.  At first I was pretty bummed out, but thankfully everything turned out alright in the end.


Chuck and I played with his cars.... a lot....
We re-enacted scenes from the movie "Mater's Tall Tales..."
Keep on reading below!

Wednesday, November 13, 2013

DIY Faux Stained Glass (using Mod Podge and Fabric paint)

Around this time last year, I made myself a lovely faux stained glass panel out of an old frame, Elmers glue, and craft paint.  Sadly, that panel broke a couple of months ago.  I thought it was high time that I made another one, but this time I experimented with 3D fabric paint, Mod Podge, and acrylic paint.   After everything dried, I was surprised by how nice the panel turned out!  Here are the results of my little experiment: 

Tee hee hee.  Do you see bald men sitting in chairs.... or ladies with large hairdos?  They're supposed to be ladies... and I find them hilarious!  (I can't take credit for the design though.  It came right from this pinned image.)  Right now this modern and quirky stained glass panel sits inside Chuck's room and I always supress a giggle whenever I see their round glasses looking at me.

Wanna try making your own faux stained glass panel?  Read on!

Materials:
  • Picture frame
  • Three dimensional black fabric paint
  • Mod Podge (I used Matte)
  • Craft Paint 
  • Paint brush
  • Muffin Tin (or artist's palette)
  • Pen
  • Paper
  • Optional:  Clear tape, glass cleaner

Directions: 


1.  Pull out the sheet inside of your frame and trace it onto a piece of paper.  (Alternatively, you could also trace the glass or back panel of the frame.)  Cut out your rectangle and draw a design on it.

2.  Clean the glass of your picture frame.


3.  Place the glass on top of your sketch.  Then, use your fabric paint to trace the black "lead" of your stained glass panel.


4.  Once your "lead" dries, turn your glass over so that the lead is on the bottom.  Place your glass panel on top of a sheet of clean, white paper.  Now you're going to paint the colored portions on the back of your glass. (I chose to do it this way so that I wouldn't have to worry about painting over my black lines.)  Create the colored portions by mixing together approximately 1 teaspoon of Mod Podge and 2-3 drops of craft paint.  Mix both together well.  Then, paint the back of your glass panel with the different colors.   


5.  Once your colored paint dries, place your glass back into your frame and secure it.  (I used a couple of pieces of clear tape to make sure the panel stayed put.)   Remember that the front of your stained glass has the fabric paint on it and the back of your stained glass has the colored Mod Podge on it  Also, make sure that you do not scratch the glass panel because the Mod Podge and fabric paint will scrape off.  


And that's it!  Make one of these babies for yourself... or better yet, get your kids to make one as holiday a gift for someone they love.  Happy crafting! 

Wednesday, November 6, 2013

Star Painting (using Contact Paper)

Lately the cooler temperatures and shortened daylight hours have me looking at the sky to find stars.  However, since we live in a well-lit, urban environment, star gazing isn't really a viable option.

So once again I felt the urge to make some star-inspired artwork.  If I can't see stars in the sky, then I'll just have to make my own to enjoy.  Now, if you've been following this blog for some time, you'll recall that this isn't the first time I felt drawn towards the stars.  Last year I placed a galaxy of cardboard stars on our living room wall.  Then earlier this year I painted the inside of an umbrella to look like a galaxy.  This time I took a simpler approach and made myself some star artwork using contact paper.


Materials:
  • Canvas
  • Contact Paper
  • Pen
  • Scissors
  • Paint
  • Sponge brushes (or paint brushes)

Directions:

  1. Sketch out your stars onto the back of your contact paper.  Cut the stars out.
  2. Place the stars on your canvas.  Play around with their arrangement until you're satisfied.  Once you have a pleasing design, pull the backing off and stick the stars onto your canvas. (Make sure that they are stuck on well so that you get nice crisp lines.)
  3. Dab paint over your canvas.
  4. Once the paint dries, carefully peel off your contact paper stars.  You should see a bunch of white stars where your contact paper blocked the paint.

Quick and easy, right? Just remember to make sure that your contact paper stars are completely stuck on tight.  Eeek!  See that leftmost star below?  The paint bled through because the contact paper wasn't sticking to the canvas properly.

 Happy star crafting!

Wednesday, October 9, 2013

DIY Honeycomb Hexagon Popsicle Stick Wall Art

Did you ever make things out of Popsicle sticks as a kid?  I have fond memories of making popsicle stick picture frames and jewlery boxes in summer camp.

Today's craft is a slightly more sophisticated version of this beloved childhood activity.  (Maybe that's why I enjoyed making it so much?) This hexagon wall art is graphic, super easy to make, and (bonus!) covers a large space for relatively little cost.   If you have a wall that you'd like to easily decorate, why not give it a try too? 


Materials:
  • Popsicle sticks
  • Paint
  • Paint brushes
  • Hot glue gun

Directions:


 1.  Practice arranging your Popsicle sticks.  When you're pleased with your arrangement, take a photo so you'll remember it. 

2.  Paint your sticks.  (I initially painted them yellow, but thought they looked a little too flat.  Hubby suggested that I add a gold stripe to them to give them more depth.)

3.  Hot glue your sticks together.  One easy way to ensure that your hexagons have similar angles is to draw out a hexagon shape and use that to guide your gluing. 

And that's really all you have to do to create your own honeycomb wall art.


Happy crafting!

Wednesday, September 11, 2013

Temporary Contact Paper Kitchen Cabinet Decorations

So, this is apparently what happens when you give me some paint pens and contact paper.


Yup.  Those are flamingos.  And yes, they're all over our kitchen cabinets.

I know it's September, and officially autumn, but I refuse to cave in to the cold weather just yet.  Oh no.  This gal is holding onto every last drop of sunny, warm weather fun.  And seriously, what's more fun than pink flamingos?

Exactly.

Here's how I made my temporary pink cabinet decorations. 

Materials
  • Contact paper (No need for the fancy stuff, I just got cheap rolls from the Dollar Store)
  • Paper
  • Scissors
  • Exacto knife 
  • Cutting mat
  • Paint pens
  • Masking tape  
  • Ruler (optional)
Directions
1.  Make paper templates of your cabinet doors.  (I simply placed sheets of paper on top of cabinets and traced.  I was too lazy to pull out a ruler.  So, my lines came out a bit crooked.  Not a big deal for me.  If you want lovely, clean, straight lines, pull out your ruler and measure away.)

2.  Then, doodle your design on your paper.  Cut out your design and make yourself a stencil.


3.  Cut out sheets of contact paper that are the same size as your paper templates.  Tape the paper template on top of the contact paper.  Use your paint pens to decorate your contact paper.


4.  Attach your decorated contact paper to the cabinets.  (You'll probably want to make sure the cabinet doors are clean.  And, you'll probably want to go slowly.  Attach a bit of contact paper and then remove a bit of the backing.   Then continue until your entire sheet of contact paper is securely attached.)


Enjoy your new flamingo kitchen cabinet decorations.

Just realized, this would be a really easy and cute way to decorate for Halloween too.  Give the kids the paint pens and have them doodle monsters or spiderwebs... or whatever they want onto the contact paper.   Then, stick their scary decorations to your cabinets (or windows... or walls...) and boom, instant, personalized Halloween decorations.

(Special thanks to hubby for supporting his kooky wife's pink flamingo dream... and for photographing the tough kitchen shots.  We get such little light in there and I'm amazed that his shots look as good as they do.)

Happy crafting!

Monday, July 15, 2013

Make Perler bead bowls (and words)

Today's post is a bit late because my computer died last night.

RIP, dear friend.

I knew that it was going to happen sooner or later (but I just wish it was later.)  Boo.  I also wish that I had backed up my stuff (double boo.)  Hubby's performing some intensive surgery on it, so hopefully we can get my documents and photos back.

OK, enough heavy shop talk... onto today's craft.

When I saw Poppy Haus melting Perler beads to make bowls, I knew that I had to try it too.  Melting plastic beads in the oven?  Too. Much. Crafty. Awesomeness.  Sign me up!

Definitely check out her results, because they were much classier (she used two colors.)  I, on the other hand, went whole-hog color crazy.  Here are my results:

Bam!  It's like a whole bunch of sprinkles and confetti exploded to make this bowl.  We're currently using it to store fruit.     


Monday, July 1, 2013

Paint a rainbow fan

So I don't know about you, but this DIY rainbow fan has been stuck in my mind.  What?  You can see primary colors mixing in front of your very eyes?  Amazing!  I felt so inspired that  I made my own version.  Here's my DIY rainbow fan:


DIY Rainbow Fan


how to paint a rainbow fan DIY


(This post contains affiliate links.  Thank you for your support.)

Oooh.  Circular rainbow!  I just think it's so cool that the blades are painted different combinations of red, yellow, or blue.  Yon can only see the rainbow when the fan is turned on.  Whoa, right?

Let's get crafting.

Tuesday, June 25, 2013

Make Colorful Coffee Filter Pinata-inspired Letters

I don't know about you, but I've been feeling so inspired by all the warm weather lately.  It seems like everything around us is bursting with life, light, and color.  To bring some of that happy, airy, summer feeling inside, I made these fun pinata-inspired letters to decorate our bedroom wall.


Materials:
- coffee filters
- markers
- spray bottle
- shallow pan
- cardboard box
- tape
- double sided tape
- pencil
- exacto knife
- scissors
- white paint
- paint brush
- plastic bags

Directions:
1.  Cut out your letters from cardboard.  (I found that using an exacto knife was much easier than using scissors.)  Paint the letters white to help your colors stand out.

2.  Use markers to doodle on your coffee filters.  (Have fun with it!  It really doesn't matter what you doodle.  All your designs are going to be washed away anyway.)

3.  Spray your coffee filters to make the colors run.  Then, let the coffee filters dry.  (I placed ours on some plastic bags and waited overnight.)

Here's what the coffee filters looked like after they dried:

4.  Cut out strips from your coffee filters and tape them onto the horizontal sides of the letters to cover them.  (This way you won't see the raw cardboard edges.  The vertical edges are going to be covered by fringe.)
Oops.  I missed one edge on the "L."

5.  Cut out similar sized strips from your coffee filters and turn them into pinata fringe.  Use your double sided tape and normal tape to stick them onto the cardboard letters.  Be sure to work from the bottom upwards.  Also, wrap the strips around the letters to cover the exposed cardboard sides.


Here's what a finished letter looks like:


And here's what the fringe looks like up close:
And that's it.  Now we have a lovely set of pinata-inspired letters.  I placed them right above our bed.  I think they look nice there, don't you?


Thanks for reading!
(Psst-  If you liked this pinata-inspired craft, you can check out my number pinata or snack bag pinata.)