Showing posts with label Crapty Fridays. Show all posts

Wednesday, January 30, 2013

Make a cardboard guitar

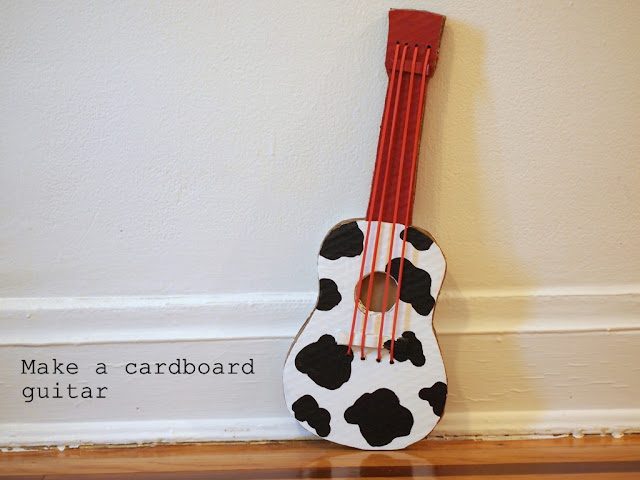
Whenever I play the guitar, Baby Chuck seems keen to join in.  He pulls on strings, turns the tuning keys, and inevitably drops picks (and possibly raisins- ick) into the body.  I figured he'd like his own guitar, so I made him this black and white cutie.  It's the size of a ukulele.

(Why cow print?  Well, whenever we ask him "What does a cow say?" he responds "Mmm mmm."  Then we always cheer because that's close enough for us.)

Want to make your own guitar?  Read on!

DIY Cardboard KidsGuitar

how to make a cardboard guitar for kids

(Disclaimer:  I got the template and directions from Make It and Love It.  They wrote a really comprehensive set of directions packed full of lovely photos.  Check out their post for detailed directions and cute kid pics.  I'm posting up this set of directions because I did things slightly differently.)

(Disclaimer 2:  This project takes a long time.  Crapting helps me to relax, so I didn't mind.)

Materials Needed to Make a DIY Kids Guitar

- Already cut out and assembled guitar template (follow her directions on how to resize, cut, and assemble pieces)
- Exacto knife
- Aleene's tacky glue (you'll need something stronger than Elmer's, hot glue didn't quite work for me)
- Scissors
- Nice cardboard (no bends or stains) <-- crap
- Ruler
- Drill
- Paint, paint brushes, Mod Podge
- 4 jumbo 7 inch rubber bands (purchased at Staples)
- 2 paperclips (I used jumbo sized ones, but I think 1 inch ones would work too)
- heavy books

Directions to Make Your Own DIY Cardboard Guitar:

1.  Trace and cut out 4 guitar pieces out of your cardboard:

  • 3 full length guitar cutouts (with holes cut out of the center of them)
  • 1 body only guitar cutout (cut your template at the dotted line and just trace out the bottom portion)


2.  Glue together two of your full length guitar pieces.  Now you have a nice sturdy  base.  (You don't want your rubber bands to bend the cardboard.)

3. Cut out 4 rectangles out of cardboard:

  • 2 larger rectangles- approximately 3 inches x 1/4 inch
  • 2 smaller rectangles- approximately 1 3/4 inches x 1/4 inch

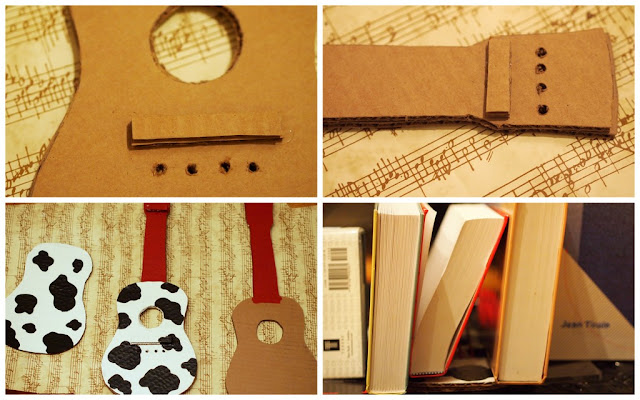
4.  Glue your two large rectangles, one on top of each other, about 1 inch below the cutout circles on your previously glued together guitar cutouts.  Glue your two smaller rectangles, one on top of another, around the neck of your previously glued together guitar pieces.


cut out cardboard guitar shapes

5.  Now it's drilling time. (Aka- Time to call hubby because drills totally freak me out.)  Drill four holes approximately 1/3 inch below your larger rectangles and about 1/2 inch above your smaller rectangles.  Honestly, the measurements aren't that important.  You can just eyeball it.  Just make sure that (a) your holes are evenly spaced and (b) four rubber bands could potentially be strung from one set of holes to the other.  Oh yeah, when drilling the holes on the head of the guitar, try not to place the end holes too close to the edge of the cardboard.  Otherwise your rubber band will periodically slide off...

6.  Now it's painting time (Aka- Let's get funky and creative!)

  • Completely paint one side of the smaller guitar body  (I painted it cow print)
  • Completely paint one side of your glued together guitar cutouts.  (I painted it red and cow print.) 
  • Paint the neck of your third guitar cutout (That's the only part that will be showing in your final product
Once your paint dries, apply Mod Podge to protect your lovely work.  Let Mod Podge dry.

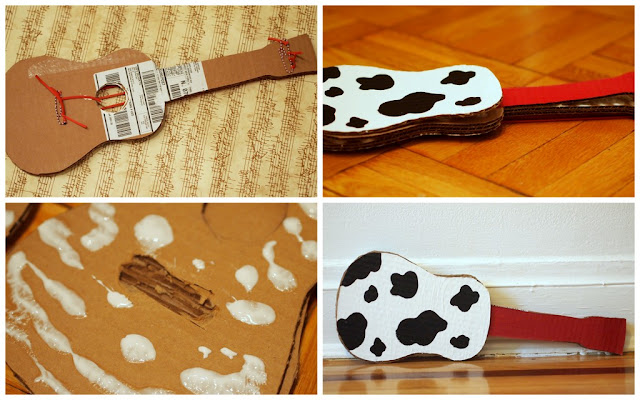
7.  You may notice that your cardboard starts bending.  This isn't good because it will prevent your cardboard pieces from properly sticking together.  Don't worry!  Just use some heavy books to flatten your cardboard out.  (Sadly, my two previously glued together guitar pieces were coming undone.  I reattached them by squeezing in more glue between the crevices.)  Let glue dry.


drill, paint, and complete your DIY cardboard guitar toy for kids

8.  Now let's string the guitar!  Cut your four jumbo sized rubber bands to make four long strands.  Double knot each rubber band to a paperclip.  Then, string your four strands through the holes in the neck of the guitar.  Pull to make sure that your paperclip sits flush against the cardboard.  Pull those strands down one by one through the holes in the body of your guitar.  Double knot the strands to another paperclip.  (I had some problems tying my middle rubber bands to the paper clip, so I just double knotted them to each other.)  Trim all your excess rubber band bits.

9.  Make four small indentations in your cardboard rectangle bits (on the front of the guitar) to keep rubber bands in place.

10.  What? Aren't we done yet?  No way. Crapting is not for the weary. Time to cover up the ugly rubber band ends and paper clips.  Spread a thick layer of glue on the back of your newly strung guitar and glue on your third full guitar piece.  Make sure the painted neck is shown.  Apply pressure to make sure the pieces stick together.  Then, glue on your small guitar body on top of that.  Again, apply pressure.

11.  Note:  I found that my pieces wouldn't stay glued together because my jumbo paper clips were pretty thick.  If you find yourself with this problem too, you may need to cut out two "wells" in your cardboard so that the paperclips have a nice place to rest.  Then your cardboard pieces should sit nicely together.

12.  Enjoy and rock out.

how to make a DIY cardboard guitar for kids


And here are our two new cardboard instruments:
(Click here for directions to make a cardboard rattle-drum.)
DIY cardboard instruments kids craft

Phew.  I'm exhausted.  Time for bed.  Goodnight!

Thursday, January 24, 2013

Make a lava lamp

Before you read this post, I have a confession to make.  I have a school girl crush on Steve Spangler.  He's so dreamy and he makes science fun.  How can any person resist? *Sigh*  Mind you, this isn't my first school girl crush.  Back in grad school I thought my stats professor was super brainy and super dreamy too.  *Double sigh*

Ok... moving on...  Last week Baby Chuck and I made this lava lamp using directions from Steve Spangler's super awesome website.  Doesn't it look cool?

 Here's what it looked like when put a flashlight behind the bottle::
Whoa- swirly sci-fi effects

Want to make your own lava lamp?  (Come on, I know you do!)  If so, read on, fellow crapter!

Materials:
- empty bottle and cap (we used a soda bottle) <-- crap!
- vegetable oil
- water
- dark food coloring (we chose blue)
- alka-seltzer tablet (divided into smaller pieces)
- flashlight (optional- for alien effect)

Directions:
1.  Fill your bottle 3/4 full with vegetable oil.  Then, pour water into the bottle until it's almost full.  Make sure to lave enough room at the top of the bottle for the alka-seltzer reaction, otherwise liquid will spill out.
2.  Add 10 drops of food coloring.  (Watch the water turn a different color as the oil remains the same.)
3.  Drop your alka-seltzer pieces one by one into the bottle and watch the water bubble and fizzle.
4.  (Optional:  Put a flashlight behind the bottle and turn off the lights to see sci-fi alien effect)
5.  Once you've dissolve all your alka-seltzer pieces, screw the cap on and tip the bottle back and forth.  Watch the water and oil roll around.  Feel relaxed.

Monday, January 21, 2013

Cowboy gear part 2: Cardboard tissue box cowboy hat

 Cardboard Tissue Box Cowboy Hat

And here's how you crapt a cowboy hat from cardboard...
(Directions modified from a video that I viewed here)

tissue box and cereal box cardboard cowboy hat

Cowboy gear part 1: Make your own sheriff star

Hi everyone!
Here's how I crapted Baby Chuck's Sheriff star:

Materials:
- cake tin <-- crap!
- cereal box <--- crap!
- scissors
- strong glue (I used Aleene's)
- thin permanent marker
- packing tape
- pen
- safety pin
- felt (optional)
- printout of a sheriff star


 Directions:
1.  Glue your cake tin to your cereal box.
2.  Print out an image of a sheriff star that you like.  Cut that star out.
3.  Trace the star onto the cake tin.  Trace and color over the "sheriff" lettering too.  Lift up your paper star and reveal your "sheriff" imprint.
 4.  Cut out the star from the cake tin.  Use your permanent marker and trace over your lettering and any decorative designs that you want to stand out.

5.  Use your packing tape to "laminate" your star.

 6.  Cut out a piece of felt (or cardboard), and tape it to the back of your sheriff star to secure a safety pin to your star.  (Make sure to orient your safety pin so that the star sits the right way when pinned.)

Enjoy!  Yee-haw!

Thursday, January 17, 2013

Crapty cardboard cereal box giraffe

So this is the adorable cardboard giraffe that I fell in love with.  
Meet Chloe. (Isn't she darling?)


And here she is au naturale:
This time I used a tissue box to make her.


I can't take any credit for this template.  My talented momma friend Vanessa made it up and let me share it with you.  This little giraffe was super easy to make and fun to decorate too.  (Polka dots... oooh la la!)

Best part is that little elephant Ella now has someone to play with...
Beasty besties

Just download this free giraffe template to make your very own Chloe the giraffe.

Happy making, friends!

Thursday, January 10, 2013

Crapty cardboard cereal box elephant

Dear Long-time reader,

I'm no longer only crapting on Fridays.  Now that I've unleashed my craptiness, I'm just going to upload crapts any time I feel like it.  Hope that's ok with you.

-Me

Ok, now that that's over with, let the crapt begin!

Last week, a mommy friend showed me Muji's super cute cardboard animals.  She made herself a little giraffe and I was inspired to try making something too.  I had a lot of fun making my cardboard animal trophy head awhile back.  This time I ventured into new territory because I had to make my own template from scratch.

Eek.

So after many tries and fails, I finally came up with an animal that stands and a pattern that other people can use (although please note that it's far from perfect!)

So please meet Ella, my little cereal box elephant.
Isn't she cute?  


And this is what little Ella looks like naked (aka sans paint):


If you'd like to try making your own elephant, you'll just need these few materials:
- free elephant template
- scissors
- pencil or pen
- cereal box
- paint or markers (optional)

Then, you simply
(1)  Cut the shapes out.

(2)  Trace the shapes onto a cereal box.

(3)  Cut those shapes out again.

(4)  Optional- Decorate the shapes
Note:  If you paint the shapes, be sure to save a bit of the paint to fix up the scratch marks that will appear after you assemble the pieces.  If you look carefully at Ella, you'll notice that there's a bit of white by her nose.  That's where my paint chipped off.  Or, maybe you could protect your paint by coating your pieces with modpodge?  Not sure...

(5) Assemble the pieces
Note:  I tried my best to make sure that the pattern works as is... however... it's not perfect.  So you'll probably have to adjust the lengths and widths of the slits and various pieces, especially if you painted them.

(6)  Fix up any little scratch marks that assembling

Thanks for reading this tutorial.  I hope this little elephant project provides you and your family a bit of cheap and creative fun.  If you try it out, I'd love to see your results. :)
  Buy Now

Monday, January 7, 2013

DIY coat hanger iPad stand

A couple of months back, hubby's sister generously gave us an iPad.  It's sleek and gorgeous and we love using it.  Hubby especially likes using it to watch videos when he rides his bike in our apartment.  But, he's never quite sure how to hold it up so that he can ride and watch at the same time.

Well, hubby, look no further.  A couple of nights ago I took matters into my own crapty hands.  After a quick search online, I was able to make iPad stand using a coat hanger and my bare muscles.

Yes!  It's true.  And you can do it too!  Learn how by watching this awesome CNET video.

In case you don't believe me, here's a photo showing that my coat hanger stand actually does work.

Holding an iPad vertically is no small feat!


Ok... so you're probably thinking... this is too good to be true.

Well, the stand does work.

But, I do have one small disclaimer.  My crapted stand looks a bit.... well... take a look for yourself:


Ooh.

 I know what you're thinking.  It looks like a piece of wire bent by a deranged person.... and I totally agree.  But, I just can't deny the facts.  Ugly as this thing is, it does its job and costs nothing to make.

It's as strong as it is ugly.


 So what do you think?  Amazing?  Or amazingly ugly?

Friday, January 4, 2013

Crapty DIY galaxy light jar

You know how there are TONS and TONS of beautiful craft posts floating around online?

Well, this isn't one of them.

This week's crapt is a DIY galaxy light jar... and it came out looking a tad... crapty.


Don't get me wrong,  making this galaxy light jar would be a really fun activity to do with a young child.  And if you squint your eyes and tilt your head just so... the jar and lights do sort of resemble the night sky.  But, sadly mine just didn't turn out as cool looking as the one from this Design Mom post.  Perhaps I needed a stronger LED light?  Or a jar with a wider mouth?  Hmm....


Anyway, if you love the night sky, or if you have a child that loves staring at the stars and space, maybe you'd like to make one of these? Here's what you'll need:

Materials:
- scissors
- tape
- skewer
- 1 small LED light (I just used our bicycle light)
- jar (with opening large enough to fit your light)
- disposable cake tin <-- crap!

Directions:
(1)  Smooth out your cake tin (I just rubbed the scissor's handles against the metal to flatten out the ridges)

(2)  Cut out a rectangle from your cake tin.  Make sure that it's tall as your jar (it reaches from the bottom all the way to the lid)

(3)  Trace the bottom of your jar onto the cake tin and cut the circle out.

(4)  Use a skewer to punch a bunch of holes into your rectangle and circle.  (You want to see lots of starry light, so you'll need to punch a loooot of holes.)

(5)  Tape your metal circle to the bottom of the jar

(6)  Roll your rectangle into a cylinder.  Tape the cylinder so it keeps its shape.  Squeeze your cylinder into your jar.

Yup.  It's looking crapty already....
(7)  Turn on your LED light and drop it in the jar. (Make sure the light faces the bottom of the jar.)  Screw on the lid.

(8)  Turn off the lights in your room. Orient the jar so that it's resting on the lid.  Enjoy your very own mini galaxy.

Friday, December 21, 2012

Crapty DIY potato chip bag pinata

So remember that surprise we were talking about?

Surprise!  Today our Toddler Time group is holding a Christmas party.  We're going to eat, drink, and hopefully meet Santa Claus.  Cross your fingers.

Everyone is bringing something to the party.  Baby Chuck and I are bringing a pinata.  What?  Why am I making yet another pinata?  Well, some of the moms are from Mexico and apparently it's a Mexican tradition for children to hit a pinata at Christmas.  (Side note:  I really love that there are so many different cultures represented in our toddler group.  It's neat learning about other cultures.  Added bonus-I get a chance to practice my Spanish.  Que bueno!)   

Now, a traditional pinata looks like a sphere with seven cones sticking out of it.  Here's the one I made:


Erm... I know what you're thinking.  Leslie, yours looks nothing like that.  True true, but it looks kinda like a star and there are tassels.  Does that count?  Let's just say that mine was inspired by the traditional one.  The coolest thing about this pinata is that it's a true blue CRAPT!

Materials:
- several cereal boxes <-- crap!
- LOTS of potato chip bags* <-- crap!
- tape
- glue (I used Aileen's tacky glue)
- scissors
- pens
- ribbon
- aluminum foil

(*I'm slightly embarrassed by the amount of chips we eat in two weeks.)

Directions:


Hope you have a wonderful weekend.

Friday, December 14, 2012

Crapty origami boat ornaments and Christmas crackers

This weekend we're hosting a gingerbread house party.  To prepare, I purchased a whole bunch of candy, graham crackers, and icing.   I also crapted a couple of origami boat ornaments.  They were folded from magazine paper.  My little boats were inspired by this origami boat necklace that I won in a recent blog giveaway.  (First time I won one of these giveaways, hooray!)


I also made a bunch of psuedo Christmas crackers out of my ever growing pile of paper towel rolls.  Each guest is going to take one home as a gift.  Inside the cracker they'll find a balloon, a corny Christmas joke, a snowflake, cute band-aids  and a couple of candies.  I think traditional crackers are supposed to pop, but I couldn't find the cracker snaps, so mine will just look cute.  

Hope you have a great weekend.  See you on Monday!


Sunday, December 9, 2012

Landfill Orchestra

I don't usually post on the weekends, but I had to load this video up.  It's beautiful and hopeful and inspiring.

Landfill Harmonic film teaser from Landfill Harmonic on Vimeo.

Friday, December 7, 2012

Crapty DIY geometric straw ornament

To my highschool geometry teacher:
You were right.
Triangles are really cool.
This crapt is for you.

I think geometric forms are beautiful.  Using the directions I found here and here, this week I tried to diy my own geometric ornament out of straws.

Materials:
- stirrers <-- crapt!
- scissors
- ruler
- string
- Elmer's glue

Directions:
(1) Cut your stirrers into 12 two-inch segments.
(2) Cut yourself a piece of string that's two arm lengths long.
(3) String four segments onto the string.
(4) Push the segments to the end of the string. Create a square with the straws and tie a double knot to hold the straws in place.  (Note:  Don't tie the straws too tightly together, otherwise your straws will split under the pressure. I saw this happen with my first attempt.)


(5) String two straws onto your string and then tie those straws down across from your previous knot.


(6)  String two more straws and then tie them across from your previous knot.   (At this point you should be tying a knot over the first knot you made in step 3.)

We're going to now tie more straws onto the figure, but this time we'll tie them in the middle of the figure, between each of the pairs of straws.  So, you'll have to cut your string.

I made a small loop to hang the ornament from at this point. But you could create the loop elsewhere too.


(7)  Tie a double knot in the between two straws in the middle of your figure.

(8) String a straw and then make a knot between another set of two straws.

(Note: The most difficult part about making this ornament was making sure I tied the knot in the right place.  I found it helped if I mostly tied the knot over a straw and then slid the knot into place between the straws.)


(9) Repeat step 8 with with three other straws.  Double knot at the end and cut string.  Add a drop of Elmer's glue if you're worried about the final knot coming undone.  If you don't like the colors of your stirrers, you can also spray paint the ornaments whatever color you want.

Voila!  Enjoy your ornament and make your math teachers proud.


Friday, November 30, 2012

Crapty Paper Fortune Cookie Advent Calendar


Can you believe that tomorrow is the first of December!  Aiyah!  How quickly the time flies.

I love advent calendars.  I don't know why, but there's something immensely satisfying about moving a little figure from one day to the next.

We own one small felt snowman advent calendar, but I wanted to try making my own out of crap.  (Why?  Why not!  I love crapting.  There's just something immensely satisfying about transforming garbage and recyclables into something beautiful.)

I've always loved eating fortune cookies. (They're the best part about eating Chinese food!) So, I made my advent calendar look like paper fortune cookies.  Unlike their doughy counterparts, these fortune cookies don't contain traditional cookie wisdom.  Instead, each holds a Christmas-y activity that our family can do together or a way that we can serve others. Each cookie also holds a bible verse.

Hopefully these paper treats will help put us in the right frame of mind this holiday season.

Want to make your own paper fortune cookie advent calendar? Read on!

Materials:
- paper grocery bags (<--crap!)
- scissors
- cup
- pen
- computer paper
- glue stick
- gold paint
- paintbrush
- string
- tape
- Bible Advent verses

Directions:
1)  Trace and cut out 24 circles.
 2)  Write down fun Christmas-y activities or different ways you can serve others onto the circle's backs.
 3)  Make your fortune cookies!  Fold your circle in half, making sure your writing is on the inside.
 4)  While still holding your half circle, use your other hand crease the circle like so.  (Thumb and middle finger on the edge while your pointer finger gently applies pressure and creases the paper.)
 5)  Keep applying pressure until you have your fortune cookie shaped.
 6)  To keep the paper in this shape, you'll now need to let go of the paper and dab glue onto center crease. (Or you can use one of those glue dots... but I'm cheap so I just used my glue stick.)
 7)  Now, refold your fortune cookie.  Apply a bit of pressure to where the glue is to make sure both fortune cookie "arms" (no idea what  they're called) stick together.  Insert a bobby pin inside the "arms" so that they remain sticking together until the glue dries.
 8)  Repeat the process to create the rest of your fortune cookies.
9)  Come back 24 hours later.  (Or earlier if you wish.  I just waited to make sure the glue was dried.)  Paint half of the fortune cookie gold.  While waiting for the paint to dry, write out your bible verses and corresponding numbers on thin slips of paper.
9)  Once your paint dries, tape the slips of paper into the fortune cookies.

10)  I wasn't sure how to string the cookies up, so I created small loops out of leftover paper and taped them to the inside of the fortune cookies.) String up your cookies and enjoy!