Showing posts with label Thrifty. Show all posts

Tuesday, March 19, 2013

Make shrinky dink charms (out of number 6 plastic)

Can you believe that these charms were once take out sushi lids?


Well, it's true.  I've been saving number 6 plastic containers for awhile because I wanted to make shrinky dinks.  (Number 6 plastic is usually found in takeout containers.  You know it's number 6 because it has a "6" printed in it.)  This past weekend I finally had enough plastic lids, so I took the crapty plunge.

Want to try this crapt out too?  If so, read on:

But first, a cautionary note:
Most craft bloggers seem to say that it's ok to melt this plastic in the oven.  However, there are a few who worry about toxic fumes being released.  I went with the majority's opinion and tried out the  craft.  I just wanted to put that out there....

Materials:
- Number 6 plastic
- Permanent markers
- Scissors
- Hole puncher
- Aluminum foil
- Baking sheet
- Jump ring (and jewlery pliers to apply jump ring)
- Optional:  Mod Podge or clear nail polish (see step 7)

Directions:
Step 1:  Wash and dry your number 6 plastic containers.  Make sure to get rid of any sticky sticker residue.

Step 2:  Draw your design.  (I found some pendants from online stores that I liked and I doodled those images on paper first.  Then, I placed my piece of plastic over the doodles and traced and colored them.  All my original images were about 2 inches long.)


Step 4:  Cut out your images.

Step 5:  Hole punch your images.

Step 6:  Place your charms on a baking sheet covered with aluminum foil.  Bake them at 350 degrees for about 3 minutes.  (Each charm will initially bend and curl.  But then they will flatten out and stop shrinking. If a piece isn't fully flattened when you pull it out of the oven, you can always quickly push it flat yourself.)

Step 7:  Let your charms cool.  Then, add a jump ring to each one.

Another word of caution:  You have to handle the charms with care because the ink can rub off.  I tried protecting my work with Mod Podge, but got mixed results.  Some charms seemed alright, but the color rubbed off of others.  I also tried sealing some charms with clear nail polish.  But, I noticed that the nail polish smeared some of my images and not others.  So.... I'm not really sure how to seal them so that the images last.... Hrmm.... let me know if you figure anything out...


Happy crapty shrinky dinking!  Let me know if you try this out!

Friday, March 15, 2013

St. Patrick's day photo props

Today our toddler time is holding a St. Patrick's day event for the kids.  Here are two photo props that I crapted for the event:


Both props were made out of old cereal boxes. The kids are supposed to stick their faces through the hole in the left prop and they're supposed to stand underneath the hat on the right.

Please send some good Irish luck our way.  I'm hoping that the kids will use the props and we get some super cute and silly photos.

Happy St. Patrick's Day!

Thursday, March 14, 2013

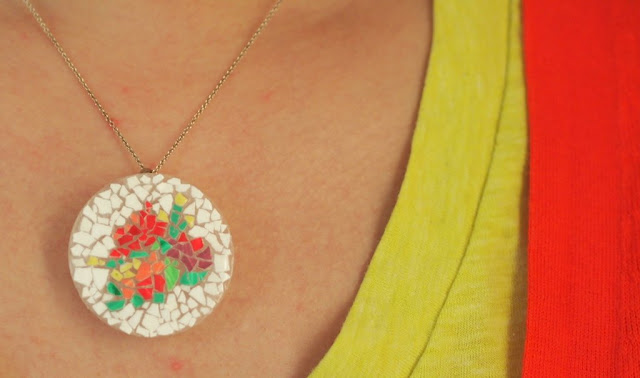
Make an eggshell mosaic pendant

Don't toss out your eggshells!  Today's craft shows a really unique way to turn them into beautiful pieces of art!

I love vintage micro mosaic jewelry, but being a huge cheap-o, I never allow myself to buy it.  So, yesterday, armed with a bunch of eggshells and milk jug caps (thanks Tita Tina for the stash!), I made my own version of micro mosaic jewelry.  Here are my two finished pendants:

Eggshell Mosaic Pendants


make yourself an eggshell mosaic pendant- great kids craft!
What a lovely piece of crapt


This post contains affiliate links. Thank you for your support! 

Tuesday, March 12, 2013

Stencil a St. Patrick's day shirt (using freezer paper)

Can I admit something to you?

I'm not Irish.  *Gasp*  I know!  How surprising!

I've never felt the need to celebrate St. Patrick's day.  But, strangely... now that I'm a mom I feel the need to celebrate this and every holiday with Chuck.  President's day? St. Patrick's day?  Passover?  Bring them all on.  I relish the thought of dressing him up in holiday themed gear.

And since St. Paddy's day is just around the corner, what better way to celebrate than dress him in green. So last night I donned my crafting hat and made this "lucky charm" shirt for Chuck to wear.

Freezer Paper Stenciled St. Patrick's Day Shirt

Not too shabby, right?  It was my first time trying out the freezer paper stenciling technique.  Isn't it surprising how nice and crisp the lines turned out?  Wow.  This is definitely a technique that I'll use in the future.


Tuesday, March 5, 2013

"Hello" stamped pants

Since I've been making tons and tons of stamps, I thought I'd take a short break from card stamping and decorate a pair of pants for Chuck.

They were really easy to make, but I'm just going to include the tutorial down below in case anyone feels the urge to stamp "hello" on a bunch of clothing.

Materials:
- pants
- fabric paint
- pencil
- paper
- scissors
- craft knife
- glue
- cardboard
- paint brush
- craft foam

Directions:

1.  Create your stamp.  I just wrote out the word "hello" on a piece of paper in a font that I liked.  Then, I cut out my word, traced it onto a piece of foam, and used my craft knife to cut it out  Then, I glued the word backwards (mirror-image!) onto a piece of cardboard.  Then, I just trimmed my cardboard. After letting the glue dry overnight, I had a lovely "hello" stamp.

2. I followed directions on the fabric paint bottle to properly prepare my pants for painting.  (Ooh!  Alliteration.)

3.  I slipped in a piece of cardboard into my pants leg to make sure that my fabric paint didn't go through to the other side.  Then, I painted fabric paint onto my stamp, and pressed down onto my pants.

4.  Hmm. The initial results weren't quite as bright and vibrant as I had hoped.  So, I took out my paintbrush and carefully painted over my word.

5.  Then, I just followed the directions on the bottle and laid the pants flat to dry.

We've already worn the pants once and put them through the wash.  The paint stayed put  and still looks good.  Phew!  Now Chuck has some happy and friendly pants to wear around town.  Easie-peasie.   I'd like to decorate some other clothes.... once I emerge from my card-making dungeon.  (Ack! Is anyone even going to buy my cards?  Freak out time!)

Monday, March 4, 2013

Bleach Pen Decorated Scarf

Hi everyone!

Happy Monday.

I'm semi-stressed about the upcoming craft show (ahhh! It's this Saturday!), so I won't be able to post lots of crafts this week.  However, I'll try my best to upload something every day ... (even if it's just a photo of the stamps that I'm working on) so that you'll get a glimpse into my harried card-making world.

Anyway, here's a fun craft that I made last week.  I finally took the plunge and tried my hand at using bleach to decorate a recycled t-shirt scarf.
Ooh.  Looks nice, right?  (And btw- can you see that pimple?  Well, it ain't the only one.  Curses, acne!)

Materials:
- Scissors (I used fabric shears)
- Old t-shirt (<--crap!)
- Cereal box (<--crap!)
- Bleach Pen
- Rubber gloves
- Pen

Directions:


Step 1:  Cut an old t-shirt horizontally under the armpits.  (This medium black shirt shrunk in the wash, so it was perfect.)  Now you should have a fabric loop.  Stretch your loop so that it's longer.  Save your unused material.

Step 2:  Doodle some possible designs.  (I debated between two designs, but ultimately chose to doodle flowers because it seemed easier and more fun to draw.)

Step 3:  Place a piece of cardboard between the top and bottom layers of your fabric loop.

Step 4:  Shake your bleach pen very well.  Then, draw on the topside of your t-shirt loop.

Note:
- You must shake the bleach pen.  Otherwise blobs of oozy bleach water will leak out of the pen.
- Even after shaking, I still found the bleach "ink" to be pretty runny.  It had the consistency of watery Elmer's glue.
- Bleach fumes are strong.  Don't work in a tiny, stuffy room.
- Be careful and don't touch the bleach.  (Yeah- I learned that one the hard way.)


Step 5:  Once you've completed one side, let your bleached fabric sit there for as long as you want.  When you get the fading that you like, put on your rubber gloves and rinse the bleach out.

Note:
- I was impatient.  Once I noticed the bleach changing the black cloth, I ran to the sink to rinse it out.  So, my flowers probably don't look as vibrant as they could.
- Rinse your cloth well.  If you don't, the scarf will slightly burn your neck when you wear it.  (Again, another lesson that I learned the hard way.)

Step 6:  Let your cloth dry.  Then, repeat Steps 3-5 with the non-decorated side.

Step 7:  Once both sides of your fabric loop have been decorated, rinsed out, and dried, cut your loop into two thinner loops.*

Step 8:  Now you're going to attach the two loops together to create the illusion of a very long infinity scarf wrapped around your neck.  (Sorry I don't have a photo of this process.)  First, you'll have to make one loop shorter than the other.  To do this, I cut apart one of my loops (making it a long strand.)  Then, I placed this strand on top of the other fabric loop, curving it to make it a shorter loop.  (Does this even make sense?  Is anyone still reading at this point?)  I tied a long thin strip of t-shirt material (taken from the discarded scraps) around the strand and the loop to attach them together.  Finally, I trimmed off any excess fabric bits so that I had a nice clean knot.

And that's how I made this scarf.


(*Psst- Want a thicker, fuller-looking scarf than mine?  Hubby and I think this scarf would have been cuter if I used two shirts.  Then I could have decorated two very thick loops and tied them together.  That was initially my plan, but my bleach pen died after drawing one loop.  So if you want to try that out, you'll need 2 bleach pens.)

Let me know if you try this craft out!   I'd love to see your results.

Wednesday, February 27, 2013

Make a Sharpie decorated plate

I never know what to get people as gifts.  Maybe you're like me?  I walk through the entire store several times.  Each time around, I find different treasures and then mentally debate the pros and cons of the item for several minutes.  Then, I inevitably change my mind and movie onto the next item. Then, after about 2 hours of mumbling to myself like a crazy lady, I finally leave empty handed, with only a grouchy hubby and fussy baby to show for my effort.

So when I was invited to a friend's bridal shower, I knew I was in trouble.  If buying gifts for the building's superintendent already caused me grief, buying a gift for a longtime friend should have sent me into cardiac arrest.

Unfortunately (or perhaps fortunately?), Chuck's been having a rotten time with teething, so this time around I just took the easy way out:  gift card.  Packaged money.  And honey, who doesn't want money?

As I walked towards the cash register that nagging voice started whispering in my ear, "Leslie.  Is this really the best gift?  You've known her for how long?  Isn't this a bit impersonal?"  I tried responding back, "Shush. Chuck's actually behaving nicely.  If we leave now I can get good parking.  And I don't need to buy wrapping paper."

But the nagging voice continued, and I finally succumbed.  But this time a crafty idea also came to me and I took a quick trip to the kitchen section and grabbed a plate.

Because after seeing the gorgeous DIY Anthropologie knock-off mug from Home Heart Craft, I had to get into the Sharpie plate decorating market.

And after a couple of hours, I came up with this lovely plate:

I really like how it turned out.  It's beautiful, personal, quirky, useful, and *fingers crossed* long-lasting.  (I didn't try washing it... so I'm hoping the marker holds.)

Want to use Sharpie markers to unleash your creativity on some unsuspecting pieces of china?  Read on!

Materials:
- Oven
- Plate (I got mine at Target)
- Sharpie markers
- Paper
- Pencil
- Scissors
- Tape
- Q-Tip

Directions:
1.  Trace your plate onto a piece of paper and cut out the resulting shape.  Now you know how big to make your design..

2.  Come up with your design.  (This was super hard.  I knew I wanted to practice my handwriting skills and include something romantic and slightly naughty.)

3.  Turn your paper over.  On the back, rub your pencil over the back of your design.  (Guess what?  You've essentially made your own carbon paper!)

4.  Tape your design to your plate.  Trace over your design with your pencil.  Lift up your paper and you'll find a faint imprint of the design underneath.  (Magical!)

5.  Use Sharpie to trace over your design.  I have shaky hands, so I did this very slowly and carefully.  Some parts of the lettering came out a big uneven, so I retraced over parts to make sure that everything looked uniformly black.  Once my Sharpie dried, I brushed off any visible pencil residue with a Q-tip.  Feeling inspired, I also free handed a design on the back.

6.  Pop your work of art into the oven and bake at 400 degrees for 45 minutes.  Then, admire your handiwork and wrap it up.

(Have you ever tried to draw on plates or mugs with Sharpies?  Did the Sharpie marker stay on even after you washed the item?  I'm hoping my design stays on.  Hubby received this lovely mug decorated with Sharpie from his students last year.... and the message they wrote washed away after several rinses.  Luckily we took a photo of the mug before everything disappeared... but it was still pretty disappointing.  *Crosses fingers*)

Tuesday, February 26, 2013

Make Eggshell Mosaic Pots

Can you feel spring in the air?  

In honor of the warmer weather and my love for mosaics, today's post is all about decorating tiny pots with eggshell mosaics.

Mosaic Eggshell Pots


mosaic eggshell pots- fun kids craft idea for Easter
This post contains affiliate links.  Thank you for your support!

Monday, February 25, 2013

Make a Mosaic Bean Pendant

Hi everyone!

How was your weekend?   We had a pretty quiet Sunday, but our Saturday was full of fun activity.  I attended a bridal shower while hubby and Toddler Chuck visited family.  (I'll post up photos from the bridal shower later on this week.) I thought I'd start off the week with this crapty (and slightly crappy?) pendant that I made.

I think mosaics are lovely.  There's something quite special (and dare I say, possibly mathematical?) about laying pieces of varying shapes and/or colors together so that they fit a space and create a desired image or pattern.

Wanting to make a wearable mosaic of my own, I used some household materials to create this mosaic bean pendant:


Yeah.  I know what you're thinking.  Girl, that's a lot of look.  And my reply? Girl, I know.  But really, what does one wear with beans anyway?

Erm.... I'm not sure if I like the result, but I did have fun making it.  And who knows?  If you ever find yourself trapped at home with a couple of bored children, then perhaps you could whip these up for fun.

Materials:
- dried beans
- cereal box cardboard <--crap!
- craft paint
- paint brushes
- Tacky glue (I used Aleene's)
- String
- Felt
- Scissors


Thursday, February 21, 2013

Making Styrofoam stamps

Hello there!

I'm on a crapting roll, so I figured I'd upload two posts today.

As you can see, I'm still working on my greeting card designs for the upcoming craft show.  Here's my newest attempt at crapting stamps:

These are the materials that I used:
- Scissors
- Craft knife
- Pencil
- Tacky glue
- Cardboard
- Styrofoam (I used one that originally held ground beef-- I know... gross when you think about it, but I promise I washed it really well)

To make these crapty beauties, I used a pencil to sketch out my designs onto the Styrofoam.  Then, I used my scissors and craft knife to cut out the different pieces.  Then, I used tacky glue to attach them to pieces of cardboard.  Once the Styrofoam was stuck on tight, I trimmed the cardboard so that it was slightly bigger than my stamp.

Instead of making a sponge ink pad, this time I used a paintbrush and painted a thin layer of craft paint onto each stamp before each use.   Here are my results:

Look!  My lettering came out the right way.  Hooray!

These stamps were fun to crapt... and I feel like I'm moving in the right direction... but I definitely have a ways to go if I want to make cards that are good enough to sell.

So currently I'm going back to the drawing board and channeling the mantra of Chuck's favorite book character:  "I think I can, I think I can, I think I can..."

Tuesday, February 19, 2013

Make a bubble snake

We don't drink much soda so when hubby finally brought a Pepsi home I snatched up his empty bottle quicker than a hungry child grabbing at freshly baked Christmas cookies.

Why?  Well, I had been dying to make a bubble snake blower. And honestly, could you blame me?  Look at the long foamy chain of bubbles I was able to blow.

Wowzers.  This photo makes my inner child squeal with delight

To blow awesome foamy snake-like bubble chains, I just needed a couple of materials:

Materials:
- empty plastic bottle
- wash cloth
- scissors
- rubber band
- dish detergent
- water
- plastic container

Directions:
1.  Cut off the bottom of the bottle.
2.  Cut a circle out of the wash cloth that's about 1-2 inches larger than the bottom of the bottle.
3.  Use a rubber band to attach your washcloth circle to the bottle.  That's it!
4.  Dip the bottle (wash cloth bottom) into dish detergent that's been mixed with a bit of water.
5.  Blow.  A foamy bubble snake will appear before your eyes.

(Warning:  Do not inhale, only exhale. Otherwise you'll end up drinking dish detergent like I did. Yuck.)

Here are some photos of Baby Chuck and I playing with our bubble snake blower.  (You may be wondering why we're in the bath tub.  Or why my bathtub is so dirty.... Hmm..  Well, we fully intended to blow bubbles outside, but it was just too cold.  The bath tub served as a nice place to try the activity out, since the bubbles created quite a sticky mess on the ground.  As for why my bathtub  is so dirty... I've neglected to clean it.... eek.)


Let me know if you try this out with your kids.  I can't wait till the weather gets warmer.  We'll definitely try blowing more bubble snakes outside.

Wednesday, February 13, 2013

Make Eggshell dolls

During a recent trip to our library, I found a couple of old craft books showing how to create dolls from eggshells.  I'd never seen this type of craft before, so I was super excited to try it out.

If you're like me, you have a thing for Matryoshka dolls... and fairy tales.  (Random tangent time:  As a kid I used to read tons and tons of fairy tales.  Magical powers? Fairies?  Elves? Yup. Yup. Yup.  I loved it all.  This love for fairy tales ended up morphing into a love of science fiction and fantasy novels later on... but I digress.)

 Here are my results:

Make Eggshell Dolls


how to make dolls using eggshells


I had fun making them... but I had way more fun decorating them.  In my opinion, painting cute things is the best part about crafting.


If you'd like to make your own eggshell dolls, read on!

Tuesday, February 12, 2013

DIY Cardboard Whale Tissue Box Holder

Once again, I fell in love with something that I saw on Etsy:  a whale tissue box holder.  Although he was super cute, I couldn't justify spending the money.  So... I crapted my own.


Would you like to make your own whale tissue holder?  If so, read on!

Materials:
- Pen
- Ruler
- Exacto knife
- Scissors
- Tacky glue (I used Aleene's)
- Packing tape
- Paint
- Paint brushes
- Mod Podge
- Foam brush
- Cardboard  (<-- Crap!)

Directions:
1. Measure and cut out
2 pieces of rectangular cardboard, 3 3/4 inches x 9 1/2 inches 
- 2 pieces of rectangular cardboard, 3 3/4 inches x 5 inches

2.  Cut out the shape of a whale tail from a piece of cardboard.  Cut out a small slit at the end of your tail.  Cut out a similar slit in the center of one of your smaller cardboard pieces.  Make sure the tail slides snugly into the rectangle.  

3.  Glue your four rectangular pieces together to create the sides of your tissue box holder.   (I used tacky glue and packing tape to securely attach the pieces together.)  Then, slide the whale tale in and tape it down as well.


 4.  Measure the top of your creation and cut out another rectangular piece of cardboard to place on top.  Cut out a rectangle where your tissues usually come out.

(I made my top rectangle 5 inches by 9 1/2 inches.  It was slightly too narrow, but I used it anyway because I ran out of cardboard.)


5.  Paint your box.  Then, give it a couple of coats of Mod Podge to protect your paint job.

Enjoy!

Thursday, February 7, 2013

DIY Eggshell Sidewalk Chalk

Yes. You read the title correctly.  Last week I tried making sidewalk chalk out of eggshells... and it worked!  Here's the proof:

DIY Eggshell Sidewalk Chalk


how to make sidewalk chalk with eggshells


This post contains affiliate links.  Thank you for your support! 


DIY Band- Aid heart nail stencil

I may not look like a girly girl on the outside.

I don't wear makeup.
My daily outfit usually consists of a pair of jeans and purple Converses.
My hair is usually in a ponytail or messy bun because I haven't gotten a haircut in over a year.

But here's a little secret- I'm a bonafide girly girl on the inside.

I dream of wearing sparkly shoes, bright red lipstick, and lovely polka dot vintage dresses with peter pan collars.  I'm also an unabashed fan of YouTube beauty gurus.  I could spend hours watching them talk about beauty and fashion products.

Strange right?  Hopefully one day I can figure out how to balance out my inner girly girl with my outer plain jane.

Anyway,  I just brought this up because I wanted to show you a neat trick that I learned from the mega talented Michelle Phan.   Did you know that you can use band aids as nail stencils?    (Click here to watch her tutorial.)  


Directions:
1.  Cut off the two end bits from the band aid.  Toss out the middle white pad.
2.  Fold each end bit in half and cut out a tiny heart.  Make sure the heart is smaller than your nail. (This was surprisingly hard for me to do.  I had to cut up a lot of Band-Aids to get two hearts small enough to fit my large thumbs.)
3.  Stick the Band-Aid to your nail and rub it to make sure that it's stuck on tight.
4.  Paint over the heart.
5.  Take a deep breath and quickly rip the band aid off.

Voila! Enjoy your hearts.


Tuesday, February 5, 2013

Make marbled paper with shaving cream

Look at what Baby Chuck and I made the other day: 


No, it's not a Rorschach test.  It's a piece of marbled paper.  And guess what?  We made the marbled effect using shaving cream and acrylic paint.  Pretty right?  I think we'll use it to make some Chinese New Year envelopes... or hubby's valentine.  I'm not sure yet  Hmm..

If you'd like to make your own marbled paper, keep reading:  (Original recipe found here)

Materials:
- baking tray
- heavier weight paper (we used watercolor paper, but I think card stock would be good too)
- craft paint (or maybe food coloring would work too?)
- shaving cream (white foam kind)
- old towel
- ruler/ unused credit card

Directions:
1.  Prep your area and child.  Decide where you want to do the activity.  Set up the materials beforehand.  Cover your work area with something to protect it.  Decide where you want to place the papers to dry.  Place a towel near you so that you can easily wipe your hands. Place your ruler / unused credit card near you for easy access.  (This is a pretty messy activity, so I recommend you plan things out first.)

2.  Make sure your piece of paper is smaller than the baking  tray.

3.  Spray your shaving cream into the baking tray.  Use your hands to smooth it around so that you have a nice even layer.

4.  Add in random lines of craft paint.  (We chose reds and yellow, but you could do all sorts of colors if you want.)

5.  Use your fingers to swirl the paint around.  (Note- You don't want a big blob of color.  It looks prettier with swirls).

6.   Place your paper into the tray so that it comes in contact with the shaving cream/ paint mixture.  Lift the paper up.  Wipe the excess shaving cream off the sheet with your ruler/ unused credit card.  Don't let the shaving cream sit too long on the paper, otherwise your paper may get soaked and rip.

(Isn't it neat?  Any parts of the paper that came in contact with the shaving cream will remain white while the parts that came in contact with the paint will get colored.)

7.  Let your beautiful sheets dry.  (Added bonus:  They'll smell shaving cream sweet.)

(Sorry I didn't take any photos of the process.  Chuck and I had fun doing the activity, but I had to keep a close eye on him so that he wouldn't eat the shaving cream.... or wipe it on himself or our couch.)


Update:   I ended up making Chinese New Year envelopes out of the paper.  They're unexpected, thrifty, and lovely.


Sunday, February 3, 2013

Crapty marshmallow poppers

Did you watch the game? Wasn't it a nail biter? I'm a once-a-year football watcher and even I couldn't tear my eyes away.

Since it was Baby Chuck's first Super Bowl experience, hubby and I tried to make the experience special. We were going to have a small Super Bowl watching party, but then hubby ran into a couple problems at work... and we had to cancel. So we ended up watching the game, just the three of us.

To help make the game a bit more toddler-friendly, I crapted these marshmallow poppers. We had fun using them to shoot marshmallows across the room and at our crapted field goal.


Materials:
Exacto knife / scissors
- Yogurt container
- Balloon
- Packing Tape
- Marshmallows

Directions:
1.  Cut out the bottoms of your yogurt containers.


2.  Cut off the top of your balloon (about 1/2 an inch), and then tie the other end into a knot.

3. Stretch the balloons over the larger opening of the yogurt container.  Use packing tape and tape the balloon down to the yogurt container.

4. Enjoy your poppers.

Now, to shoot your poppers, just
1.  Drop a marshmallow into your popper.
2.  Pull the knot back to stretch out the balloon.  Let the marshmallow roll into the indentation created in the balloon.
3.  Aim
4.  Let go of the knot and watch your marshmallow soar.

(Alternatively, you could also just use the popper to shoot air balls at each other.  It's amazing how strong these little guys are!)


Can you see the little white circle above the truck?  That's not an unidentified flying object.  It's a marshmallow!


Wednesday, January 30, 2013

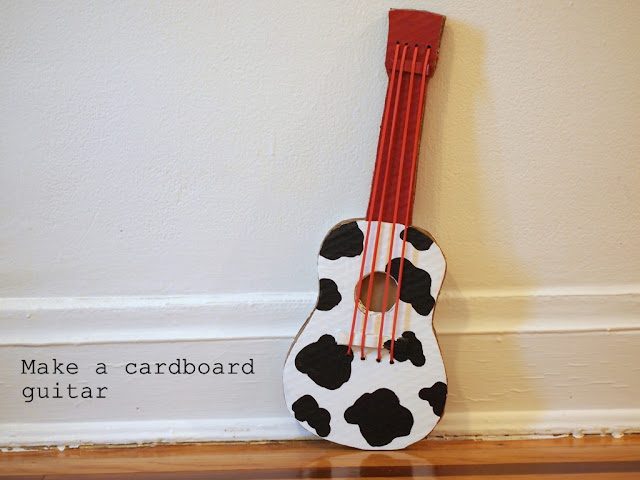
Make a cardboard guitar

Whenever I play the guitar, Baby Chuck seems keen to join in.  He pulls on strings, turns the tuning keys, and inevitably drops picks (and possibly raisins- ick) into the body.  I figured he'd like his own guitar, so I made him this black and white cutie.  It's the size of a ukulele.

(Why cow print?  Well, whenever we ask him "What does a cow say?" he responds "Mmm mmm."  Then we always cheer because that's close enough for us.)

Want to make your own guitar?  Read on!

DIY Cardboard KidsGuitar

how to make a cardboard guitar for kids

(Disclaimer:  I got the template and directions from Make It and Love It.  They wrote a really comprehensive set of directions packed full of lovely photos.  Check out their post for detailed directions and cute kid pics.  I'm posting up this set of directions because I did things slightly differently.)

(Disclaimer 2:  This project takes a long time.  Crapting helps me to relax, so I didn't mind.)

Materials Needed to Make a DIY Kids Guitar

- Already cut out and assembled guitar template (follow her directions on how to resize, cut, and assemble pieces)
- Exacto knife
- Aleene's tacky glue (you'll need something stronger than Elmer's, hot glue didn't quite work for me)
- Scissors
- Nice cardboard (no bends or stains) <-- crap
- Ruler
- Drill
- Paint, paint brushes, Mod Podge
- 4 jumbo 7 inch rubber bands (purchased at Staples)
- 2 paperclips (I used jumbo sized ones, but I think 1 inch ones would work too)
- heavy books

Directions to Make Your Own DIY Cardboard Guitar:

1.  Trace and cut out 4 guitar pieces out of your cardboard:

  • 3 full length guitar cutouts (with holes cut out of the center of them)
  • 1 body only guitar cutout (cut your template at the dotted line and just trace out the bottom portion)


2.  Glue together two of your full length guitar pieces.  Now you have a nice sturdy  base.  (You don't want your rubber bands to bend the cardboard.)

3. Cut out 4 rectangles out of cardboard:

  • 2 larger rectangles- approximately 3 inches x 1/4 inch
  • 2 smaller rectangles- approximately 1 3/4 inches x 1/4 inch

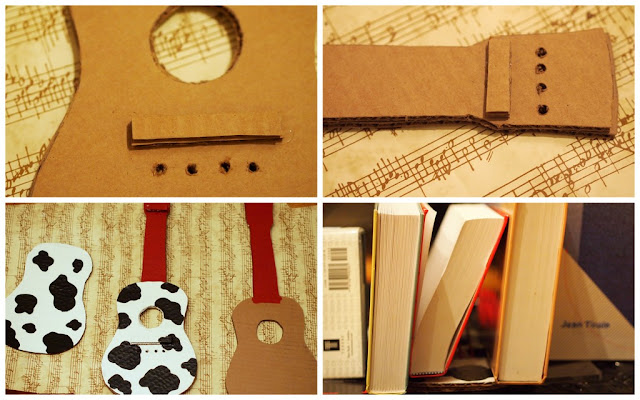
4.  Glue your two large rectangles, one on top of each other, about 1 inch below the cutout circles on your previously glued together guitar cutouts.  Glue your two smaller rectangles, one on top of another, around the neck of your previously glued together guitar pieces.


cut out cardboard guitar shapes

5.  Now it's drilling time. (Aka- Time to call hubby because drills totally freak me out.)  Drill four holes approximately 1/3 inch below your larger rectangles and about 1/2 inch above your smaller rectangles.  Honestly, the measurements aren't that important.  You can just eyeball it.  Just make sure that (a) your holes are evenly spaced and (b) four rubber bands could potentially be strung from one set of holes to the other.  Oh yeah, when drilling the holes on the head of the guitar, try not to place the end holes too close to the edge of the cardboard.  Otherwise your rubber band will periodically slide off...

6.  Now it's painting time (Aka- Let's get funky and creative!)

  • Completely paint one side of the smaller guitar body  (I painted it cow print)
  • Completely paint one side of your glued together guitar cutouts.  (I painted it red and cow print.) 
  • Paint the neck of your third guitar cutout (That's the only part that will be showing in your final product
Once your paint dries, apply Mod Podge to protect your lovely work.  Let Mod Podge dry.

7.  You may notice that your cardboard starts bending.  This isn't good because it will prevent your cardboard pieces from properly sticking together.  Don't worry!  Just use some heavy books to flatten your cardboard out.  (Sadly, my two previously glued together guitar pieces were coming undone.  I reattached them by squeezing in more glue between the crevices.)  Let glue dry.


drill, paint, and complete your DIY cardboard guitar toy for kids

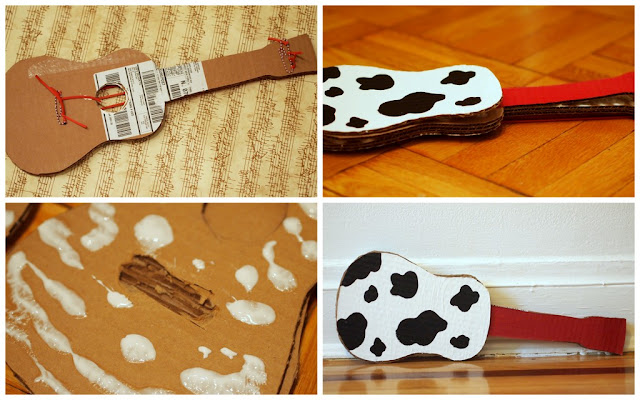
8.  Now let's string the guitar!  Cut your four jumbo sized rubber bands to make four long strands.  Double knot each rubber band to a paperclip.  Then, string your four strands through the holes in the neck of the guitar.  Pull to make sure that your paperclip sits flush against the cardboard.  Pull those strands down one by one through the holes in the body of your guitar.  Double knot the strands to another paperclip.  (I had some problems tying my middle rubber bands to the paper clip, so I just double knotted them to each other.)  Trim all your excess rubber band bits.

9.  Make four small indentations in your cardboard rectangle bits (on the front of the guitar) to keep rubber bands in place.

10.  What? Aren't we done yet?  No way. Crapting is not for the weary. Time to cover up the ugly rubber band ends and paper clips.  Spread a thick layer of glue on the back of your newly strung guitar and glue on your third full guitar piece.  Make sure the painted neck is shown.  Apply pressure to make sure the pieces stick together.  Then, glue on your small guitar body on top of that.  Again, apply pressure.

11.  Note:  I found that my pieces wouldn't stay glued together because my jumbo paper clips were pretty thick.  If you find yourself with this problem too, you may need to cut out two "wells" in your cardboard so that the paperclips have a nice place to rest.  Then your cardboard pieces should sit nicely together.

12.  Enjoy and rock out.

how to make a DIY cardboard guitar for kids


And here are our two new cardboard instruments:
(Click here for directions to make a cardboard rattle-drum.)
DIY cardboard instruments kids craft

Phew.  I'm exhausted.  Time for bed.  Goodnight!

Tuesday, January 29, 2013

Make a rattle-drum

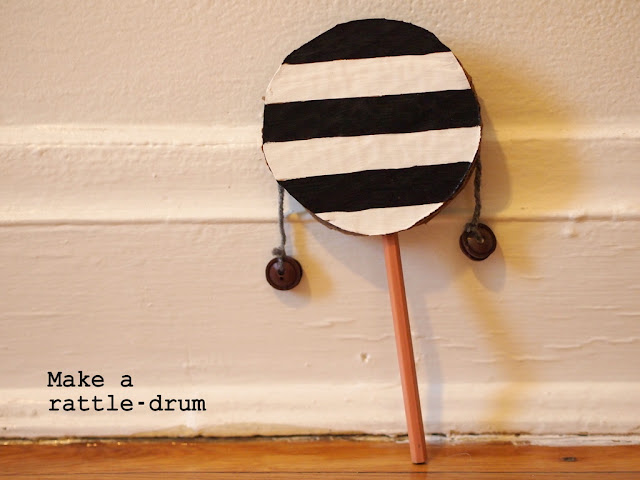
Chinese New Year is quickly approaching.  To help get us in the mood, I made this rattle-drum for Baby Chuck using directions I found in a book of crafts. Do you like the black and white?  I chose those two colors to give it a modern look.

DIY Musical Instrument:  Cardboard Rattle-drum


make a cardboard rattle drum musical toy for kids

Wanna make your own?  Here's how I did it.