Showing posts sorted by date for query summer. Sort by relevance Show all posts

Monday, June 24, 2013

Make a Corn Husk Doll

Today we're going to be making a corn husk doll!  I love Summer time because it means that two of my favorite  foods (watermelon and corn) are stocked in stores and super cheap.  Yum, yum!  Lately we've been eating a lot of corn.  Too lazy to stand over a boiling pot of water, I just throw them in the oven (husks, and all) and roast them for about an hour.  Deee-licious.

Even though I really enjoy eating corn, I'm always slightly disturbed at the end of the meal.  Have you ever noticed just how much we toss out once we're done with the corn?  Those corn cobs and husks are quite heavy and take up a lot of space  in comparison to the tiny yellow kernels 

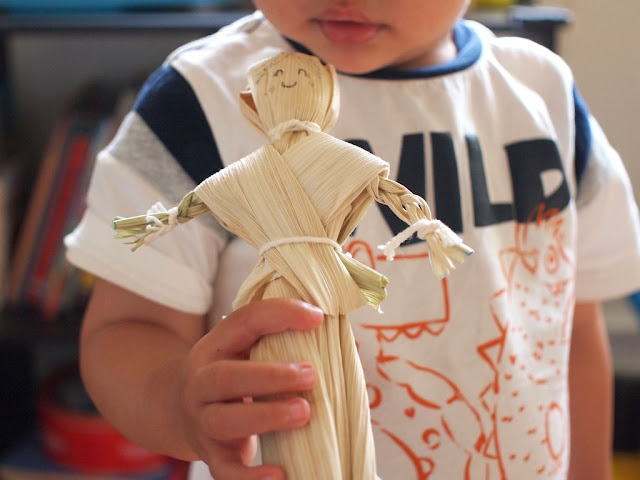
So, I thought I'd try making something from the castaway bits.  Here's my little corn husk doll.

Corn Husk Doll

how to make corn husk doll


Materials to Make Corn Husk Doll:

- Corn husks (I used corn husks from about 5 ears of corn.  But note-  since I roast my corn, I was only able to get a couple leaves from ear.  You could probably do it with fewer ears if you use up all the leaves.)
- Yarn
- Scissors
- Paper towels
- Baking pan 
- Shallow Pan
- Sharpie marker
- Water

Directions to Make Corn Husk Doll:

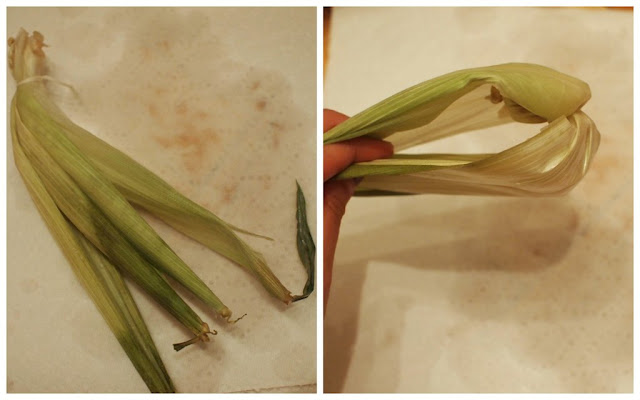
1.  Rip off the leaves from your corn.  Set them out to dry.  (We live in an apartment, so I just placed them on a baking dish near a sunny window.  After a couple of days they just shriveled up.)  Note:  If you make the dolls with the green leaves, all your bindings will come loose once the leaves start shriveling up and drying.

2.  Once your leaves dry, re-hydrate them in a  bit of water.  (It took my leaves about half an hour to plump out.)
steps to make a corn husk doll

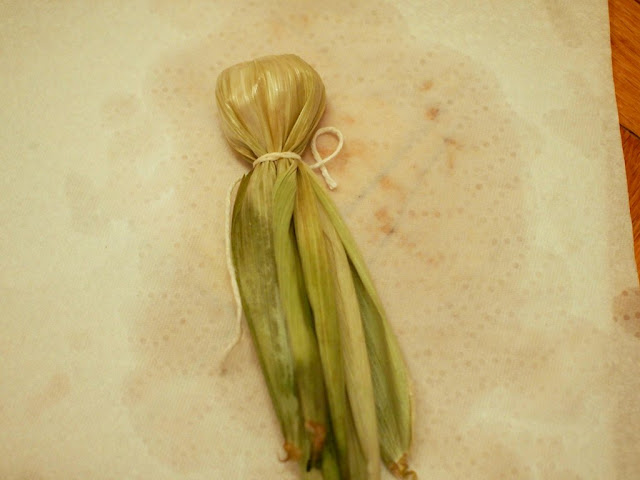
3.  Now you're going to make the head and the body.  Pick out 4-5 nice large leaves.  Tie them tightly together with a bit of yarn.  

4.  Flip the leaves over your yarn.  
steps to make corn husk doll head

5.  Straighten out the leaves and then tightly tie a piece of yarn to make your head.  (Make sure that the leaves are smoothed out and  cover each other.  Try not to have any gaps where the yarn is visible.  I wasn't too careful and my poor doll's head had a bit of gap once the leaves started drying again.)
completed corn husk doll head

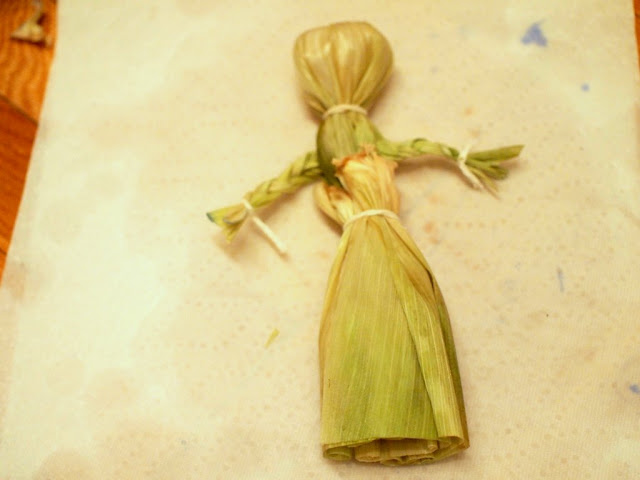
6.  Now you're going to make the arms.  Find another nice large leaf.  Cut two slits on one side of the leaf.  Then, cut two slits on the other side of the leaf.  Braid both sides and secure the braids with bits of yarn.   Trim off the ends.
how to make corn husk doll arms

7.  Open up your doll's body and slide the braided arms in.  Tie another piece of yarn to create the waist and hold the arms in.  completed corn husk doll arms

8.  Now you're going to make a skirt.  Take a bunch of nice big leaves and wrap them around your doll's waist.  Tie these leaves to the waist with another piece of yarn.  Then, trim off the the ends of the leaves to create the skirt.  (If you wanted to give your doll pants, you could also just split your leaves up into two piles and tie those off to create trousers.)
corn husk doll skirt

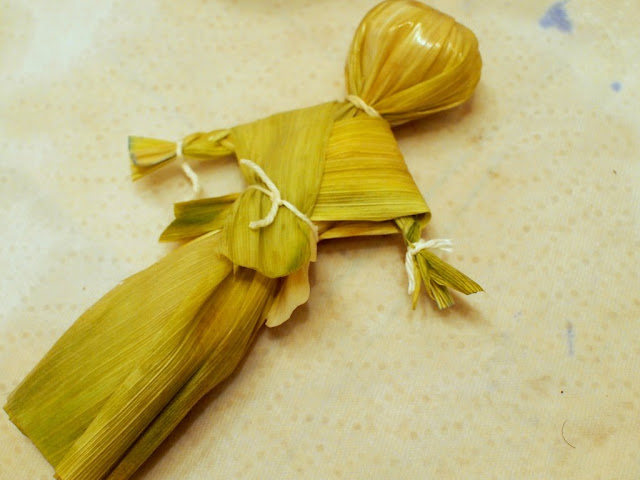
9.  Now you'll create a shawl for the doll (which will help cover the ugly waist bit.)  Take two nice leaves and criss-cross them over and behind the dolls body.  Tie off your leaves with yarn.  Trim any excess bits.  
completed corn husk doll

10.  Now you've got yourself a doll.  Once the doll dries, use a Sharpie marker to draw a face on it.  Voila.  Now you've got your very own corn husk doll.
how to make a corn husk doll


Not sure if Chuck was a big fan of the doll, but I enjoyed the experience of taking something destined for the garbage and giving it a second life.

For more information on making corn husk dolls, check out these three great resources: GardenMama blogAcorn Pies blog or this YouTube video  They really helped me to figure everything out. 

Happy crapting!

Wednesday, June 19, 2013

What's up, Chuck?

Warm, sunny weather is finally here... and we are loving it.  I forgot how much I missed the sunshine.  Here are some photos from a recent outdoor play date with friends.  We spent the morning eating, chatting, and splashing in the water.

It's times like this that I wish summer would never end.


Hope you have a wonderful weekend.  See you on Monday!

Friday, May 24, 2013

DIY Scalloped Jean shorts

DIY Scalloped Jean Shorts


It's Memorial Day Weekend.  How are you going to celebrate?  We're going to eat burgers, attend a wedding, and nap.... a lot.  (<--If Chuck lets us... that is...)  Inspired by all the lovely lazing about that I hope to be doing next week, I made myself a pair of comfy scalloped jean shorts from a pair of old jeans:

DIY Scalloped Jean Shorts


(This post contains affiliate links.  Thank you for your support!)

Thursday, May 9, 2013

Two days in New York

This past week I got a chance to tour Manhattan for two whole days.  (!!!!)  Hubby took me around town to celebrate my birthday (yay!) and then I showed our aunt around town another day.  It was such a nice treat to wear my "nice" clothes (aka non-mommy-stained-t-shirts) and see the city I love.

Here are some photos from my New York adventures:
Delicious breakfast at Cafe Lalo (famous from the movie "You've got mail.")

Sneakily taking a photo during a wedding photo shoot at Central Park's Bethesda Terrace

One of my travel companions


Fresh flowers at Union Square Farmers Market
Ethiopian food served at Massawa Ethiopian Restaurant

No idea where I shot these flowers, but I love them because they remind me of an old painting
Best. Popsicle. Ever.  (People's Pops on the High Line)  I left feeling inspired to re-try popsicle-making this summer
Beautiful mural seen on the High Line

Three Pie Face meat pies. Yurrrmmy.


Tiny New York City from Pink Stripey Socks on Vimeo.

Wednesday, April 24, 2013

String art thread and milk jug necklace

Spring is here!

I love feeling the warmer temperatures and seeing the trees bursting with delicate pink and white blooms.  And I don't know about you, but I can't wait to exchange my dark, winter wardrobe for a lighter, more colorful one.

Inspired by the warmer weather and this gorgeous necklace from Modcloth, I welcomed the new season by crapting a wearable, string art necklace out of two materials:  a milk jug and embroidery thread. 

Materials:
- empty milk jug, cleaned and dried
- scissors
- hole puncher
- 2 colors of embroidery thread
- Sharpie marker


Thursday, August 23, 2012

Hungry Caterpillar party prep: DIY Number Pinata

I just realized this week that September is right around the corner.  Eek!  Summer is slipping through my fingers.  Nooo!

Baby Chuck's birthday party is almost here.  I have all these marvelous DIY plans dancing in my head, but I have yet to fully complete one.  Fortunately, Kim is super crafty and creative.  I'm mucho thankful that she was able to help out.  

Here's our first birthday party project:  The pinata! Ole!  (Note:  I've never hit a pinata before, but the whole idea seems very fun.  What? You get to hit something with a big stick?  And it's ok?  And it spits out candy?  Sign my kid up!)  After looking through pages and pages of pinatas, I skipped the paper mache route in favor of cardboard (using this awesome set of directions).  I'm not sure how sturdy the structure will be since we used flimsy cereal boxes.  Luckily, only a couple of young kids will attend our party, so I think it'll be ok.  *Crosses fingers*

I'm not going to lie.  It was loads of fun to make, but it took a looooong time.  We could only work at night when Baby Chuck was sleeping.  (Unfortunately, that meant that we were both also exhausted too.)  Having Kim as my slave helper really helped.   If you were to try this project, I recommend that you get yourself a Kim too.

Here are some photos from our efforts:

I added thicker cardboard to reinforce my flimsy ones.


This was all we were able to accomplish the first night.
Note the ice-cream in the background.  We needed to keep our energy up.


We started from the bottom and then slowly worked our way up.

Delirium sets in.

This is all we accomplished the second night.

And then when I work up the next morning , our pinata was magically completed!  Just kidding, we finished it after another night of work.


Now I just have to fill this baby up and then we can see it in action. 

Wednesday, August 22, 2012

We like to party

During the Summer, our town hosts small Sunday get-togethers in the park.  They serve free food and drinks.  Plus, they hire a dj to play music.  Week after week I kept meaning to go but something always came up.  This past Sunday Kim, Baby Chuck, and I finally joined the festivities.  It was  a lot of fun.  We ate delicious food, people-watched to our heart's content, and even got roped into a little dancing.

Boy oh boy, West New Yorkers sure know how to party!


Love em and leave em from Pink Stripey Socks on Vimeo.

Wednesday, June 6, 2012

Bucket list- Berry picking

A couple of days ago, I helped a friend weed and harvest strawberries from her backyard garden. 


They were delicious and tasted like summer.

Wednesday, May 30, 2012

DIY-Sharpie dye your clothes

I've always wanted to learn how to tie dye properly.  I tried to do it once way back in elementary school, but ended up with a light grey stained shirt.  (We were going for bright purple.) 

Now that summer is showing off her vibrant hues, I once again felt inspired to try this colorful art form.  Some quick researching online showed that people were actually using Sharpie markers to dye their shirts!   The method was so simple and I had all the materials at home.  Score!  So, I decided to give this craft a try. 

Here are the materials that I used:


Here's what I did: 
  1. I placed a piece of cardboard inside my shirt so the marker wouldn't seep through.  (I only wanted one side of my shirt dyed.) Note:  You could probably also use a plastic bag too. 
  2. I channeled my inner artist and began doodling on my shirts.  Note:  I used old markers which didn't have much ink in them.  I recommend using juicy, new, fat markers.  Then you can put more ink on the shirt and get a better effect.      
  3. I stretched my t-shirt over a baking pan to catch the alcohol.  Note:  Again, you could probably just do this part with a plastic bag.
  4. I used my dropper to drip alcohol onto my design.  A couple of drops was all it took to make the marker bleed. 
  5. I let my shirt dry.
  6. I ironed my shirt to set the colors.  (Note:  This didn't work because the colors still bled when I hand washed the shirts.  Other people suggested placing your shirts briefly in the microwave or dryer.)
  7. I hand washed my shirts.
 Want to see the results?
Here's my first attempt:
My inspiration came from beach waves and fourth of July fireworks.
The design reminded hubby of a dental x-ray.
Hmm... crafty or crappy?  Not sure if I'm digging my design...


And here's my second attempt:  (This time I tried something simpler.)  

All in all the method worked relatively well.  The colors were vibrant and reminded me of watercolors.  But, the markers bled during my hand washing, resulting in staining on the back of the shirts.  Also, the rubbing alcohol and markers smelled A LOT.  So just be sure to do this in a well ventilated room!

Have you tried using sharpies to dye your clothes?

Tuesday, April 17, 2012

Bucket List: Meijer gardens

Since we're leaving Holland this Summer, hubby and I created a bucket list of things we wanted to do before returning back East.  One of Hubby's wishes was to visit the Meijer Gardens and see the butterflies.  We went this past weekend and really enjoyed seeing the butterflies and flowers.  By the end of the day we were all tuckered out.


Although Baby Chuck enjoyed seeing those butterflies, he really enjoyed seeing these lovely gals.

Meijer gardens- check!