Christmas is right around the corner! And while we've yet to decorate the house in Christmas decor, I've already started dreaming of fun Christmas crafts to do with the kids. If you're looking for an easy printable that kids can color and fold for the holidays, this agamograph is it! This would make the perfect quick after-school activity, library activity, or classroom activity. Download the free sheets below and enjoy!
Showing posts sorted by relevance for query Christmas. Sort by date Show all posts
Showing posts sorted by relevance for query Christmas. Sort by date Show all posts
Thursday, November 17, 2022
Tuesday, December 3, 2013
Make mini Christmas trees from Pipe Cleaners and Cardboard
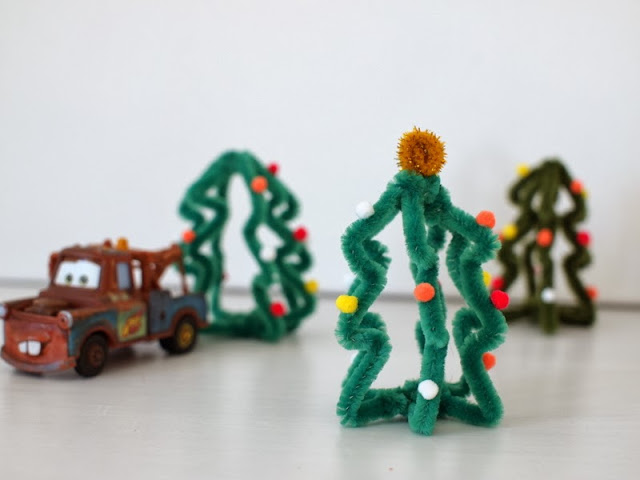
Yesterday I shared how I made a miniature Christmas village out of plaster of paris. Today I just wanted wanted to show how I quickly made these uber cute cardboard and pipe cleaner Christmas trees for my village.
(And if you like these trees, check out my tutorial for mini paint chip trees!
Directions:
Pipe Cleaner Christmas Trees
Materials:
Directions:
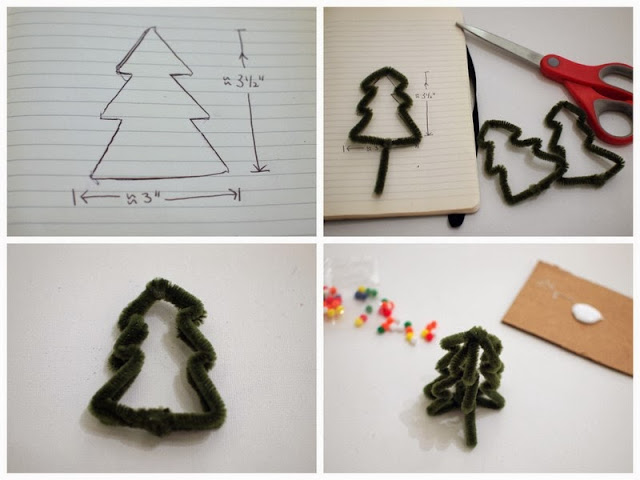
1. Doodle out a tree on a piece of paper.
2. Bend a green pipe cleaner around your doodle. Wrap both ends together to secure your tree. Trim excess bits off. Repeat this for all three tree shapes.
3. Tie the three trees together by wrapping the tops and bottoms together with pipe cleaner.
4. Gently separate the branches and glue small pom poms on with tacky glue.
That's it! Happy crafting! (Chuck was the artistic director for this photo shoot. Can you tell?)
(And if you like these trees, check out my tutorial for mini paint chip trees!
Cardboard Christmas Trees
Materials:- Cardboard
- Cutting Mat
- Pattern (see below)
- Pen/pencil
- Exacto knife
- Scissors
Directions:
- Print out the template to make one large and one small tree.
- Cut out the Christmas tree parts.
- Trace them onto cardboard.
- Cut our your parts with an exacto knife.
- Slide both pieces together and you've got yourself a mini tree!
Pipe Cleaner Christmas Trees
Materials:
- Paper
- Pen
- Scissors
- Pipe cleaners (three per tree)
- Pom Poms
- Tacky glue
Directions:
1. Doodle out a tree on a piece of paper.
2. Bend a green pipe cleaner around your doodle. Wrap both ends together to secure your tree. Trim excess bits off. Repeat this for all three tree shapes.
3. Tie the three trees together by wrapping the tops and bottoms together with pipe cleaner.
4. Gently separate the branches and glue small pom poms on with tacky glue.
That's it! Happy crafting! (Chuck was the artistic director for this photo shoot. Can you tell?)
Sunday, December 30, 2012
A few Christmas photos
Let me just start this post by saying that I had intentions to take tons and tons of photos during Christmas. But, I didn't touch the camera once.
Surprised? Me too.
I just enjoyed spending time with family.
I was also so happy to see Baby Chuck surrounded by people who loved him. Seeing him laughing and smiling and giving sloppy wet kisses to his relatives? Those were definitely my favorite Christmas memories from this year.
Now for those of you who still want to get a glimpse of our Christmas, hubby luckily snapped some shots of our yummy meal. Here's what he captured:

Wow. What will they think of next?
I'm such a dork. I spent at least half an hour staring into the Christmas lights and rocking my head back and forth just to make the snowmen dance. Ah-maaaa-zing I tell you. Ah-maaaa-zing.
The lights also gave me an idea for a craft that I wanted to try...so stay tuned.
And now I will conclude this post with a quote from my very wise friend Alice-
"May this season be bright and lovely as we celebrate the God who sees fit to greet us as a child and to send angels and songs to us on all our dark nights."
Hope you had a wonderful relaxing, and refreshing holiday break as well.
Surprised? Me too.
I just enjoyed spending time with family.
I was also so happy to see Baby Chuck surrounded by people who loved him. Seeing him laughing and smiling and giving sloppy wet kisses to his relatives? Those were definitely my favorite Christmas memories from this year.
Now for those of you who still want to get a glimpse of our Christmas, hubby luckily snapped some shots of our yummy meal. Here's what he captured:

Oh yeah, here's one more funny memory. Our aunt and uncle also gave us a pair of glasses that would create snowmen shapes out of Christmas lights. You just put on the glasses and stare into the Christmas lights. Then, presto! The lights magically turn into snowmen ligths. Cool, right?
 |
| Left: Normal Christmas lights Right: Christmas lights transformed into snowmen |
Wow. What will they think of next?
I'm such a dork. I spent at least half an hour staring into the Christmas lights and rocking my head back and forth just to make the snowmen dance. Ah-maaaa-zing I tell you. Ah-maaaa-zing.
The lights also gave me an idea for a craft that I wanted to try...so stay tuned.
And now I will conclude this post with a quote from my very wise friend Alice-
"May this season be bright and lovely as we celebrate the God who sees fit to greet us as a child and to send angels and songs to us on all our dark nights."
Thursday, December 20, 2018
How To Cut Christmas Nativity Snowflakes
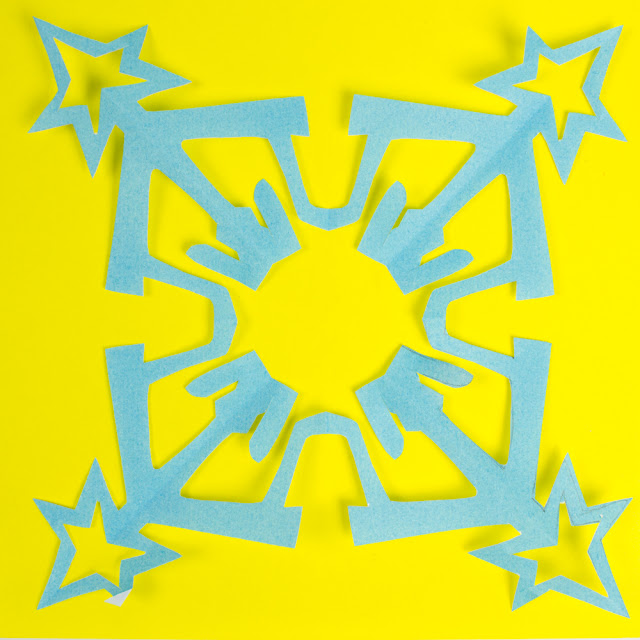
Today I'm sharing the final snowflake craft of the year! I'm taking a short break over Christmas and thought I'd leave you with one final snowflake design. These nativity snowflakes are really simple and pretty. They're a great way to celebrate the season.
This post contains Amazon affiliate links. This means I make a small portion off of any purchases made through the links at no additional cost to you. Thank you for the grocery money! For my full disclosure policy, click here.
How To Cut Nativity Snowflakes
This post contains Amazon affiliate links. This means I make a small portion off of any purchases made through the links at no additional cost to you. Thank you for the grocery money! For my full disclosure policy, click here.
Wednesday, November 9, 2016
25 STEAM Christmas Activities (Book and Coloring Page!)
Looking for ways to encourage kids to tinker, create, and explore this holiday season? How about 25 awesome STEAM Christmas activities?

This post contains affiliate links. Thank you for the grocery money! For my full disclosure policy, click here.
This post contains affiliate links. Thank you for the grocery money! For my full disclosure policy, click here.
Wednesday, December 3, 2014
Free Christmas Coloring Sheets
I've been seeing lots of beautiful Christmas coloring sheets online lately. I love doodling and wanted to make one for the blog....but things got pretty busy during the holidays. (Our Aussie family is visiting us AND I'm making paper Moravian stars for a friend's wedding!) So I didn't have a chance to doodle some coloring sheets till now.
These 2 coloring sheets contain ornaments (or gift labels) that the kids can color and then hang onto the tree.
Free Christmas Coloring Sheets
These 2 coloring sheets contain ornaments (or gift labels) that the kids can color and then hang onto the tree.
Tuesday, December 20, 2016
DIY Outer Space Planet Ornaments for Christmas
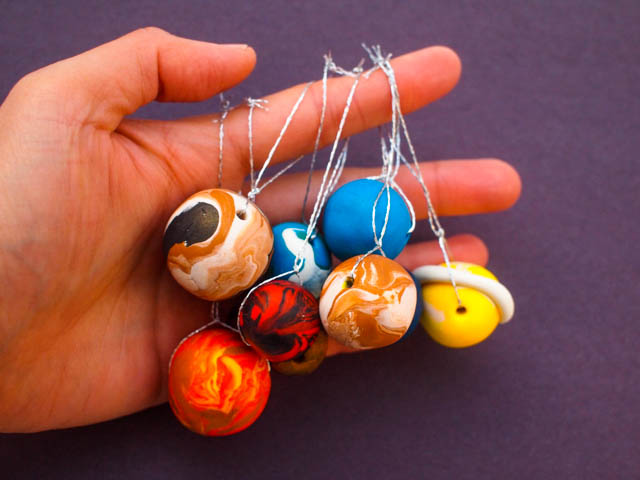
Christmas is right around the corner. Most likely your tree and home are already completely decorated. My deepest apologies, friend, but I'm throwing a wrench in your plans. (Muah ha ha ha!) Here's one last STEM inspired Christmas Craft that you'll want to try out this year. If you love space, you'll love making these Outer Space Planet Ornaments. (They're out of this world!)
This post contains affiliate links. Thank you for the grocery money! For my full disclosure policy, click here!
Monday, December 12, 2016
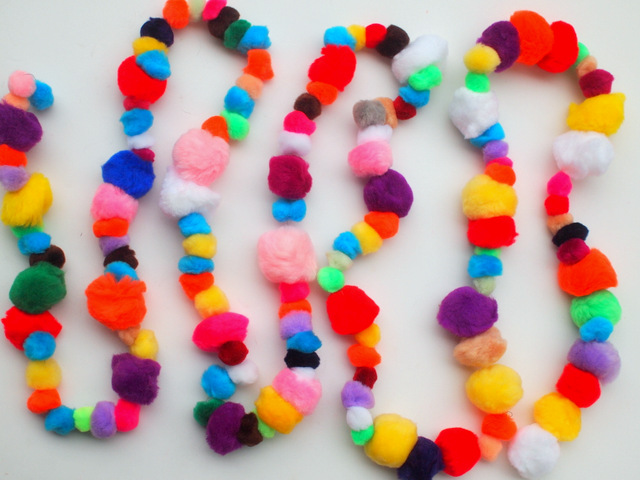
Easy, Colorful Pom-Pom Garland
If I had to choose one Christmas Craft to choose as my favorite this year.... this DIY Christmas Pom-Pom Garland is probably it. Seriously, folks. It's got all my favorite crafting elements. It's super easy to make. The materials are really affordable. And it's hyper colorful. I'm mean seriously.... is this not the cutest garland ever?
Sunday, December 4, 2016
Origami Paper Wreath Christmas Ornaments
This past weekend I remembered one more reason I love this time of the year. Holiday Craft Fairs! We visited two in one day and my craft-loving heart went pitter pat. I love seeing handmade items- especially ornaments! So today I'm mixing my love of origami crafts and Christmas Crafts with these fun, origami paper Christmas ornaments!
Sunday, November 21, 2021
Free Christmas Bird Coloring Sheet
Lately, I've been enjoying doodling and figured I'd share this sweet Christmas bird coloring sheet that I drew the other night. :) You can download it for free below and I hope that it brings you some happiness this time of year!
Cute Christmas Bird Coloring Sheet Printable
Monday, December 16, 2019
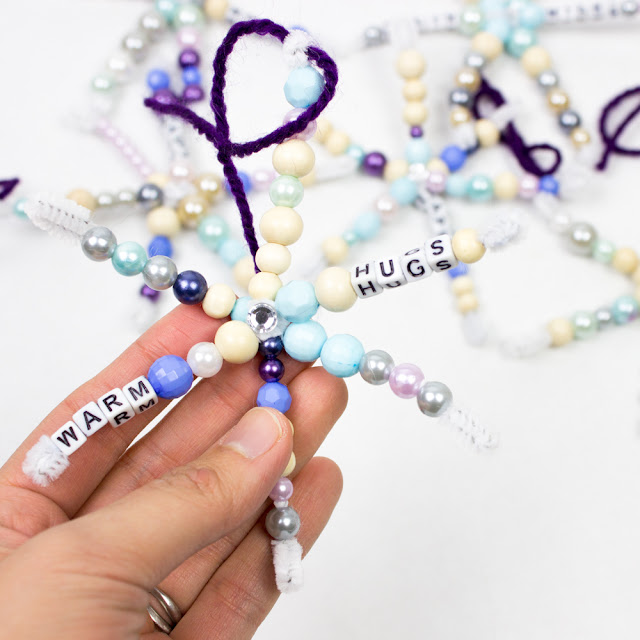
Beaded Pipe Cleaner Snowflakes... with Messages!
Just stopping in to share these super quick beaded pipe cleaner snowflakes that we made with a bunch of kids this past weekend. I know, I know, there are already a ton of posts out there sharing a nearly identical craft... but ours came out so cute, I had to share them! (Besides, who doesn't enjoy looking through a good homemade ornament post?)
How to Make Beaded Pipe Cleaner Snowflakes
(with messages)
Monday, November 24, 2014
Poppable Wrapping Paper (DIY Gift Wrapping Rockin' Art Mom Style!)
Are you looking for creative ways to wrap your holiday gifts? Well, today I've joined forces with fellow Rockin' Art Moms to share several imaginative and unique ways to wrap your holiday gifts! (So be sure to check out all the rockin' holiday ideas below!)
Because we always seem to have an abundance of bubble wrap lying around, I put our excess to good use and made this modern, poppable holiday wrapping paper!
I'm all about easy holiday crafts- like these paint chip Christmas Trees, easy DIY Reindeer Headbands, and mini pipe cleaner and cardboard Christmas trees. Today's wrapping paper idea is super simple, colorful, and fun! The recipient of your gift will get a kick out of popping the bubbles!
Because we always seem to have an abundance of bubble wrap lying around, I put our excess to good use and made this modern, poppable holiday wrapping paper!
Popping Holiday Wrapping Paper!
This post contains affiliate links. Thank you so much for your support!
I'm all about easy holiday crafts- like these paint chip Christmas Trees, easy DIY Reindeer Headbands, and mini pipe cleaner and cardboard Christmas trees. Today's wrapping paper idea is super simple, colorful, and fun! The recipient of your gift will get a kick out of popping the bubbles!
Monday, November 30, 2015
Milk Jug Santa Claus Craft
Got a milk jug lying around? Well don't throw that baby out! Instead, use it to make a recycled Christmas Craft! My preschooler and I recently turned ours into this cute
Milk Jug Santa Claus!
This post contains affiliate links. Thank you for your support!
Friday, December 5, 2014
Pin the Nose on Rudolph Game
Are you looking for a simple way to entertain the kids during the holidays? Well, today our Creative preschool group has 5 great Christmas activities to do with the kids!
Recently I shared the story of Rudolph the Red Nosed Reindeer with Chuck. He seemed to like Rudolph a lot, so I whipped up this super easy Pin the Nose on Rudolph game from us to try out.
Recently I shared the story of Rudolph the Red Nosed Reindeer with Chuck. He seemed to like Rudolph a lot, so I whipped up this super easy Pin the Nose on Rudolph game from us to try out.
Let's Pin on Rudolph's Nose!
Wednesday, November 25, 2020
Easy Pop-Up Christmas Snowman Card
Hi friends! We are busy here preparing for Thanksgiving. It will look different this year, but our family is trying to make the best of it. If you're looking for easy winter crafts to do with the kids, I'm popping in to share this cute pop-up Christmas Snowman card.
Isn't he adorable?
How to Make a DIY Pop-Up Paper Snowman Card for Kids
Monday, December 23, 2013
Holiday Train Show at Grand Central Terminal
One of the best things about this Christmas is that Hubby is off the entire week. Hooray! With all of his traveling last month, it's really nice having him around. I also especially love seeing Chuck and Daddy playing like best buddies.
This past weekend we finally got a chance to visit the Holiday Train Show at Grand Central Terminal. Even though it was pretty crowded, the display itself was enchanting. Everything was meticulously crafted and I kept "oohing" and "ahhing" over all the lovely details.
Here are some photos from our trip into the city:
 |
| The miniature taxis were too adorable! Can you spot the tiny Santa? |
 |
| As you can see, this little guy really wanted to get inside |
 |
| I loved seeing the sparkly Christmas light-night sky, King-Kong, and tiny, tiny nuns |
 |
| Ack! Look at that adorable mini Christmas tree! |
 |
| We then got some yummy gluten free pizza at Two Boots Pizza. I love this little guy's sweet kisses |
 |
| Since it was such a nice day, we walked back to our bus stop. On our way across town, Daddy and Chuck posed underneath the Bryant Park Christmas tree |
 |
| It's a family portrait. Can you find all of us? |
Wednesday, November 20, 2013
Geometric Popsicle Stick Christmas Tree Ornament Craft
Christmas tree ornaments? What?
Yurp. I know that we haven't celebrated Thanksgiving yet.... and this craft is for Christmas... but please bear with me. I was bored one night and began playing around with leftover mini craft popsicle sticks. After messing around with them for a bit, I came up with this easy, geometric looking Christmas tree ornament.
It was really easy to make, so if you like the design, the kiddos can certainly help out too. (Ooh. Did you notice the sequins? Bling bling!)
Here's what I did:
Materials:
Directions:
1. Cover your work area. Paint 18 of your popsicle sticks shades of green. Paint 4 of your popsicle sticks shades of brown. (I only painted the front and the sides of the sticks, but you might want to paint the backs too if your ornament is going to twirl around.)
2. Once your paint dries, begin hot gluing your sticks together. (I made sure to hot glue on top of parchment paper so my glue won't stick to my work surface. Cheapie crapter tip: You can reuse this parchment paper for other project too!) To ensure that my triangles looked the same, I made one triangle first, then traced the corners onto the parchment paper. I then used those corners as guidelines when hot gluing other triangles.)
3. Hot glue your "trunk" sticks on.
4. Hot glue your sequins onto the green triangles' corners.
Smaller versions would like nice as ornaments or strung together as a garland. Right now my bigger tree is just hanging outside of our door, waiting for December.
Happy Wednesday!
Yurp. I know that we haven't celebrated Thanksgiving yet.... and this craft is for Christmas... but please bear with me. I was bored one night and began playing around with leftover mini craft popsicle sticks. After messing around with them for a bit, I came up with this easy, geometric looking Christmas tree ornament.
It was really easy to make, so if you like the design, the kiddos can certainly help out too. (Ooh. Did you notice the sequins? Bling bling!)
Here's what I did:
Materials:
- Mini Popsicle Sticks (I used 22)
- Scrap paper
- Paint Brush
- Paint (Shades of green and brown)
- Hot glue gun
- Parchment paper
- Sequins
- String or ribbon
Directions:
1. Cover your work area. Paint 18 of your popsicle sticks shades of green. Paint 4 of your popsicle sticks shades of brown. (I only painted the front and the sides of the sticks, but you might want to paint the backs too if your ornament is going to twirl around.)
2. Once your paint dries, begin hot gluing your sticks together. (I made sure to hot glue on top of parchment paper so my glue won't stick to my work surface. Cheapie crapter tip: You can reuse this parchment paper for other project too!) To ensure that my triangles looked the same, I made one triangle first, then traced the corners onto the parchment paper. I then used those corners as guidelines when hot gluing other triangles.)
3. Hot glue your "trunk" sticks on.
4. Hot glue your sequins onto the green triangles' corners.
Smaller versions would like nice as ornaments or strung together as a garland. Right now my bigger tree is just hanging outside of our door, waiting for December.
Happy Wednesday!
Friday, December 27, 2013
Christmas Photos
Warning! This post contains a lot of photos! But, I figure it's ok since Christmas only happens once a year.
This year we went to two family get-togethers. We had lunch at one aunt's place and dinner at a cousin's house. Fortunately for us, both houses were only 5 minutes apart. We had a lot of fun hanging out with family and stuffing ourselves silly. Here are some photos from our Christmas adventure:
(Thanks hubby for taking most of these while I played with the kids!)
Click below to see more photos...
This year we went to two family get-togethers. We had lunch at one aunt's place and dinner at a cousin's house. Fortunately for us, both houses were only 5 minutes apart. We had a lot of fun hanging out with family and stuffing ourselves silly. Here are some photos from our Christmas adventure:
(Thanks hubby for taking most of these while I played with the kids!)
 |
| Hubby, Chuck, and I wearing our Christmas headbands, ready to party (thanks Tito Ric for the photo!) |
Click below to see more photos...
Friday, December 4, 2015
Easy Twig String Art Ornaments
Our tree is finally up! And since I love me some Christmas crafts, my son and I recently whipped up these lovely (and easy) string art twig ornaments!
Easy Twig String Art Ornaments
This post contains affiliate links. Thank you for your support!
Tuesday, March 3, 2015
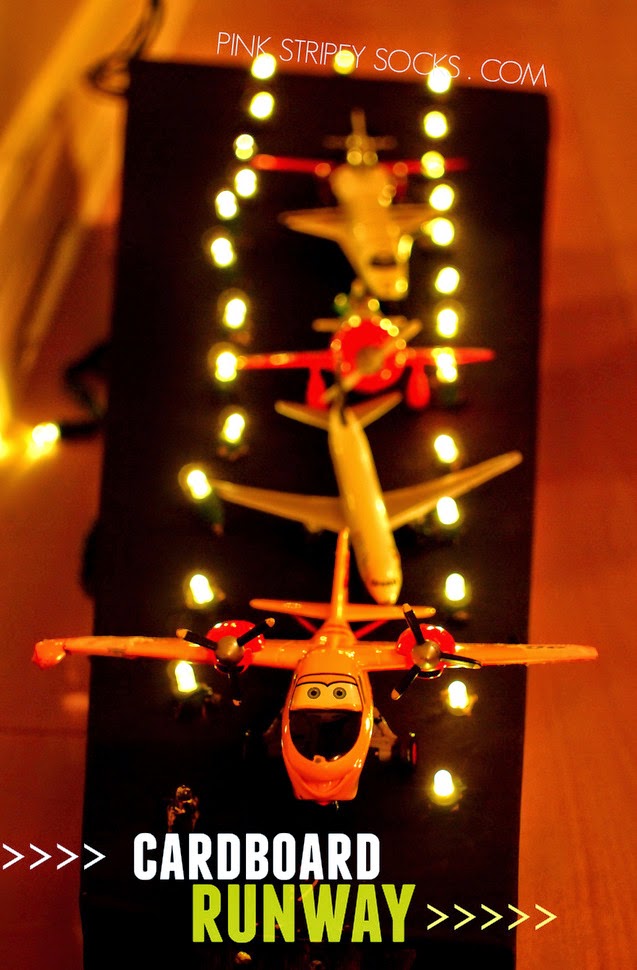
Cardboard Airport Runway
Ever since I saw Paging Fun Mom's pizza box airport, I knew I had to make one for Chuck. I mean, my goodness, what a neat way to use Christmas lights! So here's my version of a Cardboard Airport Runway.
I love this craft because it's made from an old box and some Christmas lights. Plus, we made it together as a family. Chuck and his dad drilled the holes together and I painted the box with him. (And I think it looks just as nice as any of these airplane runway toys . Don't you?)
Cardboard Airport Runway
This post contains affiliate links. Thank you for your support!
I love this craft because it's made from an old box and some Christmas lights. Plus, we made it together as a family. Chuck and his dad drilled the holes together and I painted the box with him. (And I think it looks just as nice as any of these airplane runway toys
Subscribe to:
Posts (Atom)


