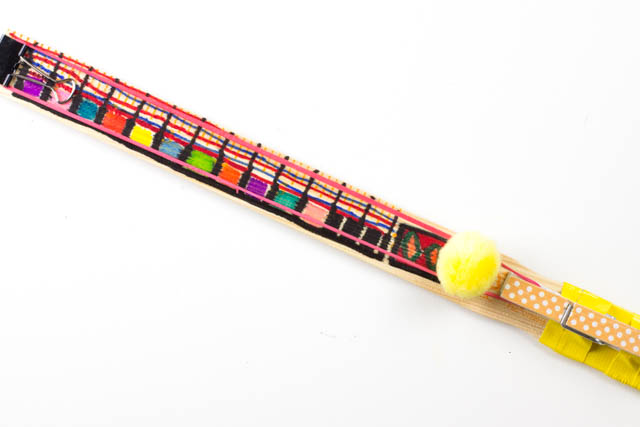
Lately my son has been obsessed with this DIY pom pom shooter. Not that I blame him. It's got a pretty sweet trigger. Simply press down on the clothes pin. The rubber band then releases, flinging pom poms into the air.
And you wanna know the best part about today's craft? You can make one yourself in less than 10 minutes. Cool right? Wanna know how? Keep reading to find out!
This post contains affiliate links. Thank you for the grocery money! Feeding 2 growing kids is no small feat. To read my full disclosure policy, click here.
Showing posts sorted by relevance for query felt. Sort by date Show all posts
Showing posts sorted by relevance for query felt. Sort by date Show all posts
Monday, March 20, 2017
Monday, August 15, 2011
Clothing modification surgery
Ever since we purchased the sewing machine, hubby and I dreamed of sewing bow ties. (Hubby loves wearing them to work, but they're so pricey to purchase!) This weekend we visited the thrift store, found a tie, and transformed* it.
*Please note: I felt like a mad Frankenstein-like scientist. Before this successful bow tie surgery two other patients died on our operating table. RIP tie 1 and tie 2. They were butchered in the name of fashion.
 |
| Did this ugly polyester tie know that it was destined for bow tie cuteness? |
*Please note: I felt like a mad Frankenstein-like scientist. Before this successful bow tie surgery two other patients died on our operating table. RIP tie 1 and tie 2. They were butchered in the name of fashion.
Monday, June 17, 2013
Make Grass Egg Heads and Grass Stocking Heads
This post brought to you by Miracle-Gro. All opinions are 100% mine.
I have a black thumb.
This past year I've already killed four plants. Sad, right? Apparently plants come to our apartment healthy and alive, and leave in garbage bags.
That's why I had basically given up on the idea of having any plant life in our apartment. But when I heard about Miracle-Gro's The Gro Project, I felt inspired to pick up my trowel and try again.
Here are my two small planting projects: Grass Egg Heads and Grass Stocking Heads (which remind me of Chia pets)
Materials:
- Miracle-Gro's Moisture Control Potting Mix
- Grass seeds
- Eggs
- Knife
- Safety Pin
- Googly eyes
- Permanent marker
- Glue
- Nude stockings
- Scissors
- Spoon
- Cup
Directions for making grass egg heads:
1. Using a safety pin, I poked a couple of holes (spaced far apart) in the bottom of my egg head. (I'm hoping these holes will allow excess water to drain out.) Using a knife, I gently tapped the egg where I wanted it to crack open. (This gave me a neater break.) Then, I poured out the egg's insides.
2. I rinsed out the eggs and set them to dry.
3. Once they dried, I glued on googly eyes and used permanent marker to draw a smile. (Permanent markers won't wash away with water.)
4. Chuck and I filled the egg heads with grass seeds and soil. Then, we watered the eggs and set them out near a sunny window.
Directions for making grass stocking heads:
1. I wrapped a stocking around a small cup to make it easier to fill.
2. Chuck scooped a bunch of grass seeds into the stocking. Then, we piled on the dirt.
3. Once the stocking was stuffed to our liking, I tied it closed and trimmed the excess material.
4. I glued on googly eyes and drew on a mouth using permanent marker.
5. Chuck watered the grass stocking head and we also placed it on a sunny windowsill.
Cross your fingers for us, ok? The potting soil that we chose is supposed to protect our seeds from over watering and under watering. I'm really hoping that we'll see lots of grass sprouting so we can give them hair cuts. (Hrrm.. a mowhawk perhaps?)
**Update- Guess what? They grew! We just spritzed the little egg heads and thoroughly soaked the stocking heads in water daily. Here's what they looked like after 2 weeks.
If you're interested in turning your thumb a bit greener, you can check out Miracle-Gro's Pinterest page for more fun garden projects.
((Many thanks to Miracle-Gro for sponsoring this post. It's my first sponsored post and I'm really thankful for this new opportunity.))
Thursday, April 26, 2012
DIY- Salt Dough Necklace Pt 1
I'm currently in the middle of purging. Maybe I'm in the mood for spring cleaning? Maybe I'm getting an early start on moving? Maybe I just like getting rid of stuff? Whatever the case may be, I'm tossing out stuff, donating stuff, and saving stuff for my first ever yard sale. (Yay for yard sales!) I've already tackled my now slimmed down stash of clothes and now I'm purging our food pantry.
We already got rid of several boxes of pasta awhile back because of our new dietary restrictions. However, I never had the heart to toss out all the wheat products. Case in point- I found a big bag of flour just sitting there in our pantry. What to do? We can't use it. Donate it? I feel strange offering a used bag of flour to friends. Toss it out? Bah, what a waste. What about crafting with it? I peeked around online and found a recipe to make beads from flour. You know me, I was intrigued and so I had to try it out.
Required ingredients:
- 2 cups flour
- 1/2 cup salt
- 3/4 cups cold water
(Note: The original recipe made a LOT of dough, so I scaled it back by half. I probably could have scaled it back even more because I still had way too much.)
Required materials:
- Baking sheet
- Bowl
- Measuring cups
- Wooden spoon
- Knife/ X-ACTO knife
- Skewer/Coffee stirrer
Optional materials:
- Food coloring
- Rolling pin
- Parchment paper
- Paper, pen, scissors
Here's what I did:
(1) I mixed the flour and salt together.
(2) Then, I mixed the water into the mixture.
(3) I kneaded the dough until it felt like play dough.
(4) I divided the dough into two balls. I added different food coloring to each ball and kneaded until the food coloring was evenly spread throughout. (Note: I semi-dyed my hands green in the process. Luckily the dye washed out after several washes.)
(5) I had dreams of making a big chunky necklace made up of big beads. So, I rolled the dough out into little snakes/logs and then grabbed off portions of the dough and rolled out uniformly shaped balls.
(6) I used the skewer to create holes through my dough balls so that I could string the beads.
(7) I baked the beads at 250 degrees for 2 hours.
When I took the beads out, I noticed two major problems: the beads cracked and the holes sealed up.
I'm not sure what happened. Perhaps I should have baked them at a lower temperature? According to several websites, thicker pieces of salt dough are more likely to crack. Perhaps I should have made my holes bigger? Holes seem to have a tendency of shrinking in the oven. After tossing out these ruined beads I saved the unused dough overnight in an air tight container. The following day, I went in with a different strategy.
(New 5 and 6) I flattened the dough. To create the various shapes I created a template with paper, cut it out, and then used a butter knife and an X-ACTO knife to cut the shape out of the dough. Then, I made larger holes with my skewers. Here are my final results:
(Note: My beads came out a bit bumpy. I probably should have rolled the dough out using a rolling pin. Alternatively, I read that you could bake the shapes under a glass baking dish to ensure even thickness. Also, I found it difficult to lift my already cutout shapes onto the baking sheet. So, I did my work on parchment paper and then lifted the entire sheet of parchment paper onto the baking pan.)
Click here to see what I did next!
We already got rid of several boxes of pasta awhile back because of our new dietary restrictions. However, I never had the heart to toss out all the wheat products. Case in point- I found a big bag of flour just sitting there in our pantry. What to do? We can't use it. Donate it? I feel strange offering a used bag of flour to friends. Toss it out? Bah, what a waste. What about crafting with it? I peeked around online and found a recipe to make beads from flour. You know me, I was intrigued and so I had to try it out.
Required ingredients:
- 2 cups flour
- 1/2 cup salt
- 3/4 cups cold water
(Note: The original recipe made a LOT of dough, so I scaled it back by half. I probably could have scaled it back even more because I still had way too much.)
Required materials:
- Baking sheet
- Bowl
- Measuring cups
- Wooden spoon
- Knife/ X-ACTO knife
- Skewer/Coffee stirrer
Optional materials:
- Food coloring
- Rolling pin
- Parchment paper
- Paper, pen, scissors
Here's what I did:
(1) I mixed the flour and salt together.
(2) Then, I mixed the water into the mixture.
(3) I kneaded the dough until it felt like play dough.
(4) I divided the dough into two balls. I added different food coloring to each ball and kneaded until the food coloring was evenly spread throughout. (Note: I semi-dyed my hands green in the process. Luckily the dye washed out after several washes.)
 |
| Oooh. What lovely colors! |
(5) I had dreams of making a big chunky necklace made up of big beads. So, I rolled the dough out into little snakes/logs and then grabbed off portions of the dough and rolled out uniformly shaped balls.
(6) I used the skewer to create holes through my dough balls so that I could string the beads.
(7) I baked the beads at 250 degrees for 2 hours.
When I took the beads out, I noticed two major problems: the beads cracked and the holes sealed up.
 |
| Failure! What a bummer. |
(New 5 and 6) I flattened the dough. To create the various shapes I created a template with paper, cut it out, and then used a butter knife and an X-ACTO knife to cut the shape out of the dough. Then, I made larger holes with my skewers. Here are my final results:
 |
| Like diamonds in the rough, these baked salt dough beads ready to be decorated and strung |
(Note: My beads came out a bit bumpy. I probably should have rolled the dough out using a rolling pin. Alternatively, I read that you could bake the shapes under a glass baking dish to ensure even thickness. Also, I found it difficult to lift my already cutout shapes onto the baking sheet. So, I did my work on parchment paper and then lifted the entire sheet of parchment paper onto the baking pan.)
Click here to see what I did next!
Sunday, September 16, 2012
Sharpie on shoes
In high school I used a lot of Sharpie markers and white out pens to decorate my clothes and backpacks. Inspired by this momma's post I felt the urge to pull out my trusty tools again and doodle on a pair of shoes.
My triangles were a bit... erm... wonky. But, I had lots of fun and now Baby Chuck will have a one-of-a-kind pair of shoes just in time for fall.
My triangles were a bit... erm... wonky. But, I had lots of fun and now Baby Chuck will have a one-of-a-kind pair of shoes just in time for fall.
Saturday, April 6, 2019
Chomp! Chomp! Tissue Box Eaters
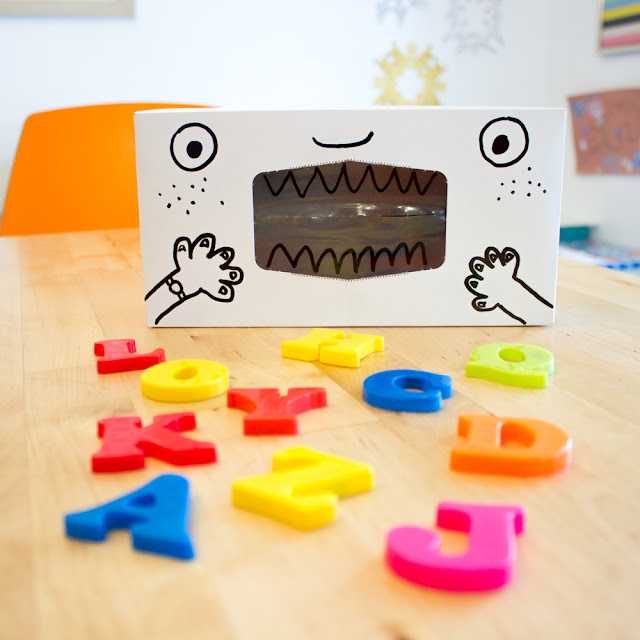
Looking for a super simple craft to help preschoolers learn their letters or numbers? This past week I battled a cold... and used (what felt like) hundreds of tissues. Before I tossed out my empty tissue box, I transformed it into a fun letter eater to help youngest learn his alphabet!
This post contains affiliate links. This means I make a small portion off of any purchases made through the links at no additional cost to you. Thank you for the grocery money! For my full disclosure policy, click here.
Tissue Box Letter Eaters
This post contains affiliate links. This means I make a small portion off of any purchases made through the links at no additional cost to you. Thank you for the grocery money! For my full disclosure policy, click here.
Monday, May 5, 2014
Brooklyn Flea Adventure
This weekend my sister took me out to city to celebrate my birthday. We passed the time thrifting, eating, walking, and chatting. It was a really perfect day. I loved hanging out with my sister and I felt so inspired seeing all the colorful street art and lovely handmade items.
Here are some photos from our adventures in Brooklyn...
To see more photos, keep on reading!
Here are some photos from our adventures in Brooklyn...
 |
| The colors and smiling children made me so happy |
Tuesday, September 10, 2013
Make Homemade Sidewalk Chalk
I'd been meaning to try my hand at making homemade sidewalk chalk out of plaster of paris for awhile now. But I never got up the nerve to try it out until this past weekend. As I stared at my craft cabinet filled with dozens of empty toilet paper rolls, I felt the crafting itch take over.
Armed with my Michaels coupons, I took the plunge and bought myself some plaster of paris. Then, a day later, Chuck and I made these:
Like the two colors? Me too. Now we get both pink and blue all in one piece of chalk. Whoa. Mind blowing.
Armed with my Michaels coupons, I took the plunge and bought myself some plaster of paris. Then, a day later, Chuck and I made these:
Like the two colors? Me too. Now we get both pink and blue all in one piece of chalk. Whoa. Mind blowing.
Monday, March 5, 2012
DIY- Rainbow rice krispies
Rice krispy treats are my new favorite dessert. They're perfect for satisfying my sweet tooth, super easy to make, and they're wheat/soy/nut free! Score!
This Sunday our church held it's monthly potluck and of course, I really wanted to bring them. Since I already brought them to the previous month's potluck (I told you they were my favorite dessert), I figured I should probably shnazz them up. That's when I thought to make some St. Patrick's day themed rice krispy treats. Oooh.
To make them, I tweaked the basic rice krispy recipe. After melting the marshmallows, I divided the goo into 6 different containers. Then, I quickly added food coloring into each of the containers (red, orange, yellow, green, blue, and purple.) Hubby quickly followed behind and stirred the food coloring into the melted marshmallows while I added rice krispies into the mixture.
It was crazy. I felt like Lucy, rushing to eat the chocolates off the conveyer belt. Hubby was mixing, I was mixing, rice krispies were falling onto the floor, the marshmallows were hardening a little too quickly, and in the midst of it all we actually broke a spoon.
As each color finished, I quickly scooped the sticky mixture into one of four mini bread loaf pans that I previously buttered. I added color on top of color and then got these:
Looking back, I probably should have just made one color first, then made one layer of colorful rice krispies, and then moved onto each of the following colors. The layers would have been neater and things wouldn't have gotten so out of hand. Oh well, there's always next time!
Special thanks to hubby for being a good sous chef.
To see my Academy Awards rice krispy treats, click here.
To see my Peep rice krispy treat, click here
This Sunday our church held it's monthly potluck and of course, I really wanted to bring them. Since I already brought them to the previous month's potluck (I told you they were my favorite dessert), I figured I should probably shnazz them up. That's when I thought to make some St. Patrick's day themed rice krispy treats. Oooh.
To make them, I tweaked the basic rice krispy recipe. After melting the marshmallows, I divided the goo into 6 different containers. Then, I quickly added food coloring into each of the containers (red, orange, yellow, green, blue, and purple.) Hubby quickly followed behind and stirred the food coloring into the melted marshmallows while I added rice krispies into the mixture.
It was crazy. I felt like Lucy, rushing to eat the chocolates off the conveyer belt. Hubby was mixing, I was mixing, rice krispies were falling onto the floor, the marshmallows were hardening a little too quickly, and in the midst of it all we actually broke a spoon.
As each color finished, I quickly scooped the sticky mixture into one of four mini bread loaf pans that I previously buttered. I added color on top of color and then got these:
 |
| Ooooh. Here I am slicing a colorful ricey log. |
 |
| Rainbows for everyone! (Note: Pot of gold not included.) |
Looking back, I probably should have just made one color first, then made one layer of colorful rice krispies, and then moved onto each of the following colors. The layers would have been neater and things wouldn't have gotten so out of hand. Oh well, there's always next time!
Special thanks to hubby for being a good sous chef.
To see my Academy Awards rice krispy treats, click here.
To see my Peep rice krispy treat, click here
Thursday, April 2, 2020
Easy and Lovely Paper Strip Birds
Lately, I've been thinking of that Emily Dickinson quote, "Hope is the thing with feathers that perches in the soul - and sings the tunes without the words - and never stops at all."
These past weeks, I've felt moments of sadness, cabin fever, fear, joy, frustration, and also hope. (Oftentimes, all in the same day!) One of the good things about staying home is that the boys and I get a chance to craft and play more. It's nice having more relaxed schedules.
Inspired by Emily Dickinson and Embossing Bird's gorgeous IG feed, the kids and I took some strips of paper and folded them into a lovely flock of colorful birds. Here's how we made these cute crafts!
This post contains Amazon affiliate links. This means I make a tiny bit of grocery money from each purchase made at no cost to you. Thank you for your support! For my full disclosure policy, click here.
These past weeks, I've felt moments of sadness, cabin fever, fear, joy, frustration, and also hope. (Oftentimes, all in the same day!) One of the good things about staying home is that the boys and I get a chance to craft and play more. It's nice having more relaxed schedules.
Inspired by Emily Dickinson and Embossing Bird's gorgeous IG feed, the kids and I took some strips of paper and folded them into a lovely flock of colorful birds. Here's how we made these cute crafts!
How to Make Super Easy Paper Strip Birds
This post contains Amazon affiliate links. This means I make a tiny bit of grocery money from each purchase made at no cost to you. Thank you for your support! For my full disclosure policy, click here.
Monday, May 18, 2015
Make Origami Faces
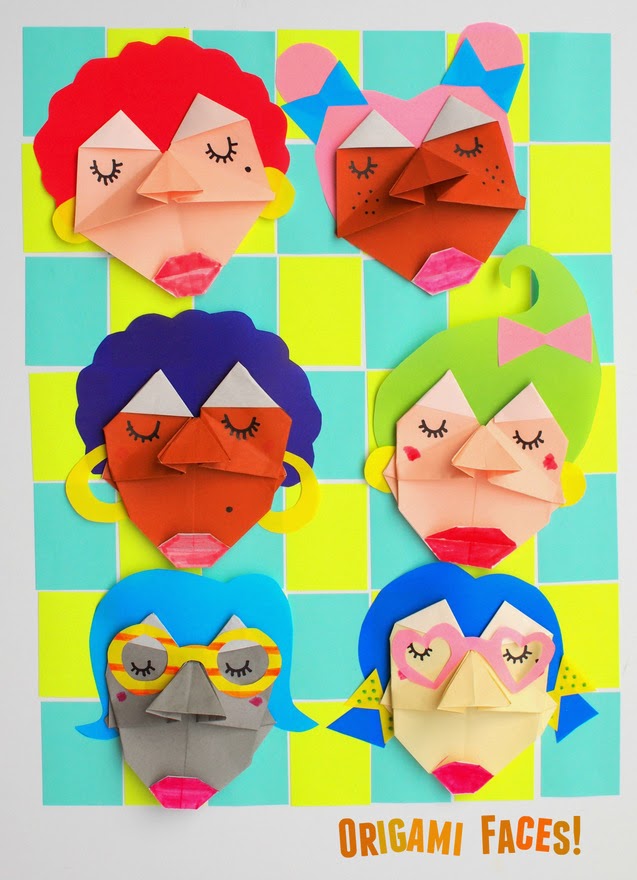
This past weekend I spent a bit of time figuring out how to make some adorable origami faces. After several failed attempts, I shortened the directions... and voila! I love how they turned out! Sculptural and modern, they are so fun to make and uber cool to display!
Paper Sculptures- Making Origami Faces with Kids!
This post contains affiliate links. Thank you for your support!
Thursday, December 20, 2018
How To Cut Christmas Nativity Snowflakes
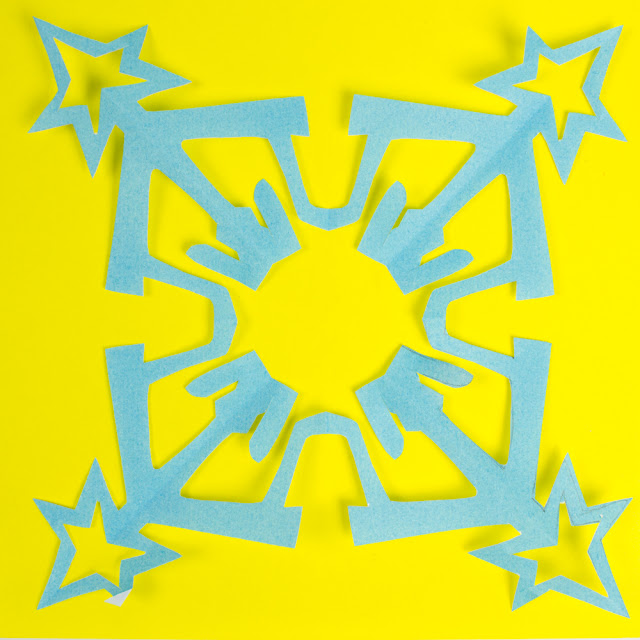
Today I'm sharing the final snowflake craft of the year! I'm taking a short break over Christmas and thought I'd leave you with one final snowflake design. These nativity snowflakes are really simple and pretty. They're a great way to celebrate the season.
This post contains Amazon affiliate links. This means I make a small portion off of any purchases made through the links at no additional cost to you. Thank you for the grocery money! For my full disclosure policy, click here.
How To Cut Nativity Snowflakes
This post contains Amazon affiliate links. This means I make a small portion off of any purchases made through the links at no additional cost to you. Thank you for the grocery money! For my full disclosure policy, click here.
Thursday, March 10, 2011
Almost here
Friday, October 19, 2012
Parenting stories and tips
Did you ever have a week where you felt like everything you did was wrong?
I know I'm not a perfect parent.
And I know that I could learn a lot from other mommies.
But sometimes I find it so difficult to just smile and nod when yet another mother or nanny gives me unsolicited advice.
It always comes about the same way.
First, she asks The question, "How old is he?"
I respond, "13 months."
They seem surprised. "Really? But he's so small. He only looks (insert number less than 10) months. And he still isn't walking?"
Even though I've had this conversation several times, it always hurts like a knife to my chest. Everyone seems to operate under the assumption that a healthy baby is big and walks around by himself.
And then the ladies always continue with those two dreadful words, "You should..."
Stab stab.
I'm beginning to dislike those two words. Yes, their advice comes from a good place, but sometimes I just don't want to hear it. They don't know me and they don't know my child.
They don't know how we battled terrible eczema during his first year of life. They don't know about all the allergy testing and sleepless nights that we went through. They don't know how we once had to change his bed crib sheets every night because he would scratch and rub until his face and head bled. They don't know that we're doing our best to live and eat normally given (what seems like) our every-growing list of allergens: wheat, soy, barley, nuts, and bass.
I'm crying as I'm writing this, because it's just so frustrating. Yes, I am a new mommy. Yes, I have lots to learn. Yes, I'm making lots of mistakes along the way. But I'm sorry, sometimes I just don't want to hear your advice, well meaning or not.
Maybe my kid is small. Maybe he should eat more. Maybe I shouldn't carry him so much. But you know what? Please just back off. I'm already berating myself enough. I'm just doing the best that I can.
And lately when I've been getting like this, I always try to think back to all the parenting tips and stories that I do appreciate hearing. You know which ones I'm talking about. They're the ones that make me laugh and remind me that all parents make mistakes, kids do crazy-funny-scary things, and we're all just trying to love our kids the best that we can.
Here's what one mommy confessed to me at the park the other day:
And you know what?
Her little girl looked just fine to me.
Thank you, cat food girl's mommy, for reminding me that things will be ok.
Monday, January 20, 2014
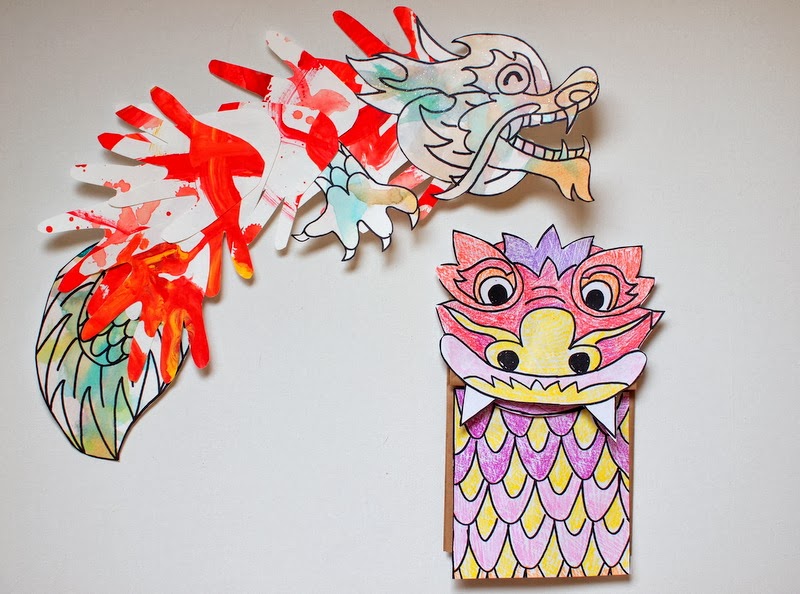
Two Chinese New Year Dragon Crafts
Ready for a fun Chinese New Year Craft? Chinese New Year is one of those really fun holidays that I enjoyed celebrating as a kid. Yummy food, wearing new clothes, red envelopes filled with money, and watching cool dragon and lion dancing? Come on, what's not to love? Since the holiday is just around the corner, I showed Chuck some lion dancing videos (Youtube to the rescue!) and then thought it'd be fun if we did some dragon crafts together:
Two Chinese New Year Dragon Crafts
Little background about me- Growing up I always felt like a "twinkie." Yellow on the outside, white on the inside. You see, I looked Asian, but I didn't always feel that way. Now that Chuck's getting a bit older, hubby and I are trying to figure out how two twinkies like us pass down their cultural traditions. (Ehh... it's a work in progress....)
This craft is one way that we're trying to pass down our tradition. And, in the interest of full disclosure, Chuck really enjoyed making the handprint dragon.... but he wasn't too keen on coloring my paper bag dragon pieces. However, once I colored and glued everything down for him, he enjoyed playing with it like a puppet.
So, do you wanna see how we made these two dragons? (I've got templates too! Ooh la la!) Keep on reading!
(And if you like this craft, definitely check out this dancing Chinese Dragon Puppet. It actually dances and is made from recycled materials!)
Wednesday, February 5, 2014
DIY Splatter Painted Pants
Everything outside is grey, grey, grey. Bah. I've been longing for some color in my life. So that's why I took a pair of pants and went crazy. Yurrrp. I splatter painted the whole thing bright happy colors.
They look pretty crazy... and pretty cool. (They were also inspired by by this awesome splatter pant tutorial from PS-I Made This.) So far I've worn these pants around the apartment but I have yet to wear them outside. (What's the correction occasion for such colorful pants? Hrmm...)Now if you'd like some color in your life too, keep reading!
They look pretty crazy... and pretty cool. (They were also inspired by by this awesome splatter pant tutorial from PS-I Made This.) So far I've worn these pants around the apartment but I have yet to wear them outside. (What's the correction occasion for such colorful pants? Hrmm...)Now if you'd like some color in your life too, keep reading!
Wednesday, February 7, 2018
Tuesday, November 1, 2011
Day of the dead
This weekend our town held a Dia de los Muertos celebration as a way to remember deceased friends and family. With the brightly colored paper decorations, twinkling lights, and dozens of costumed attendees (many with faces painted like skulls), the entire experience felt quite otherworldly.
It was a deliciously creepy and beautiful way to celebrate Halloween weekend.
It was a deliciously creepy and beautiful way to celebrate Halloween weekend.
 |
| It doesn't feel like we're in Holland anymore! |
 |
| Aren't these Fridas beautiful? |
Tuesday, September 22, 2015
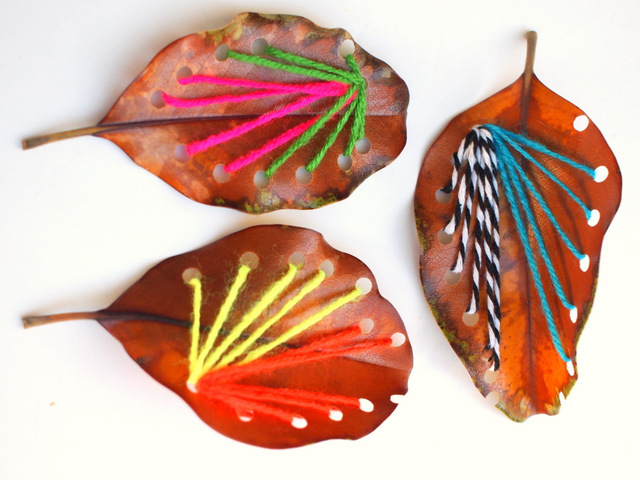
Make Beautiful Leaf Sewing Art with Kids
Are you looking for an easy fall craft that doesn't require colorful leaves? I know this may seem like a strange question to you. But we just don't get those beautiful red, yellow, and orange leaves over here in California! And I miss them so much.
So for those of you who'd like to do a leaf project with the kids... today's leaf sewing art is for you!
So for those of you who'd like to do a leaf project with the kids... today's leaf sewing art is for you!
Make Beautiful Leaf Sewing Art With kids!
This post contains affiliate links. Thank you for your support!
Monday, August 19, 2013
What's up Chuck?
This weekend we ventured out to Hoboken to enjoy the lovely, sunny weather. It felt so nice to get out, stretch our toes, and take in the last couple weeks of summer.
 |
 |
| We're pet-sitting. Isn't Henry cute? |
 |
| Sun-worshippers enjoying the day in Hoboken |
 |
| Heart-attack on a plate....but wow... what a delicious way to go... |
 |
| Have some bacon, mom! |
 |
| Bicycle riding with daddy |
 |
| Even Pink Pig got a chance to enjoy the day. Can you spot her? |
Hope you had a good weekend too!
Subscribe to:
Posts (Atom)
