Showing posts with label Halloween. Show all posts

Sunday, October 27, 2013

Make Sugar Skull Sun Catchers and Crystallized Sugar Skull Ornaments

Alright everyone... the countdown is on.  It's just a couple of days till Halloween.  Are you excited?  Or, are you over all the orange and black?

I'm in the first group and still SUPER excited for Halloween.  I just finished Chuck's costume this past weekend, so he's ready to go.  I'm not sure if he'll appreciate the idea of trick-or-treating (plus his allergies prevent him from eating a lot of the candy out there), but I think he'll enjoy seeing other kids in costumes and all the spooky decorations.

I'll upload some photos of his costume later on this week... but today I just wanted to share the last of my sugar skull crafts.

So, we already made DIY sugar skull candle holders and DIY sugar skull luminaries and Allison shared her lovely tutorial for DIY sugar skull shoes.  Today's sugar skull crafts were designed with kids in mind.  They're easy to make and the resulting products look great.

1.  Sugar Skull Window Clings

Colorful and fun, these two skulls will float happily on your window.


Materials:
  • Contact Paper (Buy the cheap stuff from the Dollar Store)
  • Black paint pen (You could also use a Sharpie marker, but the lines won't be as dark.)
  • Scissors
  • Cellophane 
  • Tape

Friday, October 25, 2013

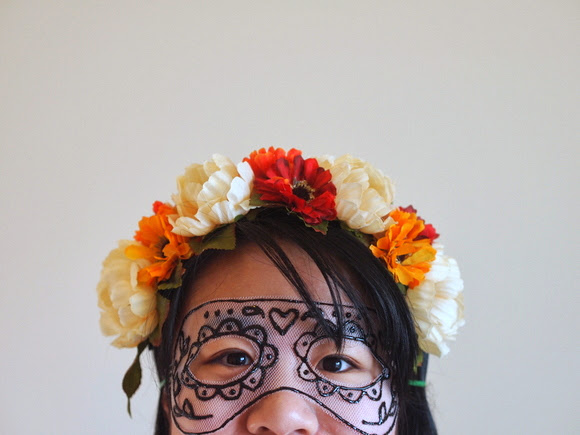
DIY Tulle Mask


Looking for a simple, cheap, and fun way to make masks for Halloween this year?  

DIY Tulle Mask for Halloween

Why not try making some out of tulle and fabric paint?  Inspired by these masquerade masks from Sprinkles in Springs, I created my own Day of the Dead Mask for Handmade Charlotte.  Check out the tutorial  here!

Thursday, October 24, 2013

DIY Sugar Skull (Day of the Dead) Milk Jug Luminaries


Currently my college friend Kim is visiting us for the week.  It's been really nice having someone else here while hubby is away.  Time just passes by much quicker when you're having fun with a friend.

And just how have we been having fun?  Well, we've been playing with Chuck... and eating... and watching tv... and crafting... a lot... a whole lot...  Halloween and Dia De Los Muertos are right around the corner, so all of our crafts have been centered around those two holidays. 

I'm currently on a sugar skull kick.  I just love the way they look.  So when I was staring at an old milk jug the other day, an idea dawned on me.  Ding!  Why not use them to make some sugar skull luminaries?  So tada, here's what I came up with:


I'd seen tons of posts for ghost milk jug luminaries for awhile, so I figured this was a nice twist on that craft.  It uses skulls and colorful lights instead of ghost faces and white lights.   I just love how this little guy turned out.  He's so cute and smiley... and gosh darn it, I've just got a big ol' soft soft for any craft that involves twinkly, colorful lights.


Tuesday, October 22, 2013

Pennsylvania Renaissance Faire

And finally, our trip to Lancaster was made fully complete with a visit to the nearby Pennsylvania Renaissance Faire.    

That's right... I finally got a chance to wear my flower crown!

All hail the Queen!

The amazing Gandolf the White

This little guy was locked up in pirate's prison.  The crime?  Being too darn cute.

Two little kids (in full protective gear), trying to pop the balloons attached to the other

Headless knight

Not sure why, but Chuck was infatuated with this giant Pumpkin man

Here he is standing at the foot of the giant pumpkin statue
 Happy Tuesday!

Thursday, October 17, 2013

Guest Post: DIY Sugar Skull Shoes


Earlier this week I shared that Allison from Dream A Little Bigger and I were doing post swaps.  On Monday I visited her blog and showed how I made these cute and colorful perler bead bracelets.  Surprise!  Today Allison's over here, presenting this super cool sugar skull shoe tutorial.  With Halloween and Dia de los Muertos coming up, this craft is a great one to do.   It'll certainly get you into the spooky spirit!


Sugar Skull Sneakers Tutorial by DreamALittleBigger.com Hello! My name is Allison and I'm a crafty cat lady that blogs over at Dream a Little Bigger. Crafting and creating is what I love to do and I'm so happy that I'm able to share that with all the sweet readers at Pink Stripey Socks! I'm a huge fan of Leslie and I'm so excited to be guesting here today! I've kind of sort of got this huge thing for shoes. Not fancy or designer shoes or anything but shoes I've made up and crafted on. It's a pretty big deal and so far I've made almost 60 DIY shoe tutorials. Don't believe me? Check this gallery 
out.


Tuesday, October 15, 2013

DIY Flower Crown Tutorial

Lately hubby's had to do quite a bit of traveling for work.  (Boo!)  Chuck and I try to hold down the fort during the weekdays, but it's just not the same and we miss him terribly.  So we're always glad when the weekend finally rolls around and we get to have fun as a family.

This weekend we're hoping to visit a nearby Rennaisance Faire.  Fingers crossed that on Saturday we'll be watching jousting knights, chomping on large turkey legs, and seeing lots of people in lovely costumes (my favorite part.) 

This will be Chuck's second Rennaisance Faire. (You can see our previous faire adventure here.)  And like last time, I wanted to make a floral crown to wear there.  Last year I crapted a floral crown out of plastic bags but this year I used leftover flowers from my crystallized flower experiment.

There are tons of tutorials and videos out there showing how to make floral crowns, but I followed this one from Kimmie of Sugar and Dots because it was really easy and straight forward.


Materials:
  • felt that's the same color as your hair
  • fake flowers
  • hair elastic
  • glue gun
  • scissors

Directions:

1.  Remove the flower heads and leaves off the stems.  Cut off the green plastic bit off the back of your flower so you'll have a flatter surface to glue onto the felt.  But be careful not to cut the green bit completely off or your flowers will just come apart.

2.  Cut out two similar sized strands of felt. 

3.  Hot glue your leaves onto one strand of felt.  Then, hot glue your flowers on.  (I glued on the larger flowers first and then added the smaller flowers.)

4.  Cut your second strand of felt into smaller rectangles.

5.  Hot glue your flower felt band onto your elastic head band.  To make sure that the elastic stays put, glue on your smaller felt rectangles on top of the elastic.  Your elastic band should now stay put because it's sandwiched between felt. 

6.  Optional:  I've worn this headband now a couple of times and noticed that the felt on both ends of the headband is starting to peel away from the elastic band.  To help ensure that they stay in place, you could always just pull out a needle and thread and add a couple of stitches on each side.

And that's all it takes to make this floral crown.

Happy crafting!

Thursday, October 10, 2013

Two Toddler approved Fall Crafts

Even though I really enjoy crafting, sometimes it takes a bit of persuasion to get Chuck to join in.  Currently he's much more into playing with toy cars than crafting with mom.  Go figure! :)  But I'm a persistent bugger, so I keep encouraging him to make stuff with me.

So far several of my craft plans flopped, but here are two crafts that Chuck actually participated in. (Hooray!) 

1.  Paper Bag Pumpkins:


Materials:
  • Lunch bags
  • Tissue paper squares
  • Glue stick
  • Marker 
  • Googly eyes (optional)
  • Pipe Cleaner
  • Newspaper

Directions:
  1. Glue your tissue paper squares onto your lunch bag.
  2. Add a face
  3. Crumple up newspapers and stick them into your bag.
  4. Use a pipe cleaner to seal up the bag.

And here are some pumpkins made during our toddler craft time:


2.  Contact Paper Leaves
 
Materials:
  •  Leaves
  • Contact paper
  • Scissors
  • Tape
  • Tissue paper (optional)

Directions:

  1. Place leaves in a heavy book to flatten them.
  2. Tape down contact paper, sticky side up.
  3. Stick leaves and tissue paper squares onto your contact paper.
  4. Place a piece of contact paper(sticky side down) on top of your first piece of contact paper.
  5. Trim the edges and tape your leaves onto a window.


Have a great weekend!

Tuesday, October 8, 2013

DIY Monster Mash-up Rubbing plates

Looking for a neat Halloween activity for your older kids to do? 

Well, why not try making some monster rubbing plates?  Call forth your inner Frankenstein and create a bunch of monster rubbing plates out of cereal boxes and fabric paint. Then, cut your monsters up and mix and match different heads and bodies to create even more wacky creatures. 

DIY Monster Mash-Up Rubbing Plates

Pretty silly, right?  Head on over to Handmade Charlotte to get started on this spooktacular craft.

Saturday, October 5, 2013

Make your own glow in the dark chalk

A couple of weeks ago Chuck and I were perusing the Halloween aisles at Target (for the bajillionth time... what can I say?  It's my favorite holiday!) and I spotted a pack of glow in the dark chalk.

Then a light bulb went off in my head.  I could buy the chalk... but it'd be more fun to try making my own.  So after tinkering around for a bit.... I came up with this result. 

Ooh!  It glows!


What what?  Yup.  They glow after you "charge" them with light.  Just doodle a design at night, shine a light on them to "charge" them, and then turn off your light.  Your doodles should glow for a bit and then you'll need to charge them again.  

To make this novelty chalk, I simply modified this homemade chalk recipe.  Instead of tempera paint, I added 3 T of glow in the dark paint to the mixture.  Here's what my chalk looked like setting up:


Have a great weekend!

Tuesday, October 1, 2013

DIY Fake Sleeve Tattoo

So... what are your thoughts on tattoos?

I don't have any, but I really love them.  They're beautiful to look at and often times come with a touching or inspiring story.  Every year or so, I toy around with the idea of getting one.  But I never do because they're so permanent.  Even though I love the ways hearts and sparrow tattoos look today.... I'm not sure how I'll feel 10, 20, or 30 years from now.  (Although... sometimes I like to imagine myself as a crazy old grandma, rocking some really gnarly skull tattoos.)

With Halloween just around the corner, I lived out my tattoo fantasies with this DIY sleeve tattoo.

Interested in seeing how I made one?  Well, in the interest of full disclosure:
  • This craft took much longer to complete than I initially thought.  It was really, really tough to color on hosiery.  So, if you aren't digging that... you can just buy yourself a sleeve from the store.  Or, you could just draw and color in one tattoo.  I love the way sleeve tattoos look, so I went in whole hog. 
  • I found this sleeve tattoo tutorial from Urban Threads to be really helpful.
 
Materials:
  • Cereal box
  • Tattoos doodled with Sharpie on paper 
  • Tape (Normal kind and packing tape)
  • Scissors
  • Old nude hosiery
  • Fabric markers

Directions:

1.  Take a cereal box and roll it into a cylinder that's approximately the same size as your arm.  Tape the cylinder closed.

2.  Cut out your various doodled tattoos.  Tape them down onto your cardboard cylinder.

3.  Cut off one of the legs from your hosiery.  Cut off the toe portion.  Roll it over your cylinder.  (If you find that it's getting cut on some of your sharp cardboard edges, round them off so the hosiery slides on easily.)

4.  Color and outline your tattoos.
Notes:
  • This was pretty tough to do.  If you color normally, your marker tip drags along the surface.  I found that dabbing worked best. 
  • I first used lighter colors and then moved to darker ones (to prevent blurring and smearing). 
  • I also looked at tattoos online for color inspiration. 

5.  Let your images dry according to directions.  (I waited overnight.)

Once your fabric paint dried, roll your sleeve right off.   Tada!

And that's it!  Slide the sleeve over your arm and you've got your very own DIY fake sleeve tattoo. 

Here's what a "tattoo" looks like up close:
Happy "tattooing!"  

Tuesday, September 24, 2013

DIY Candy Corn Perler Bead Bracelet 1

Are y'all going Halloween crazy yet?  (Or is it just me?)

Last weekend I took Chuck to Target and we had a blast seeing all the costumes and decorations.   Doesn't matter how many times I've seen a dancing skeleton or singing skull, this stuff never gets old.  I guess I'm a kid at heart because Halloween is my very favorite holiday.

So that's why I'm super excited to share this craft with you.  I went a bit crazy with my perler beads and designed two candy corn inspired bracelets.  Today I'm sharing the simpler design with you.  If you like this one, head on back tomorrow to see how I made the more complicated one.  

Here's a photo of my candy corn inspired bracelet: 


Materials:
  • Perler beads
  • Scissors
  • Elastic Cord (I used a thin 0.5 mm elastic cord for these bracelets, but honestly a thicker cord is better to use because it's easier to string the beads with and the finished bracelet feels sturdier.)

Directions:
1.  Cut out about 40 inches of cord.  (Honestly, it doesn't matter what length you initially use.  You'll just end up tying on more cording later.)  Tie on a bead to act as a stopper.  (I used a black bead.  It doesn't matter what color you choose because you'll end up removing this bead at the end.) 

2.  String on 
  • white bead (#1 bead) 
  • white bead (#2 bead)
  • orange bead (#3 bead)
  • orange bead (#4 bead)
  • yellow bead (#5 bead)
  • yellow bead (#6 bead)
(I labeled the beads with numbers to help out with step 3.) These six will be your first column of beads.


3.  Now you're going to add your second column of beads.  Add on a yellow bead (#7).  Then,slip your string through your #5 yellow bead.  Add an orange bead (#8).  Then, slip your string through your #3 orange bead .  Then, add a white bead (#9).  Then, slip your string through your #1 white bead.   Then, pull tight.


 Now you've got the basis for the rest of your bracelet.  See how some portions of the bracelet jut out and some portions of the bracelet don't?  As you continue to build your bracelet, you'll alternate between adding a bead to fill in the gaps, and stringing your cord through the beads that jut out.

4.  Let's add the fourth and fifth columns. 
  • Column 4:  Add a white bead.  Slip your string through the jutting out white bead.  Add an orange bead.  Slip your string through the jutting out orange bead.  Add a yellow bead. Slip your cord through the jutting out yellow bead.  Pull tight.
  • Column 5:  Add a yellow bead.  Slip your string through the jutting out yellow bead.  Add an orange bead. Slip your string through the jutting out orange bead.  Add a white bead. Slip your string through the jutting out white bead.  Pull tight.

Keep going and continue to follow the pattern.  Add a bead and then slip your string through a bead that's jutting out.  Keep pulling your string tight after adding each column of beads.  If you run out of cord, no worries!  Just tie on another strand.

Soon you'll get a long bracelet like this:
Now make sure that (1) it fits your wrist and (2) both ends fit together like zipper teeth.  Then, string your cord through both sides of the bracelet and pull tight.  Remove the stopper bead and tie your beginning and ending cords together.


Tada!  Done. And that's how you make a simple candy corn inspired perler bead bracelet.  Like it?  If so, come back tomorrow to see how I made a slightly more complicated candy corn bracelet.

Happy beading! 


Tuesday, September 17, 2013

Make your own window clings

Currently Chuck's windows are covered in homemade window clings.


They were super easy to make.  All you need are:
  • Clear contact paper
  • Paint pens (or Sharpies-- although the colors aren't as vibrant)
  • Scissors.  

Just doodle on the contact paper, cut out your doodles, and you're done.  Easie peasie.  Instant personalized decorations for your windows.

Happy Tuesday!

Monday, January 21, 2013

Cowboy gear part 2: Cardboard tissue box cowboy hat

 Cardboard Tissue Box Cowboy Hat

And here's how you crapt a cowboy hat from cardboard...
(Directions modified from a video that I viewed here)

tissue box and cereal box cardboard cowboy hat

Cowboy gear part 1: Make your own sheriff star

Hi everyone!
Here's how I crapted Baby Chuck's Sheriff star:

Materials:
- cake tin <-- crap!
- cereal box <--- crap!
- scissors
- strong glue (I used Aleene's)
- thin permanent marker
- packing tape
- pen
- safety pin
- felt (optional)
- printout of a sheriff star


 Directions:
1.  Glue your cake tin to your cereal box.
2.  Print out an image of a sheriff star that you like.  Cut that star out.
3.  Trace the star onto the cake tin.  Trace and color over the "sheriff" lettering too.  Lift up your paper star and reveal your "sheriff" imprint.
 4.  Cut out the star from the cake tin.  Use your permanent marker and trace over your lettering and any decorative designs that you want to stand out.

5.  Use your packing tape to "laminate" your star.

 6.  Cut out a piece of felt (or cardboard), and tape it to the back of your sheriff star to secure a safety pin to your star.  (Make sure to orient your safety pin so that the star sits the right way when pinned.)

Enjoy!  Yee-haw!

Wednesday, October 31, 2012

Happy Halloween!

We just got power back.  Yay!   It feels so good having hot water, a working fridge, lights, and the internet again.  Sadly, some of our family is still left without power.  We're hoping that everything gets fixed soon.  

Even though it doesn't really feel like Halloween, I still wanted to wish you a Happy Halloween! Here's a photo of Baby Chuck in his Mr. Potato head costume.

DIY Mr. Potato Head Baby Halloween Costume


We're just going to have a low-key day today.  With the terrible weather conditions, I'm so thankful that we were able to celebrate Halloween last Friday at our nearby library.  They did such a nice job bringing the Halloween spirit to the kids.


Tuesday, October 30, 2012

Queens County Farm Museum


Dear Sandy,

You're not playing nicely with others.  I'm sorry, but I'll have to ask you to leave.  No treats for you.  Please go away!

Leslie


As I'm writing this post, Sandy is outside loudly howling and rattling our windows.  We've briefly lost power a couple of times, but I think we should be ok.  *Crosses fingers*

Hubby and I have been watching the news and it's horrible seeing all the flooding and damage.  We hope everyone is able to stay safe. 


To mentally escape from the craziness outside, I'm posting several photos from last weekend's pumpkin picking adventure.  (Looking at colorful photos makes me happy.)  It was our first time visiting the Queens County Farm Museum.  Just an hour away, we felt like we left our urban environment behind. 

Who knew that such a beautiful place existed in New York City?


  These pictures are such a far cry  from what's going on outside.  Eek.  Please stay safe!