Showing posts with label Thrifty. Show all posts

Thursday, September 4, 2014

DIY Kids' Cardboard Art Easel

I love making and creating things with Chuck.  But sometimes I'm surprised by how much arts and crafts supplies cost.   Whenever I go to Michaels or Target I always do a double-take when the bill comes up.   What?  How did we spend so much?  Is this glitter made of 14K gold?  To stretch our pennies (and my own creativity) I love making our own art supplies on the cheap.  We've made our own Paint-With-Water Pages,  2 Ingredient Body Paint, sun prints with construction paper, and even used tortillas as canvases for art!  With dozens of cardboard boxes lying around, I thought it would be fun to DIY Chuck an art easel.

DIY Kids' Cardboard Art Easel


Turn a cardboard box into an art easel.  Great way to use recycled materials!

(This post contains affiliate links.  Thank you so much for your support.)  

This DIY easel is so neat because it only took a couple of minutes to make (score!), is made entirely out of cardboard (cheap!) , and can accommodate 1, 2, or even 3 children simultaneously painting.  Whoa! Intrigued?  Well let's get crafting!

Saturday, July 26, 2014

Make Toilet Roll Glasses!

Toilet roll crafts are some of my favorite ones to make.  (You can check out our extensive toilet roll craft gallery here.)  Right now we're still living out of our suitcases, so good ol' tp rolls are also some of the few craft items that I still have on hand.  Recently I saw Krokotak's toilet roll sunglasses tutorial and I knew that I really wanted to make my own version.  I've had pineapples and rainbows on my mind lately, so naturally they found their way into this adorable craft.

Toilet Roll Glasses


how to make toilet roll glasses


Tuesday, July 1, 2014

Cardboard and Pom Pom Soccer Game

Are you watching the World Cup?  Hubby's been keeping track of the games, but Chuck and I haven't been paying too much attention to the scores.  However, because it's soccer season, I still felt inspired to make something soccer-related.  So that's why I crafted this mini cardboard and pom pom soccer game for us to play.

Cardboard and Pom Pom Soccer Game

make a cardboard and pom pom soccer game
(This post contains affiliate links.  Thank you for your support!)


Monday, June 30, 2014

Let's Build Boats! (Engineering with Kids)

Lately we've been reading books on pirates around here.  Arrrrgh maties!  So I thought it would be fun if we tried our hands at building some boats from everyday materials.  (I saw a similar idea from i2camp's Instagram feed and really wanted to try it out.)  This was a fun engineering activity that required very little prep and just used random items from our crafting and recycling bins.

Kids' Engineering:  Let's Build Boats!

Kids Engineering- Let's build boats!
(This post contains affiliate links  Thank you for your support!)


Monday, March 24, 2014

DIY Magnetic Fishing Game

Currently, one of Chuck's favorite books is 10 Little Fish by Audrey and Bruce Wood.  It's a cute book about subtraction.  Kids count colorful fish on each page as they leave one by one.  And (my favorite part), it has a fishy romance at the end (What can I say?  I'm a closet romantic... tee heee hee.)  To accompany his love for fish, we recently made this DIY Magnetic Fishing Game

DIY Magnetic Fishing Game


Make Easy DIY Fishing Game
It's cute and colorful and really fun to make and easy to play.  Want to make your own fishing game?  Keep reading to see how we made ours! 


Tuesday, February 25, 2014

DIY IPod Speakers from cardboard roll and cups

Ever notice that how your iPod or mp3 player just doesn't play music loud enough?  Well, if you have a cardboard roll and two cups lying around, you can fix that problem in a couple of minutes.  Yup.  Just make yourself a set of makeshift cardboard roll speakers!

diy ipod speakers from cardboard roll and cups


Keep reading to see how I made these bad boys...


Tuesday, January 21, 2014

DIY: 5 Ways to update your old beanie

Hubby's away and Chuck and I are currently stuck at home, sick.  Boo.  We're watching the lovely fluffy flakes falling outside and I'm soooo tempted to bundle him up to play outside.  But, I'm holding myself back until he gets better. 

(Hrmm... but maybe I could bring some snow inside for us to play with.... thanks Lisa for that idea!)

Anyway, here's a short cold weather post in honor of the snow.

Do you have an old beanie just lying around? Maybe you never really wear it, but you just can't bring yourself to give it away just in case you need it one day?  Well, here are five super easy ways to update your drab head wear.   And bonus!  None of these are permanent changes, so you could potentially wear all five looks this winter! 

  1. Pom Pom Beanie

This update was my favorite.  Chuck is beginning to recognize Micky Mouse.  So when I saw Eugenia Kim's Pom pom beanie (for $185- holy empty wallet!), I knew that I had to make my own cheapie version.  I followed this pom pom tutorial  from Crafted.  Then, I sewed the two semi-identical (eek!) pom poms onto the corners of my beanie.  Bam.  Instant mousekateer cool.

And here I am modelling the four other updates....
2.  "Hi" Beanie:  I cut out the letters "H" and "i" from felt.  Then, I just sewed them onto the front of the beanie for some friendly headwear.  Make sure you sew the letters closer together because they will stretch apart when you wear the hat.

3.  Polka dot Pom Pom Beanie:  I bought a pack of mini pom poms from the craft store and then sewed them onto the hat.  To help with placement, I marked the hat with chalk first so I would know where to sew.

4.  Spiked Beanie:  I poked a couple of screwback cone spikes through the front of the beanie.  I thought the hat made me look like a punky Statue of Liberty. 

5.  Sparkly heart Beanie:  I cut out a heart shape from felt.  Then, I hot glued some rhinestones onto the heart.  Then, I sewed the heart back onto the hat.   Wouldn't this version be nice for Valentine's Day?  

 Alright that's it.  Time to take a nap. Stay warm and well, friends!

Sunday, January 12, 2014

Reveal hidden lampshade silhouettes


Before I start today's post, I just wanted to say thank you for all the kind words, support, and love you sent my way after my last post.  *Gulp*  Sharing my dream was a bit REALLY scary.  I kept waiting for the rotten fruit and pies to be thrown, but nothing came by.  So, thank you.

Ok!  Now onto today's post. We own two lamps that are covered with ho-hum white shades.  I kept wanting to do something to the lamps to give them a bit more pizazz, but couldn't settle on a permanent solution.  Then, I saw this nifty decorating idea at How About Orange, and had to try it out. 

Look!  When the light is off, you just see a white shade.  But when the light turns on, a secret silhouette is revealed! 

 Magic?  Nope.  Keep reading to see how it was done...

Tuesday, January 7, 2014

Quick way to jazz up old pens

As a kid I remember loving the way new pens and notebooks looked at the start of the school year.  I also remember that by January, things just didn't look as good anymore.  Today's post shows one quick and easy way to update boring school supplies.

Tada!  Check out these clear pens that I jazzed up with colorful magazine pages.   

Let's Jazz Up Old Pens!

(This post contains affiliate links.  Thank you for your support!)


 Materials:

Directions:


1.  Take your pens apart so that the tube of ink is out of the clear plastic barrel.

2.  Cut out a scrap piece of paper that, when curled up, will fill the clear barrel.  Once you know what size paper to use, use this as a template to cut out from colorful magazine pages.


3.  Curl up your colorful paper and slide it into the barrel.  Then, put your pen back together. Now you've got yourself a set of "new" and colorful pens.  (And it didn't cost you one dime! *High five!*)

Happy crafting!

Sunday, December 22, 2013

Four Winter Toddler Crafts and Activities

Looking for some easy toddler winter crafts and activities?

I'm officially over winter.  Buh-bye shortened days!  Buh-bye cold weather!  Buy-bye staying inside!  Oh, how I wish it were already spring.  But, until warmer, sunnier days come, Chuck and I are going to persevere and have fun indoors.  Here are four crafts and activities that have kept us busy, happy, and sane for the past couple of weeks. 


1.  Cereal Box Gingerbread Men


Cereal Box Gingerbread men
I cut out a whole bunch of gingerbread men from my empty cereal box stash.  (Yes, I'm a proud cardboard hoarder!)  Then, I brought them to the library and let the kids decorate them with googly eyes and foam stickers.  The older 2-year olds had fun making funny men and the babies just watched their moms do the craft. 

Chuck's attention span:  He probably spent about 5-10 minutes on this activity before he lost interest.


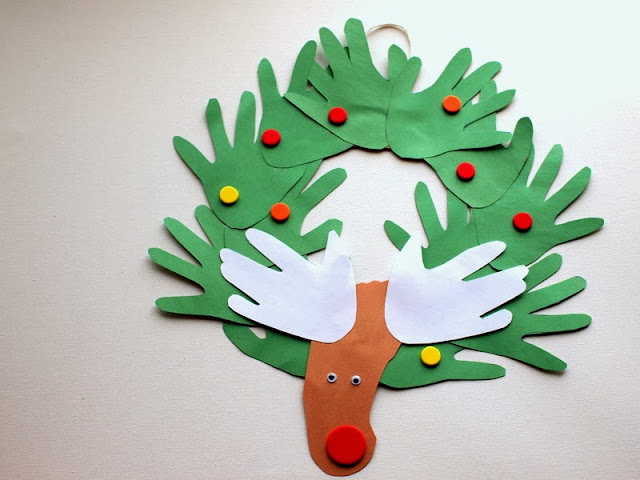
2.  Hand and Foot Reindeer Wreath

 hand and foot print reindeer wreath Christmas
I've seen versions of this craft all over the internet... and thought they were so cute and perfect for the holidays.  I traced Chuck's hand once to make a template for the wreath and horns.  I also traced Chuck's foot to make the reindeer's head.  Then, I glued everything together and he helped me add foam shapes and googly eyes.

Here are the different components of the wreath:

parts needed to make handprint and reindeer wreath craft
Chuck's attention span:  He probably spent about 10 minutes on this activity before he lost interest.


3.  Homemade Play Dough


child playing with homemade playdough
I followed this craft clay recipe and we had tons of fun rolling, cutting, and shaping our clay.  Unfortunately, our ornaments cracked when they dried.  Boo.  But, we had such fun manipulating the stuff that I kept leftovers in a sealed bag in the fridge.  It didn't dry out and we got to play with it another day. (Right now the "play dough" is still in our fridge... so we'll try it out again this week.)

He used a blunt plastic knife, measuring spoons, measuring cup, and an olive jar (our makeshift rolling pin) to play with the dough. 

boy using a plastic knife to cut homemade playdough

Chuck's attention span:  This activity was a hit!  We spent about 30-45 minutes on two separate days playing with our "play dough."


4.  Water Bead Play


water bead play
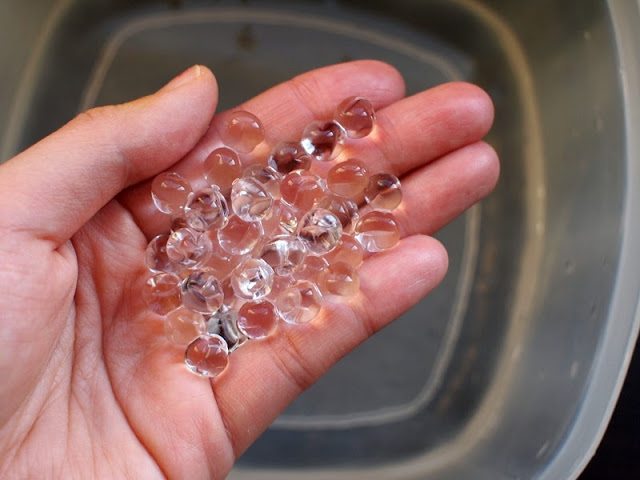
Again, I saw a ton of other mommies raving about these beads so I had to give them a try.  I found mine at Michaels in the flower section.  The beads are made of a special polymer that expands in water.  The resulting beads look a bit like boba balls and are slippery and firm.  They also bounce a bit if dropped.

Here's what the water beads initially looked like ...
what do water beads look like- explanation

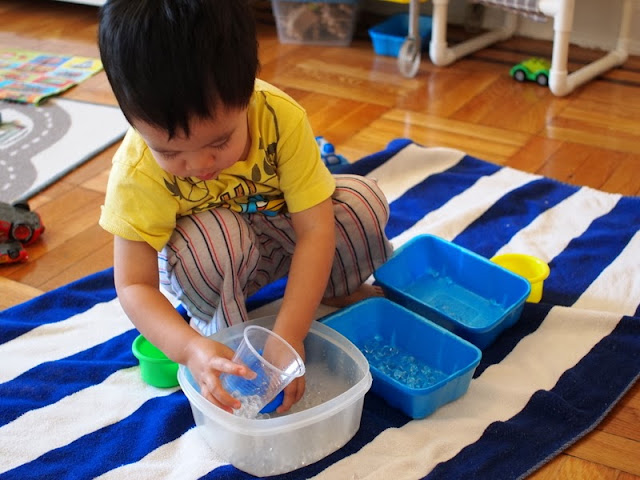
After a couple of hours, our beads grew and Chuck had a blast scooping them from container to container.

Warning:  Yes, they can be a choking hazard.  I repeatedly told him that the beads weren't food and I made sure to watch him while he played.  Once we were done with the beads, I threw them away in the garbage can.  (You can't pour them down the drain because they can clog your pipes.)

toddler playing with water beads
Chuck's attention span:  This activity was a hit!  He spent about an hour just scooping the beads from container to container.


So, for all you mamas out there who are also stuck at home with young ones... stay strong!  We can make it through winter!  Hopefully one of these ideas will help keep you sane this week.

Happy crafting, friends!

Tuesday, December 17, 2013

DIY Earmuffs? (A craft flop)

A couple of weeks ago I couldn't sleep.

Did I drink too much coffee?  Nope.  Was I worried about Christmas shopping? Nope.

Don't laugh, ok?  *Big breath* I couldn't sleep because I kept thinking about how I could crapt myself a pair of earmuffs using stuff in our apartment. 

Weird right?  I don't even wear earmuffs... but for some reason I kept wondering if I could make them.  So the next day I played around with some materials ... and I ended up with a pair of these:


I have kind of mixed feelings about them.  On the plus side, they look like earmuffs and they also block out some of the cold.  However, they feel a little too light and stiff around my ears. 

So, while I'm proud that I made a pair of semi-working earmuffs, I think this is probably a craft flop.  Now if for some reason you want to see how I crapted these earmuffs (or you wanna see Chuck wearing the earmuffs), keep on reading!


Thursday, December 12, 2013

Make your own CB2 inspired Cardboard Penguins

Cardboard penguins?  Who wants to make cardboard penguins?

Me!  I saw these wood penguins from CB2 and thought they looked so cute.  But then I saw the price tag and thought "Ha!  I can crapt them for next to nothing!"  So here they are... my crapted cardboard penguins.


Wanna make your own?  Read on to get the template!

Monday, December 9, 2013

Make Homeamde Felt Milk Jug Cap Ornaments


Each year I try to make a couple of handmade ornaments for our tree.  Last year, Chuck and I made these hand and feet salt dough ornaments.  I would have made him a new set this year... but his feet are so big that the ornaments would end up being the size of small plates.

So instead, this year I turned a bunch of milk jug caps (gifted to me by a craft-loving aunt- thanks!) to make these mini felt ornaments.  Each one has a different design and they came out so colorful and cute.... I just want to eat them up.   But don't worry, I won't because they're made of felt...and glue...and plastic...

Can you guess which one is Chuck's favorite?  Keep on reading to find out... 

Monday, December 2, 2013

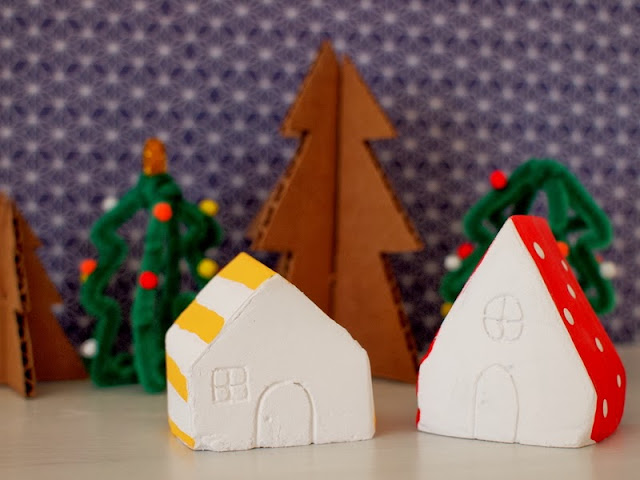
DIY Mini Plaster of Paris Christmas Village

I've always loved Christmas.  It's the time of year when twinkly lights decorate the dark nighttime sky.  And, it's the time of year that I'm reminded to hope because of God's great love for us.

Nowadays, Chuck and I love looking at the miniature Christmas village on display at our local craft store.  We always walk around oohing and ahhing over the little houses, ferris wheel, and tiny dog playing in snow.  It's magical.

So that's why I made us our own miniature Christmas village out of materials that we had lying around our apartment.

Let's Make a DIY Mini Christmas Village!


DIY Mini Plaster of Paris Christmas Village
This post contains affiliate links.  Thank you for your support!

(Psst- Click here to see see how I made the pipe cleaner and cardboard trees.)


Monday, November 25, 2013

DIY Double-sided Popsicle Stick Puzzles

I'm not sure when it happened... but Chuck went from being a "sparkly-pink-bracelet" wearing boy to being a "rough-and-tumble-loves-cars-and-trucks" kind of boy.

It happened so suddenly.  *Sigh*   (Strange, I'm humming "Sunrise, Sunset" right now...)

Anyway, with Chuck's new love for cars with eyes and Bob the Builder, I made him this set of popsicle stick puzzles. There are tons of tutorials out there for these things, but I used the one from Repeat Crafter Me because she made double-sided puzzles.  (Two puzzles for the price of one?  Love it!)

Here's a photo of one puzzle set.  It's got Bob the Builder on one side and Scoop on the other.  (Yup, I know the names of the machines.  I can't remember what day it is sometimes, but I can name most of the characters on that show by heart....weird.)

Let's get crafting!  Can we build it?  Yes, we can!  (Tee hee, I couldn't help it.)

Materials:
  • Popsicle sticks
  • Images (two of each)
  • Sandwich bags
  • Packing tape
  • Clear tape or masking tape 
  • Mod Podge*
  • Sponge brush
  • Cutting Mat
  • Exacto knife
  • Scissors
  • Optional:  Markers / Crayons
 *Note:  Some people just use Elmers glue.  I had a ton of Sparkle Mod Podge, so I just used that.  That's why they came out rather.... sparkly.... Next time I'll just use normal Mod Podge.

Directions:

1.  Print and cut out two of each image.  One copy will go on your puzzle and another will go on your sandwich bag. (I don't own a colored printer, so I had to color my images in by hand.  I don't really recommend that because it was pretty time intensive...)

2.  Figure out how many Popsicle sticks your image will need.  Then, line up your sticks against something straight.  Tape the sticks together so that they'll stay together for step 3.


3.  Turn your sticks over so that the taped side is on the bottom.  If you'd like, label the sticks with numbers.  Use Mod Podge to glue your images onto the non-taped side of your Popsicle sticks.

4.  Let your images dry.  (I moved mine to parchment paper so that the Mod Podge wouldn't stick to my work area.)

5.  Once your Mod Podge dries, turn your puzzle over so the taped side is facing up.  Take off the tape and use an exacto knife to cut the sticks apart.  (Make sure to work on a cutting mat and cut from the back/ non-image side.)

6.  Optional:  To make a double-sided puzzle, tape the sticks together again, Mod Podge another image on the backs of your puzzle, and then cut the sticks apart again.


7.   Use packing tape to label sandwich bags with the images.  This will make clean-up easier and help the user to put together the puzzle.

Happy crafting!

Thursday, November 21, 2013

DIY Crapted Wrapping paper (Plastic Bag Printing and Cat Stencils) and DIY Washi Tape

Alright, this post's title is rather crazy.  In my defense, I just put everything up there because I couldn't figure out a better way to incorporate all the ideas into one slick title.

Hrmm... let's take a step back and start again.

*Breathes*

My sister's birthday is coming up next week.  I already bought her a gift and thought it would be nice to crapt the wrapping paper.  So, I cut up a paper bag (the kind that you get from a store when you buy stuff) and made these two crapty wrapping paper patterns:

The design on the left was made using this Plastic Bag printing method.  It was inspired by my sister's love of turtles.  (That's what the green blobs are.)

The design on the right is made using cereal box stencils.  It's a bit more modern.  (Psst- Can you tell that it's a bunch of golden cat faces?)

Would you like to see how I printed the patterns?  If so, read on!  If not, you can always eat some ice-cream. Yum.

How to make cat stenciled wrapping paper:
Materials:
  • Cereal box
  • Pen
  • Pencil
  • Exacto Knife
  • Scissors
  • Cutting mat
  • Paint
  • Sponge brush
  • Paper towel

Directions:

1.  Doodle your cat face on a piece of cereal box.  Cut the face out.

2.  To keep your design even, first use a pencil to lightly mark where you want your cat faces.  (I used my stencil as a guide.)  Then, stencil your design over your pencil marks.  When you're stenciling, don't load too much paint onto your sponge brush and keep your hand steady as you hold down the stencil so you don't smudge your design.  If you're worried, you can always do a couple of trial runs on a piece of scrap paper first.

3.  Let your design dry and you're done!  Meow!


How to make a plastic bag printed wrapping paper design:
Materials:
  • Sandwich bag
  • Paint
  • Paint brush
  • Q-tip
  • Paper Towel

Directions:

1.  "Ink" your plastic bag by painting over a portion of it.  (If you're a clutz like me, only paint in the middle of your bag.  This way your hands won't smear the paint when you flip the bag over.)
2.  Use a Q-tip (or the back of your paint brush) to remove bits of paint and create a design.
3.  Flip your bag around and press the painted side on top of your wrapping paper.  Rub your hand over the design to make sure it transfered.
4. Repeat this step to add other blocks of colors or designs.  (I used the same bag throughout and simply wiped off excess paint with a paper towel.)

You can also paint little shapes onto your bag and then use those to make prints too.


As you can see, I added some turtles and yellow flowers to complete the print.

And since I was already making the wrapping paper, I figured I might as well make fake washi tape out of masking tape.  I simply took pieces of masking tape, stuck them to parchment paper, and then doodled on them with Sharpie markers.  The ends of the tape don't completely adhere to the parchment paper, but that's ok because I used the tape up right away.


Did you make it this far?  Phew.  *High five.*  This was a long post.  Here's a photo of the final product.  (I chose the cat design because it looked cooler.  Plus, my sister really loves her cat.)


Here's a photo of the back.  Yurp.  I went crazy with my fake washi tape because the patterns were just too cute.

Happy Thursday!

Thursday, November 7, 2013

DIY Kids' Portable Stove top

Sometimes when I'm cooking in the kitchen, Chuck pretends to cook alongside me.  It's pretty cute.  I'll give him one of my unused pots and a large plastic spoon, and he'll whip up something for me to try.

Lately he's been cooking for his toy cars.  With this new interest in entertaining, I thought it was high time he got his own stove.  Taking inspiration from this Pack-n-Go Kids Play Stove, I made him a mini portable stove top.

DIY Portable Kids Stove Top Toy


DIY Kids' Portable Stove Top

Since we live in a small apartment, I'm always hesitant to purchase large toys for Chuck.   I loved this simple DIY toy because it supports his imaginative play and doesn't take up too much space!  The storage container's lid becomes the "stove top" and all his cooking toys are stored inside.


Materials:
  • Plastic storage container
  • Sharpie Marker
  • Scissors
  • Contact Paper

Directions:
1.  Doodle some burners and knobs onto your contact paper using your Sharpie marker.
2.  Cut out your doodles.
3.  Stick them onto your plastic storage container.

That's it!  Now you've got an easy-peasie DIY stove for cooking.  Pretty awesome!

How to make a toy stove top for kids


Happy crafting!

Wednesday, November 6, 2013

Star Painting (using Contact Paper)

Lately the cooler temperatures and shortened daylight hours have me looking at the sky to find stars.  However, since we live in a well-lit, urban environment, star gazing isn't really a viable option.

So once again I felt the urge to make some star-inspired artwork.  If I can't see stars in the sky, then I'll just have to make my own to enjoy.  Now, if you've been following this blog for some time, you'll recall that this isn't the first time I felt drawn towards the stars.  Last year I placed a galaxy of cardboard stars on our living room wall.  Then earlier this year I painted the inside of an umbrella to look like a galaxy.  This time I took a simpler approach and made myself some star artwork using contact paper.


Materials:
  • Canvas
  • Contact Paper
  • Pen
  • Scissors
  • Paint
  • Sponge brushes (or paint brushes)

Directions:

  1. Sketch out your stars onto the back of your contact paper.  Cut the stars out.
  2. Place the stars on your canvas.  Play around with their arrangement until you're satisfied.  Once you have a pleasing design, pull the backing off and stick the stars onto your canvas. (Make sure that they are stuck on well so that you get nice crisp lines.)
  3. Dab paint over your canvas.
  4. Once the paint dries, carefully peel off your contact paper stars.  You should see a bunch of white stars where your contact paper blocked the paint.

Quick and easy, right? Just remember to make sure that your contact paper stars are completely stuck on tight.  Eeek!  See that leftmost star below?  The paint bled through because the contact paper wasn't sticking to the canvas properly.

 Happy star crafting!

Thursday, October 24, 2013

DIY Sugar Skull (Day of the Dead) Milk Jug Luminaries


Currently my college friend Kim is visiting us for the week.  It's been really nice having someone else here while hubby is away.  Time just passes by much quicker when you're having fun with a friend.

And just how have we been having fun?  Well, we've been playing with Chuck... and eating... and watching tv... and crafting... a lot... a whole lot...  Halloween and Dia De Los Muertos are right around the corner, so all of our crafts have been centered around those two holidays. 

I'm currently on a sugar skull kick.  I just love the way they look.  So when I was staring at an old milk jug the other day, an idea dawned on me.  Ding!  Why not use them to make some sugar skull luminaries?  So tada, here's what I came up with:


I'd seen tons of posts for ghost milk jug luminaries for awhile, so I figured this was a nice twist on that craft.  It uses skulls and colorful lights instead of ghost faces and white lights.   I just love how this little guy turned out.  He's so cute and smiley... and gosh darn it, I've just got a big ol' soft soft for any craft that involves twinkly, colorful lights.


Wednesday, October 9, 2013

DIY Honeycomb Hexagon Popsicle Stick Wall Art

Did you ever make things out of Popsicle sticks as a kid?  I have fond memories of making popsicle stick picture frames and jewlery boxes in summer camp.

Today's craft is a slightly more sophisticated version of this beloved childhood activity.  (Maybe that's why I enjoyed making it so much?) This hexagon wall art is graphic, super easy to make, and (bonus!) covers a large space for relatively little cost.   If you have a wall that you'd like to easily decorate, why not give it a try too? 


Materials:
  • Popsicle sticks
  • Paint
  • Paint brushes
  • Hot glue gun

Directions:


 1.  Practice arranging your Popsicle sticks.  When you're pleased with your arrangement, take a photo so you'll remember it. 

2.  Paint your sticks.  (I initially painted them yellow, but thought they looked a little too flat.  Hubby suggested that I add a gold stripe to them to give them more depth.)

3.  Hot glue your sticks together.  One easy way to ensure that your hexagons have similar angles is to draw out a hexagon shape and use that to guide your gluing. 

And that's really all you have to do to create your own honeycomb wall art.


Happy crafting!