Showing posts sorted by relevance for query Halloween. Sort by date Show all posts

Friday, November 21, 2014

Candy Mosaic Art with Kids

Do you still have leftover Halloween candy?  Eeek. We do.  This week's Creative Preschooler theme is food!  With Chuck's current aversion to painting, I thought it would be fun to use our excess candy and make art with it!  So we made ourselves some lovely, colorful candy mosaic art!

Make Candy Mosaic Art with Kids!

kid Art- Make candy Mosaic craft


It's always special to make art with non-traditional materials.  Some of my favorite food-art projects include our colored salt arttortilla art,  gumdrop flowerscornstarch sidewalk paint, and homemade watercolor paints!


Friday, October 25, 2013

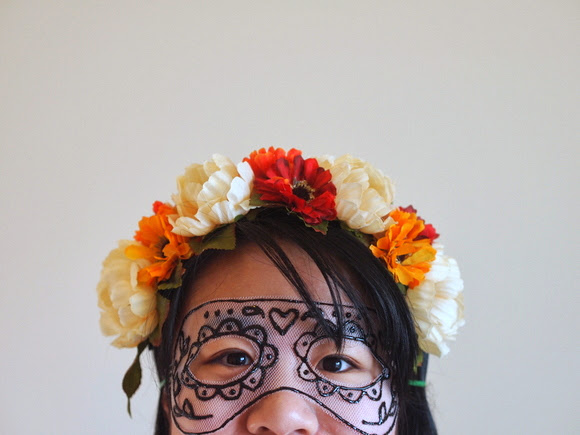
DIY Tulle Mask


Looking for a simple, cheap, and fun way to make masks for Halloween this year?  

DIY Tulle Mask for Halloween

Why not try making some out of tulle and fabric paint?  Inspired by these masquerade masks from Sprinkles in Springs, I created my own Day of the Dead Mask for Handmade Charlotte.  Check out the tutorial  here!

Wednesday, September 25, 2019

Fall Forest Paper Chains

So... apparently, I have a paper chain obsession. I know, I know. I just posted these sweet Halloween paper chains earlier...but I had to share this adorable bear and fox version too. They're SOOOO cute and such a perfect fall craft to do with the kiddos.

So if you're looking for an adorable and easy fall craft, THIS IS IT.

Let's make some...

Fall Forrest Paper Chains!

fun fall bear and fox paper chains- such an adorable paper craft to do with the kids to decorate your home or classroom


Wednesday, December 1, 2021

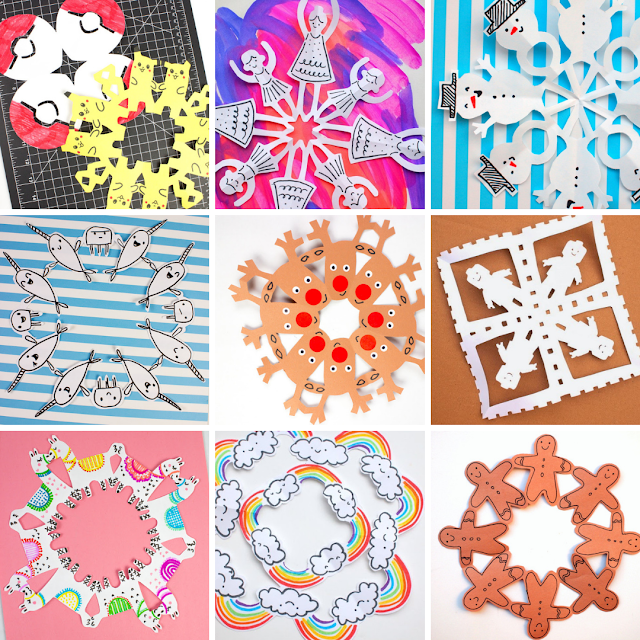
15+ Cute and Easy Snowflake Designs

Looking for some sweet and unique snowflake designs to cut out with the kids? 

Over the years I've cut out hundreds of paper snowflakes. And while I enjoy letting my scissors wander, sometimes it's fun cutting out pre-set designs. So if you're looking to try cutting out some unique and kid-friendly paper snowflakes, check out these designs below! 

(We've got Pokemon, Lego, Narwhal and Jelly, and unicorns... just to name a few!)

How to Cut Cute and Unique Paper Snowflakes with Kids

How to cut Super Cute and Fun Paper Snowflakes with Kids


Wednesday, September 26, 2018

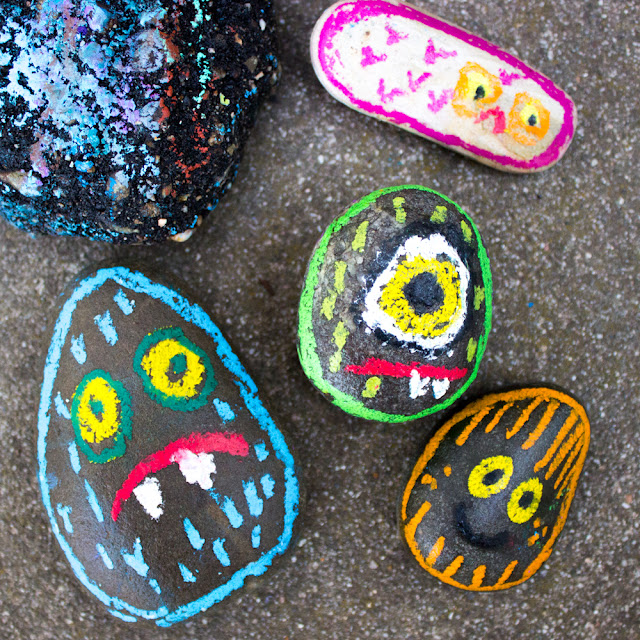
Oil Pastel Rock Monsters

These little rock monsters are super cute and fun to make around Halloween!  Just grab some rocks and oil pastels and you're ready to go!

Oil Pastel Rock Monsters


OIl Pastel Rock Monsters


Note:  This post contains affiliate links.  This means I make a small bit of change when you purchase items through the links.  Thank you for your support and the grocery money! For my full disclosure policy, click here.


Wednesday, October 30, 2013

Painting Lightening McQueen Shoes


Here's a fun fact- In the past couple of months, I've watched the movie Cars probably twenty or so times.  By now, I know all the characters' names and I could probably recite 50 to 75 % of the movies' lines from memory.

Why this sudden and intense interest in cartoon vehicles?  Well, it's Chuck.  We're a Cars household because he just loves the movie.  If you ever visit our home, you'll probably find him either (1) racing around on his bike, pretending to be Lightening McQueen, or (2) playing with his toy cars.

This Halloween, Chuck's going to dress up as Lightening McQueen.  I thought it would be fun to try painting him some shoes to go along with his costume.  It was my first time painting shoes. Here's how they came out: 


At first I wanted to get white or red canvas shoes, but they only had black ones at Walmart. Overall I'm pretty pleased with how they turned out.  They're super cute.  But, I'm not sure how long (or how well) the paint will last.... so the jury's still up about that.   I'll probably update this post in a couple of weeks to include some notes about wear and tear.... but for now here are some photos of my process in case you wanted to see what I did.

Materials:
  • Canvas shoes
  • Chalk
  • Acrylic paint
  • Thin paint brushes
  • Pencils
  • Paper
  • Q-tip
  • Paper towels
  • Jar with water
  • Tray to hold paint


1.  First I placed a piece of paper on top of my shoe and traced the top of the shoe to see how big to draw my images.  Then, I drew and cut out my Lightening Mcqueen.

2.  I briefly lamented not having white canvas shoes because I wasn't sure how to transfer my image to the shoes. (Seasoned crafters out there- do you know of a good way to do this?)  I ended up just tracing my image onto my shoe with sidewalk chalk (way too big, I know... but this was the smallest chalk I had) and sketching out the details.  (There's gotta be a better way, right?)


3.  I pulled out my paint and started painting my images.  After I filled in all the colors (see right shoe), I outlined my images using a pencil dipped into my black paint.  The black outline made my images much sharper and nicer to look at (see left shoe.)  Then, I just cleaned off my chalk marks with a wet q-tip.

And that's all!  Ka-chow!


Chuck's really enjoyed wearing these bad boys around town and I'm just glad that I got to craft something useful and cute.   

How are you getting ready for Halloween?  Happy crafting! 

Monday, September 26, 2022

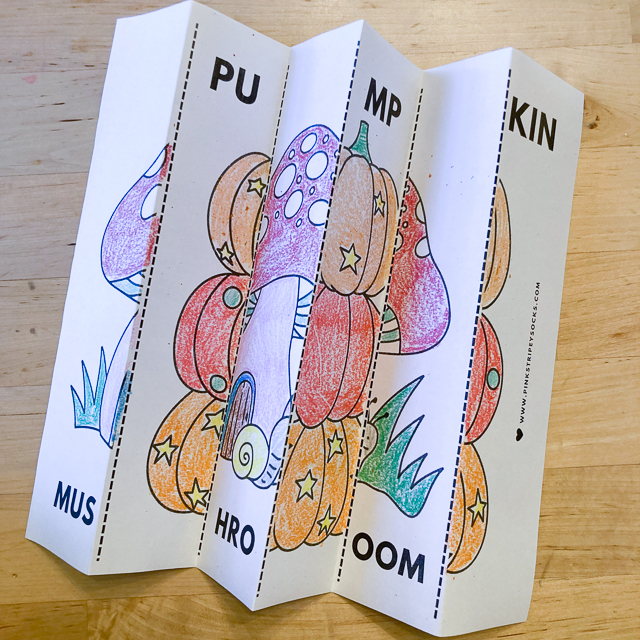
Free Printable Fall Agamographs

Did you grab our printable Halloween Agamographs last week? They were such a hit that I made these fall agamographs for you to print out and make with the kids. The free printable is down below! Print, color , and accordian fold them for some easy kid-friendly STEAM-filled fun!


Free Printable Fall Agamographs

(A super easy and fun STEM activity for kids of all ages!)

Free printable Fall Agamographs for teachers parents librarians easy STEM and STEAM craft and activity


Sunday, October 31, 2010

Super Dog

Hello everyone. Like a squirrel storing nuts for winter, I'm using this blog to store one funny, silly, or happy thought or thing that happens everyday.  Hopefully by the time winter rolls around I'll have an abundance of bright memories to carry me through the cold, dark days. 

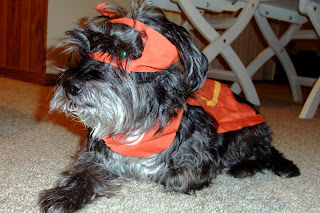
So, what better day to start blogging than Halloween?  It's my favorite holiday and coincidentally, my dog's favorite as well.  He just loves getting gussied up for the ladies.  Here he is wearing his homemade super hero dog costume. He's so crafty.

dog super hero costume DIY

DIY Halloween Dog Costume

Saturday, October 3, 2015

Sparkly and Googly Eyed No-Carve Pumpkins

Are you feeling the Fall vibes?  Ready to do some easy pumpkin crafts?  If your little guy or gal isn't quite ready for carving pumpkins, then today's no-carve pumpkin option is for you!  Check out these sparkly and googly eyed no-carve pumpkins!

Sparkly and Googly No-Carve Pumpkins for Preschool Halloween crafting
This post contains affiliate links.  Thank you for your support!


Sunday, September 26, 2021

DIY Mod Podge and Tissue Paper Dragon Eye Book

Last week I shared how to transform old books into spellbooks for Halloween. This week, I wanted to share how I made this creepy jeweled dragon eye book! It's the perfect craft for Halloween, fantasy, and dragon lovers.

How to Make a Dragon Eye Book 

How to make Mod Podge and Tissue Paper Dragon Eye Book Craft

This post contains affiliate links.  This means I make a small portion off of any purchases made through the links at no additional cost to you.  Thank you for the grocery money!  For my full disclosure policy, click here.

Friday, September 4, 2015

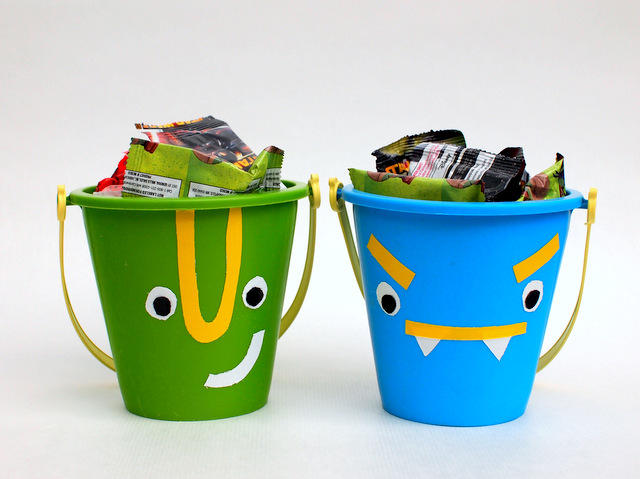
DIY Halloween Treat Containers

The other day I was cleaning out our old sand toys... when the thought hit me.  Hey!  These buckets would make great Trick-or-treat containers!

(Funny when inspiration strikes, right?)

Create your own Halloween Treat Containers- super easy way to upcycle a sand toy!

Tuesday, September 24, 2013

DIY Candy Corn Perler Bead Bracelet 1

Are y'all going Halloween crazy yet?  (Or is it just me?)

Last weekend I took Chuck to Target and we had a blast seeing all the costumes and decorations.   Doesn't matter how many times I've seen a dancing skeleton or singing skull, this stuff never gets old.  I guess I'm a kid at heart because Halloween is my very favorite holiday.

So that's why I'm super excited to share this craft with you.  I went a bit crazy with my perler beads and designed two candy corn inspired bracelets.  Today I'm sharing the simpler design with you.  If you like this one, head on back tomorrow to see how I made the more complicated one.  

Here's a photo of my candy corn inspired bracelet: 


Materials:
  • Perler beads
  • Scissors
  • Elastic Cord (I used a thin 0.5 mm elastic cord for these bracelets, but honestly a thicker cord is better to use because it's easier to string the beads with and the finished bracelet feels sturdier.)

Directions:
1.  Cut out about 40 inches of cord.  (Honestly, it doesn't matter what length you initially use.  You'll just end up tying on more cording later.)  Tie on a bead to act as a stopper.  (I used a black bead.  It doesn't matter what color you choose because you'll end up removing this bead at the end.) 

2.  String on 
  • white bead (#1 bead) 
  • white bead (#2 bead)
  • orange bead (#3 bead)
  • orange bead (#4 bead)
  • yellow bead (#5 bead)
  • yellow bead (#6 bead)
(I labeled the beads with numbers to help out with step 3.) These six will be your first column of beads.


3.  Now you're going to add your second column of beads.  Add on a yellow bead (#7).  Then,slip your string through your #5 yellow bead.  Add an orange bead (#8).  Then, slip your string through your #3 orange bead .  Then, add a white bead (#9).  Then, slip your string through your #1 white bead.   Then, pull tight.


 Now you've got the basis for the rest of your bracelet.  See how some portions of the bracelet jut out and some portions of the bracelet don't?  As you continue to build your bracelet, you'll alternate between adding a bead to fill in the gaps, and stringing your cord through the beads that jut out.

4.  Let's add the fourth and fifth columns. 
  • Column 4:  Add a white bead.  Slip your string through the jutting out white bead.  Add an orange bead.  Slip your string through the jutting out orange bead.  Add a yellow bead. Slip your cord through the jutting out yellow bead.  Pull tight.
  • Column 5:  Add a yellow bead.  Slip your string through the jutting out yellow bead.  Add an orange bead. Slip your string through the jutting out orange bead.  Add a white bead. Slip your string through the jutting out white bead.  Pull tight.

Keep going and continue to follow the pattern.  Add a bead and then slip your string through a bead that's jutting out.  Keep pulling your string tight after adding each column of beads.  If you run out of cord, no worries!  Just tie on another strand.

Soon you'll get a long bracelet like this:
Now make sure that (1) it fits your wrist and (2) both ends fit together like zipper teeth.  Then, string your cord through both sides of the bracelet and pull tight.  Remove the stopper bead and tie your beginning and ending cords together.


Tada!  Done. And that's how you make a simple candy corn inspired perler bead bracelet.  Like it?  If so, come back tomorrow to see how I made a slightly more complicated candy corn bracelet.

Happy beading! 



Wednesday, September 3, 2014

5 Ways to Write Secret Messages

As a kid, I loved the idea of being a detective or a secret spy.  They got to wear cool clothes, go on adventures, and solve mysteries.  A couple of weeks ago I tried playing a detective game with Chuck.  I hid his favorite stuffed pig and then left 5 clues for him to follow.  The clues were all written as secret messages.  We had to do something to the paper to revel the hidden words.

5 Ways to Write Secret Messages


Pretend to be a Detective and write secret messages 5 different ways

(This post contains affiliate links.  Thank you so much for your support!)

Chuck was onboard with the game.   We've recently been gobbling up Nate the Great books from the library, so he really enjoyed being a detective and solving the case.


Tuesday, October 1, 2013

DIY Fake Sleeve Tattoo

So... what are your thoughts on tattoos?

I don't have any, but I really love them.  They're beautiful to look at and often times come with a touching or inspiring story.  Every year or so, I toy around with the idea of getting one.  But I never do because they're so permanent.  Even though I love the ways hearts and sparrow tattoos look today.... I'm not sure how I'll feel 10, 20, or 30 years from now.  (Although... sometimes I like to imagine myself as a crazy old grandma, rocking some really gnarly skull tattoos.)

With Halloween just around the corner, I lived out my tattoo fantasies with this DIY sleeve tattoo.

Interested in seeing how I made one?  Well, in the interest of full disclosure:
  • This craft took much longer to complete than I initially thought.  It was really, really tough to color on hosiery.  So, if you aren't digging that... you can just buy yourself a sleeve from the store.  Or, you could just draw and color in one tattoo.  I love the way sleeve tattoos look, so I went in whole hog. 
  • I found this sleeve tattoo tutorial from Urban Threads to be really helpful.
 
Materials:
  • Cereal box
  • Tattoos doodled with Sharpie on paper 
  • Tape (Normal kind and packing tape)
  • Scissors
  • Old nude hosiery
  • Fabric markers

Directions:

1.  Take a cereal box and roll it into a cylinder that's approximately the same size as your arm.  Tape the cylinder closed.

2.  Cut out your various doodled tattoos.  Tape them down onto your cardboard cylinder.

3.  Cut off one of the legs from your hosiery.  Cut off the toe portion.  Roll it over your cylinder.  (If you find that it's getting cut on some of your sharp cardboard edges, round them off so the hosiery slides on easily.)

4.  Color and outline your tattoos.
Notes:
  • This was pretty tough to do.  If you color normally, your marker tip drags along the surface.  I found that dabbing worked best. 
  • I first used lighter colors and then moved to darker ones (to prevent blurring and smearing). 
  • I also looked at tattoos online for color inspiration. 

5.  Let your images dry according to directions.  (I waited overnight.)

Once your fabric paint dried, roll your sleeve right off.   Tada!

And that's it!  Slide the sleeve over your arm and you've got your very own DIY fake sleeve tattoo. 

Here's what a "tattoo" looks like up close:
Happy "tattooing!"  

Tuesday, October 8, 2013

DIY Monster Mash-up Rubbing plates

Looking for a neat Halloween activity for your older kids to do? 

Well, why not try making some monster rubbing plates?  Call forth your inner Frankenstein and create a bunch of monster rubbing plates out of cereal boxes and fabric paint. Then, cut your monsters up and mix and match different heads and bodies to create even more wacky creatures. 

DIY Monster Mash-Up Rubbing Plates

Pretty silly, right?  Head on over to Handmade Charlotte to get started on this spooktacular craft.

Wednesday, September 14, 2016

STEAM KIDS- An AWESOME book with 50+ creative, hands-on projects for kids!

I love doing things with my kids.  But lately it's been hard to carve out time to find, set-up, and prep fun and educational activities.  With all the buzz about STEAM (Science, Technology, Engineering, Art, and Math) activities, I've been especially keen on trying out more of those too.

Maybe you're like me?  Maybe you're looking for a great resource full of easy and fun STEAM activities to try out with your kids too?

If that's the case, then I'm so glad you're here!  I'm excited to announce the launch of a brand new book- STEAM Kids!      

STEAM Kids- 50+ Awesome and easy activities that combine science, technology, engineering, art, and mathematics learning for kids
This post contains affiliate links.  Thank you for the support and grocery money! For my full disclosure policy, click here.


Friday, June 24, 2011

Should strollers...

wear costumes?

I'm inspired. Halloween is just around the corner...

(Thanks for the link, Esther!)  To see this photo and other rocking strollers, click here.

Monday, November 14, 2016

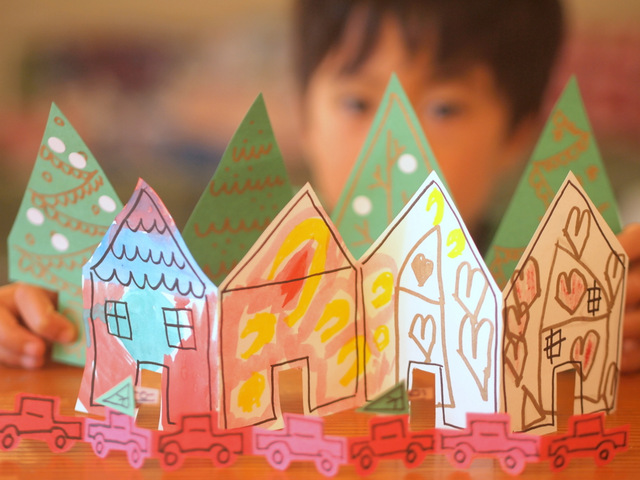
DIY Paper Chain Christmas Village

Last week I saw stores with Christmas villages already set up and ready to go.  Anyone else love seeing these tiny scenes on display?  There's something magical about seeing things in the miniature.  Today I'm sharing a fun Christmas Craft that you can do with the kids this holiday season.   Make your very own Paper Chain Christmas villages!

Paper Christmas Village Chains- Fun holiday kids craft
This post contains affiliate links.  Thank you for your support.  For my full disclosure policy, click here.

Friday, March 28, 2014

Toilet Paper Roll Flowers and Cacti

I've said it once, and I'll say it again.  I've got a black, black thumb.  And this saddens me because deep down, my heart is really green.  I love looking at plants, I love eating plants, and goodness one year I was even a tree for Halloween!  But I'm a plant killer.  So this makes today's toilet paper roll craft perfect for me.  These cardboard roll plants are pretty to look at, and impossible to kill.


Make Toilet Paper Roll Flowers and Cacti

make toilet paper roll cacti and tulip flowers craft

Yup.  Aren't they pretty?  If you're interested in making yourself some everlasting recyclable plants, keep on reading!


Tuesday, December 27, 2022

Free Printable New Year Agamograph

Can you believe that it's only three more days until the New Year? Time has sped by since Christmas and I'm stopping in to share this free printable New Year's Agamograph. :) 

FREE Print and Color New Year's Agamograph

how to make a free printable new year's agamograph for easy kids homeschool library elementary school craft activity