Showing posts with label summer. Show all posts
Wednesday, March 4, 2015
Rock Tic-Tac-Toe Game
Ah, oil pastels. After seeing that they could be used to decorate pumpkins, I thought they would be perfect for creating a cute and colorful rock tic-tac-toe game.
Thursday, February 26, 2015
Shark Binoculars
We are in LOVE with shark crafts over here. Love, love, love them.
So when I was sent a bunch of free craft materials from Horizon Group awhile back, I knew what we had to use them to make.... Shark toilet roll binoculars!
Toilet Roll Shark Binoculars
Aren't they adorable? They are my favorite shark-themed craft so far!
Tuesday, February 24, 2015
Make Sand Dough Sculptures and Ornaments
Whenever we go to the beach and build with sand, I always feel slightly sad knowing that our creations will eventually wash away. Do you ever feel that way too? I recently found this great book at the library Kids' Crazy Concoctions (affiliate link) that shared a recipe for making homemade gluten free sand dough! Yup. You just need 3 ingredients to whip up a batch of this stuff. Then, once you're done making your creations, wait over night and they'll dry nice and hard. Isn't it cool? You can make your very own long-lasting sand dough sculptures and ornaments!
Make Sand Dough Sculptures and Ornaments!
This post contains affiliate links. Thank you for your support!
Wednesday, February 4, 2015
Super Easy Cardboard Biplanes
The plane obsession continues over here! Just when you think we're done with transportation crafts... oh no... we've got another one up our sleeve.
Awhile back Chuck and I made this toilet roll biplane. But sadly, that plane broke. Chuck still loves biplanes, so I came up with this super easy practically unbreakable cardboard biplane craft for him to make and then fly.
Super Easy Cardboard Biplane Craft
This post contains affiliate links. Thank you for your support!
Sunday, October 19, 2014
Toilet Roll Biplane Airplanes Craft
Although Chuck isn't always so keen to craft with me (sad, I know,) he fortunately loves making cardboard toys with me. (Yay!) Currently he loves planes. But since we've already crafted toilet roll planes, toilet roll helicopters, and cardboard roll space shuttles... I was at a loss as to what we could make together next. One day he suggested that we make a biplane together. So we went with his suggestion and did this toilet roll biplane craft!
I think he looks a little like Leadbottom from the movie Planes, don't you?
Check out how we made this simple plane from recycled materials below!
Toilet Roll Biplane Craft
Note: This post contains affiliate links. Thank you so much for your support!
I think he looks a little like Leadbottom from the movie Planes, don't you?
Check out how we made this simple plane from recycled materials below!
Monday, August 18, 2014
DIY Cardboard Rocket Launcher Toy
Apparently we've reached the stage where Chuck likes pretending to shoot things... and people. (Ack. Is this common? I'm assuming so... ) So I thought it would be fun to somehow make a toy that would actually shoot things, like a catapult or a slingshot. We always seem to have cardboard rolls lying around, so I built this cardboard roll rocket launcher toy. Then, we had a BLAST playing with it!
Get it? Rocket launcher? Blast? Like blast off? Hee hee hee... wah wah wah.
This rocket launcher toy uses rubber bands and cardboard rolls to shoot aluminum foil balls. It's so powerful that we can actually shoot a ball across our (small) patio... whoa, right? Since the balls are made from aluminum foil, they don't hurt. So you could create several launchers, shoot each other, and then not worry about anyone getting hurt. Excellent, right?
Keep on reading to build your own rocket launcher and see other cool DIY toys that you can make and play with your little one.
Get it? Rocket launcher? Blast? Like blast off? Hee hee hee... wah wah wah.
DIY Cardboard Roll Rocket Launcher Toy
(Note: This post contains affiliate links. Thank you for your support.)
This rocket launcher toy uses rubber bands and cardboard rolls to shoot aluminum foil balls. It's so powerful that we can actually shoot a ball across our (small) patio... whoa, right? Since the balls are made from aluminum foil, they don't hurt. So you could create several launchers, shoot each other, and then not worry about anyone getting hurt. Excellent, right?
Keep on reading to build your own rocket launcher and see other cool DIY toys that you can make and play with your little one.
Saturday, July 26, 2014
Make Toilet Roll Glasses!
Toilet roll crafts are some of my favorite ones to make. (You can check out our extensive toilet roll craft gallery here.) Right now we're still living out of our suitcases, so good ol' tp rolls are also some of the few craft items that I still have on hand. Recently I saw Krokotak's toilet roll sunglasses tutorial and I knew that I really wanted to make my own version. I've had pineapples and rainbows on my mind lately, so naturally they found their way into this adorable craft.
Toilet Roll Glasses
Monday, June 30, 2014
Let's Build Boats! (Engineering with Kids)
Lately we've been reading books on pirates around here. Arrrrgh maties! So I thought it would be fun if we tried our hands at building some boats from everyday materials. (I saw a similar idea from i2camp's Instagram feed and really wanted to try it out.) This was a fun engineering activity that required very little prep and just used random items from our crafting and recycling bins.
Kids' Engineering: Let's Build Boats!
(This post contains affiliate links Thank you for your support!)
Thursday, June 26, 2014
Make Bubble Prints! (from 101 Kids Activities)
Note this post contains affiliate links. Thank you so much for your support!
About a month ago, I received a free copy of 101 Kids Activities to review. It was written by the amazing kid blogger duo Rachel and Holly from Kids Activities Blog. These ladies are like the queens of kid fun and I was super excited to see what they had in store. 101 and activities? Wowzers.
After looking through the book, I can definitely say that it is an awesome go-to resource for anyone who wants to battle kid boredom. (Which seems to be especially prevalent in the summer... right?) The activities are super fun and use everyday, affordable materials. Here's an example of one activity that Chuck and I tried out from the book- bubble prints!
Make Bubble Prints!
Tuesday, June 24, 2014
Summer Paper Plate Crafts
It just hit me this morning that July 4th is next week. Next week. Summer is just flying by! Ahhhh! So I feel the need to do some summer crafts and that's why I made these super easy paper plate crafts. I dunno about you, but when I imagine summer, I see outdoor picnics, grill outs, and beach adventures. These activities usually involve disposable paper plates... which are such a great item to craft with because they're super cheap and super versatile.
So these are my summer inspired paper plate crafts. They're super easy to make, colorful, quirky, and just scream SUMMER FUN!
Fun Summer Paper Plate Crafts for Kids
(This post contains affiliate links. Thank you so much for your support!)
So these are my summer inspired paper plate crafts. They're super easy to make, colorful, quirky, and just scream SUMMER FUN!
Thursday, June 5, 2014
Homemade Body Paint Recipe (2 ingredients Needed!)
Last week I shared a simple 3-ingredient homemade body paint recipe. While we had fun trying it out, I kept wondering if there was another way to make homemade body paint. Turns out there is! I peeked around the internet and found this neat series of body paint recipes. The author shares a couple recipes that involved using washable white paint (which I kind of felt weird using on my skin...) and one that involved using two ingredients that I already had on hand.
2 Ingredient Homemade Body Paint Recipe
Tuesday, May 27, 2014
Corn Husk Paint Brushes
Last week my sister brought over a bunch of corn. I roasted them in the oven with their husks on and they were yummy. But as I cleaned up, I kept wondering if there was anything I could do with the discarded husks. Last summer I used my husks to make a corn husk doll. This time I tried my hand at making some corn husk paint brushes, since Chuck has been so keen on painting lately.
Last time he really enjoyed making abstract art with cardboard. This time he found it funny to paint with brushes make from food. Now if you're eating a lot of corn too, your kids might like trying out this activity too!
Corn Husk Paint Brushes
(Note: This post contains affiliate links. Thanks so much for your support!)
Last time he really enjoyed making abstract art with cardboard. This time he found it funny to paint with brushes make from food. Now if you're eating a lot of corn too, your kids might like trying out this activity too!
Friday, May 23, 2014
Make Homemade Body Paint
A couple of days ago my sister came over to visit. Chuck and I were super excited for her to come. She also enjoys making things so I wanted to try Paging Fun Mom's homemade body paint with her. I ended up not following their recipe and just winging it. It still came out and we had lots of fun painting homemade body paint on ourselves.
You just need three ingredients to make this creamy (and very moisturizing) body paint. Just FYI- it has a completely different consistency then real body paint and it's not meant to stay on. But that was ok with us. We ended up painting our pictures, wiping off our artwork, and then painting something else. Interested? Let's get making!
Make Homemade Body Paint
(Note: This post contains affiliate links. Thanks for your support!)
Thursday, May 15, 2014
Corn Syrup Paint
Are you looking for a paint that's super pigmented and remains glossy looking when it's dry? Well then this corn syrup paint is for you. Chuck and I whipped up a batch of this glossy paint the other day in our kitchen. Then we had loads of fun trying it out. The paint is edible (although you probably don't want to eat it), has a consistency thicker than regular paint, and looks like shiny enamel when it dries. Intrigued? Check out the results!
Oooooh. Pretty. So far we've made homemade sidewalk paint, homemade watercolor paints, and cornstarch toddler paint ... but none of those stand up to the gorgeous results of this homemade corn syrup paint. The bright colors and gloss are fabulous. (Yes. I used the f-word.) And ready for the best thing? You could probably whip up a batch of this stuff tonight with ingredients and materials already found at home. Let's get painting!
Make Glossy Corn Syrup Paint
(This post contains affiliate links. )
Oooooh. Pretty. So far we've made homemade sidewalk paint, homemade watercolor paints, and cornstarch toddler paint ... but none of those stand up to the gorgeous results of this homemade corn syrup paint. The bright colors and gloss are fabulous. (Yes. I used the f-word.) And ready for the best thing? You could probably whip up a batch of this stuff tonight with ingredients and materials already found at home. Let's get painting!
Thursday, May 1, 2014
Build a toy car that moves
I love painting things with Chuck, but sometimes I yearn to make things that actually move or do things. So when a mommy friend suggested that we build cardboard toy cars that actually move, wowzers, I had to say yes. She found the directions in an old kids' science book (that I don't remember the name of... sorry). And that's how we spent an awesome play date with five kids- eating pizza and then building and racing some cardboard racing cars.
1. The cars really move. Really. You just twist the tin can and then let go. Bam. The rubber bands store the potential energy and then once released, they turn the can... and your car moves by itself!
2. You don't need any expensive materials. In fact, you probably have most of the items already at home.
Have I whet your appetite enough? Ok. Let's build! Vroooom!
Kid Science: Let's Build a Car that Moves!
Today's craft is awesome for 2 reasons:1. The cars really move. Really. You just twist the tin can and then let go. Bam. The rubber bands store the potential energy and then once released, they turn the can... and your car moves by itself!
2. You don't need any expensive materials. In fact, you probably have most of the items already at home.
Have I whet your appetite enough? Ok. Let's build! Vroooom!
Thursday, March 20, 2014
DIY Flying Whirly Copter Toy
Lately Chuck and I have been infatuated with things that fly. That's why we made our cardboard space shuttle a couple of days ago. So today I took things one step further to create a handmade toy that actually did fly. Modeled after a plastic toy that hubby brought back from one of his trips, here's our version of a DIY Flying Whirly Copter Toy.
It's pretty neat that the toy actually does fly. You simply spin it between both hands and the copter flies out and floats to the ground. Keep reading to see how we made it (and a video of it flying!)
DIY Flying Whirly Copter Toy
It's pretty neat that the toy actually does fly. You simply spin it between both hands and the copter flies out and floats to the ground. Keep reading to see how we made it (and a video of it flying!)
Wednesday, February 26, 2014
Make a square and cube bubble
We are definite bubble lovers over here. With the colder weather outside, we've just been blowing them at home over a beach towel. Recently I learned that bubbles didn't have to just be spherical shaped. They could also look like squares and cubes too. What? No way!
Whoa. It's bubble play for us older folks! Keep reading to see how we made different shaped bubbles:
Yes way! Behold! A cubic bubble!
Whoa. It's bubble play for us older folks! Keep reading to see how we made different shaped bubbles:
Tuesday, February 4, 2014
Make Shaving Cream Clouds and Paint the bathtub walls
With all the crazy weather that's been happening around these parts, I thought Chuck and I could try creating some of our own crazy weather... indoors! So we made a shaving cream cloud and watched it rain rainbows...
Keep reading to find out how we made it rain rainbows!
Oooh. Isn't it pretty?
Keep reading to find out how we made it rain rainbows!
Friday, September 20, 2013
Cardboard Spaceship Climbing Toy
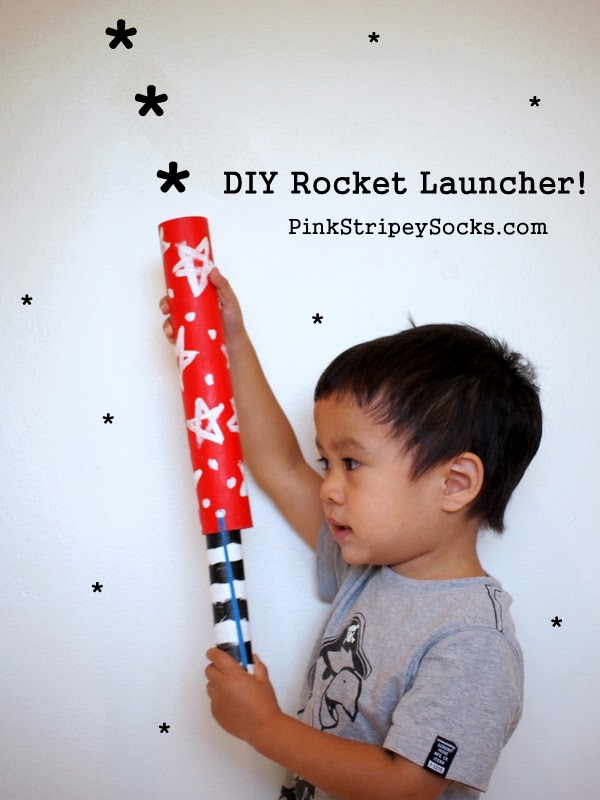
Currently Chuck and I have been reading books about the moon and space travel. He loves the Berenstein Bears "On the Moon" book and Eric Carle's "Papa, please get the moon for me."
So with that in mind, I made him a little cardboard spaceship climbing toy. I found some lovely examples online and one of the mommies in our toddler group made a very simple version out of paper. So, I based my design off of these.
- Cardboard box
- Scissors
- String
- Paint and paint brushes
- Mod Podge and brush (to protect your paint job)
- Packing tape
- Straw
Directions:
This was a really quick and simple toy to make.
1. Cut out your spaceship, moon, and two small rectangular stopper pieces out of cardboard.
2. Paint your spaceship and moon.
3. Once the paint dries, protect your paint job with Mod Podge.
4. Cut your straw in half. Tape it to the back of your spaceship.
5. Fold your long piece of string in half. Tape the middle of the string to the back of your moon. Then, string your two strands through the two straws. Tape the ends of string to your cardboard rectangles so that the spaceship doesn't fall off.
Here's a shot of the mechanics:
And that's it. Simple to make, and simple to use. You don't even have to make a spaceship and a rocket. What about an alien spaceship and earth? Or a basketball player and a basket? The possibilities are endless.
We went this route, and Chuck got a kick out of sending his cardboard rocket to the moon.
Cardboard Rocket Ship sent to the moon from Pink Stripey Socks on Vimeo.
And then, since I was working with cardboard already.... I figured I'd make Chuck some cardboard food as well. All that flying sure gives an astronaut a hearty appetite.
Have a wonderful weekend! See you back on Monday.
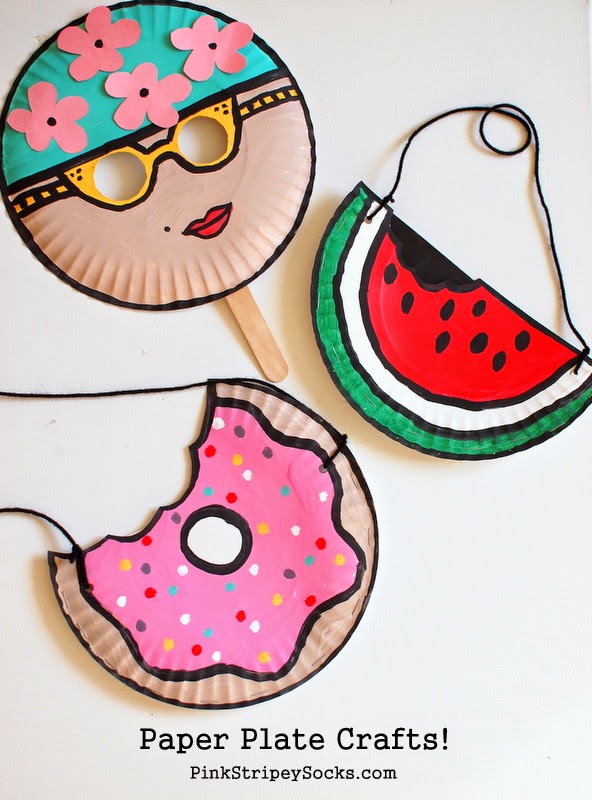
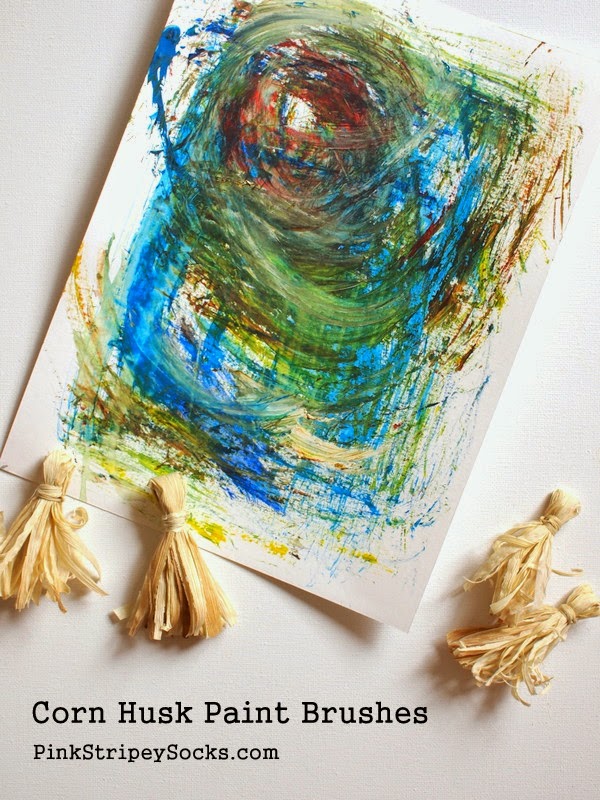
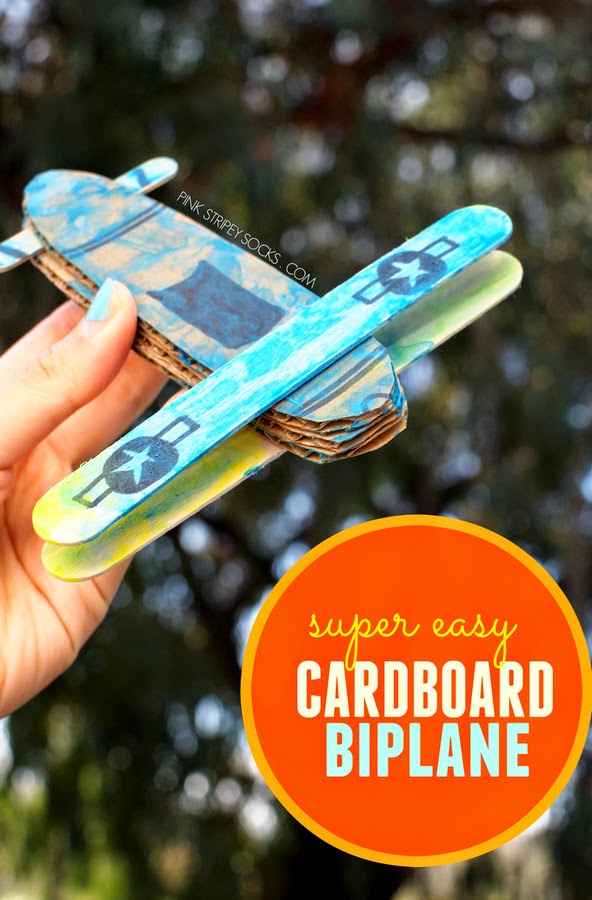
Psst- If you've got a ton of cardboard lying around... check out these fun kids' crafts that use cardboard:
Monday, September 2, 2013
DIY Watermelon Perler Bead Bracelet
That's it.
Summer is over.
No more vacation, no more white shoes.
Want to keep the good time summer vibes going?
Check out this watermelon bracelet I made out of Perler beads.
It's my second craft post for Handmade Charlotte.
Happy belated Labor Day!
Subscribe to:
Posts (Atom)