Showing posts with label Food. Show all posts

Thursday, November 7, 2013

DIY Kids' Portable Stove top

Sometimes when I'm cooking in the kitchen, Chuck pretends to cook alongside me.  It's pretty cute.  I'll give him one of my unused pots and a large plastic spoon, and he'll whip up something for me to try.

Lately he's been cooking for his toy cars.  With this new interest in entertaining, I thought it was high time he got his own stove.  Taking inspiration from this Pack-n-Go Kids Play Stove, I made him a mini portable stove top.

DIY Portable Kids Stove Top Toy


DIY Kids' Portable Stove Top

Since we live in a small apartment, I'm always hesitant to purchase large toys for Chuck.   I loved this simple DIY toy because it supports his imaginative play and doesn't take up too much space!  The storage container's lid becomes the "stove top" and all his cooking toys are stored inside.


Materials:
  • Plastic storage container
  • Sharpie Marker
  • Scissors
  • Contact Paper

Directions:
1.  Doodle some burners and knobs onto your contact paper using your Sharpie marker.
2.  Cut out your doodles.
3.  Stick them onto your plastic storage container.

That's it!  Now you've got an easy-peasie DIY stove for cooking.  Pretty awesome!

How to make a toy stove top for kids


Happy crafting!

Monday, October 7, 2013

Trip to Baltimore

Hi everyone!  How was your weekend?  (Good, I hope!)

This past weekend I left hubby and Chuck to fend for themselves (eek!).  I had a mini adventure and rode the bus to visit a friend in Baltimore.  We met there while we were both college students.  I guess our goofy personalities just clicked because we're still friends ten years later.  Here are some photos from our Baltimore adventure...


Fried green tomato, avocado, egg, bacon, and cheese on pumpernickel bread... yum!


Wednesday, October 2, 2013

Make your own gummy candies

Did you know that you can make your own gummy candies?  I didn't know that it could be done so easily until I saw this fruit juice gummy candy recipe on Instructables. 

Last week I roped my sister into trying the recipe out.  Using just four ingredients, we made homemade gummy candies in a  little over an hour.  Here are our results:

make your own gummy candies- fun STEM activity for kids

Ingredients:
  • 2 envelopes of Knox Original Unflavored Gelatine
  • 1 tablespoon of sugar (or more if you want them sweeter)
  • 1 C of juice
  • Canola oil

Directions:
1.  Combine gelatine, sugar, and juice in a pot.  Let the mixture sit there for a minute.

2.  Lightly oil your mold.  (If you skip this part your gummy candies will break apart as they pop out of the molds.)

3.  Bring the mixture to a boil.  Let it boil for 10 minutes.  The liquid will become more viscous.

4.  Spoon the hot liquid it into your molds.
 Notes:
  • I placed my mold on top of a plate before I did this to catch my spills.
  • I had some extra liquid, so I lined a glass baking dish with saran wrap and then poured the liquid into that.  Once the liquid hardened, it was easy to pop out a very large gummy candy.  
  5.  Put your mold into the fridge until your candies harden.  (Mine took about 1 hour to solidify.)
make your own gummy candies- fun STEM activity for kids
6.  Pop your gummies out and enjoy!
make your own gummy candies- fun STEM activity for kidsmake your own gummy candies- fun STEM activity for kids


Can you believe that the recipe worked?  I was super stoked because the resulting gummies had a great texture and easily slid out of their molds.  I also liked that they weren't too sweet.  Next time I'll probably try using fruit juice concentrate instead of juice (as recommended by the original recipe.)  That should give them a more intense flavor.... and maybe they'll taste more like the store bought ones.

Happy Wednesday!

Friday, September 20, 2013

Cardboard Spaceship Climbing Toy

Currently Chuck and I have been reading books about the moon and space travel.  He loves the Berenstein Bears "On the Moon" book and Eric Carle's "Papa, please get the moon for me." 

So with that in mind, I made him a little cardboard spaceship climbing toy.  I found some lovely examples online and one of the mommies in our toddler group made a very simple version out of paper.  So, I based my design off of these.        


To operate the toy, you simply attach the moon to the wall or a doorknob.  Then, you pull the two brown tabs apart and your spaceship shoots straight to the moon.


Materials:
  • Cardboard box
  • Scissors
  • String
  • Paint and paint brushes
  • Mod Podge and brush (to protect your paint job)
  • Packing tape
  • Straw 


Directions:
This was a really quick and simple toy to make.
1.  Cut out your spaceship, moon, and two small rectangular stopper pieces out of cardboard.
2.  Paint your spaceship and moon.
3.  Once the paint dries, protect your paint job with Mod Podge.
4.  Cut your straw in half.  Tape it to the back of your spaceship.
5.  Fold your long piece of string in half.  Tape the middle of the string to the back of your moon.  Then, string your two strands through the two straws.  Tape the ends of  string to your cardboard rectangles so that the spaceship doesn't fall off.

Here's a shot of the mechanics: 

And that's it.  Simple to make, and simple to use.  You don't even have to make a spaceship and a rocket.  What about an alien spaceship and earth?  Or a basketball player and a basket?  The possibilities are endless.

We went this route, and Chuck got a kick out of sending his cardboard rocket to the moon.


Cardboard Rocket Ship sent to the moon from Pink Stripey Socks on Vimeo.


And then, since I was working with cardboard already.... I figured I'd make Chuck some cardboard food as well.  All that flying sure gives an astronaut a hearty appetite. 


Have a wonderful weekend!  See you back on Monday.


Psst-  If you've got a ton of cardboard lying around... check out these fun kids' crafts that use cardboard:

Friday, August 30, 2013

Orange Peel Canola Oil Candle


Did you ever watch MacGyver?  I was introduced to the show by an older cousin, and I loved it. MacGyver was my hero.  Give him a paper clip and he could do anything, unlock handcuffs, start a car, or even disarm a bomb.


Last week, I definitely channeled my childhood hero when I made this orange peel candle:

Can you believe that it was only made out of two materials?  1.Orange peel and 2. Canola oil.   Yup.  That's it.  Super duper easy and it stayed lit for over an hour. 

Materials:
  • Orange
  • Knife
  • Cutting Board
  • Canola Oil (or probably any oil, really...)
  • Lighter


Directions:

1.  Slice around the circumference of your orange, trying your best to not slice the fruit inside.  Then, use your finger to carefully peel off the two halves.  One half should have a white membrane stem sticking out of it.   Keep that stem intact! It's going to act as your candle's wick.  The other half will become a decorative "hat."

2.  Cut a design out of the half without the wick.  Now you've got a little "hat" for your candle.  (Note:  This hat is more for looks than function.  It makes a pretty light design, but ends up getting quickly singed by the flame.)


3.  Pour oil into the bottom half with the "wick."  Then, light the "wick."  It'll take a little while for the stem to light, but once it does, you've got yourself a lovely, long lasting candle.


 Happy MacGyvering!

Wednesday, August 28, 2013

Tattoo A Banana

I went a wee bit crazy....
and turned our apartment into a fruit tattoo parlor.

(I simply just followed the temporary tattoo directions and pretended that the banana was my child's arm.)  

Who knew that temporary tattoos would stick to bananas?


Hey!  What's this on my banana?

Happy Wednesday!

(Interested in another way to decorate your beloved yellow fruit?  Click here)

Tuesday, August 20, 2013

Make Party Blowers

When we go out to eat, one of Chuck's favorite things to get is bubble tea. 

It's so cute watching him order.  Too short to reach the counter, Hubby has to lift Chuck up so that he's eye level with the cashier. 

Of course, it's the same lady behind the counter every week.  Even though she already knows what he's going to say, she always asks Chuck what he wants.  And without fail, he gives the same response:  bubble tea with a blue straw.  (Blue is his favorite color.)

The lady then giggles when she hears his little voice.  When she's done, she hands over the drink and a couple extra straws.  (He loves straws.)  Typically, Chuck just blows and chews on the extras... but this time he generously gave them to me so that I could craft with them.  

I saw how much he loved blowing on party blowers at another child's birthday party.  So, of course I had to try making them for him at home.  


 Materials:
  • Magazine paper (Cut into 5x9" rectangles)
  • Bubble tea straws cut in half
  • Scissors
  • Tape


Directions:
1.  Fold your paper in thirds lengthwise.   Tape your paper where the two sides meet. 

2.  Fold over one end of the paper and tape that down too.  (Make sure your tape all the openings closed.  You want your party blower to be air tight.) 

3.  Starting from the sealed end, tightly wrap your magazine paper around a pen.   (Do this a couple of times with the pen and then without the pen to make sure that the curl stays.  I've also seen some other bloggers, like Design Mom, wrap their rolls with rubber bands to help the curl to stay better.)


4.  Now stick your straw in the open end of the paper.  Fold your paper over the straw and tape it down.  (Again, make sure that everything is air tight.) 

And that's it!  Hand your party blowers over to your kid and watch them have fun!


We just used magazine paper, so our blowers only lasted for about a couple of minutes before they stopped recoiling or ripped.  But not to worry!  I washed, dried, and cut up the straws to make some "beads."  Chuck then enjoyed stringing them onto some pipe cleaners. 

Happy crafting!

Monday, August 5, 2013

What's up, Chuck?

How was your weekend?  Ours flew by way too quickly. A college friend came up from Maryland to visit us.  We hung out at home on Friday and Sunday, but on Saturday I put on my non-mommy clothes and explored Manhattan with her.

Ooh la la.  I felt like I was in college again.  It was so nice having her around....
 and I miss her a whole bunch already. 

Here are some photos from our weekend:


Chuck and I attended a friend's birthday party.  As you can see, he kept the party going as we walked home.

My friend's a pretty good storyteller....

and artistic to boot.  (Can you believe that she doodled this shirt freehand with fabric markers? Whoa.)

We tried Xi'an Famous Foods' hand-pulled noodles... Yummy oxtail...

and watched a Broadway show...

 and toured Soho (which, by the way, is really just way too glamorous for me....)

I also found out that Topshop teamed up with Project CANVAS to raise funds for art programs in the city.  If you're interested in supporting art programs (and getting a pair of one-of-a-kind kicks), visit Topshop's Soho store.  Local artists will personally decorate your purchased shoes until 8/8.

Happy Monday!

Wednesday, July 17, 2013

6 things to do with gummy bears

I thought you might need a giggle, so here's a list of six things you can do with gummy bears (besides eat them).

6 Ways to Play with Gummy Bears

6 Ways to Play with Gummy Bears - Fun and tasty STEM activity to do with the kiddos!


Thursday, July 11, 2013

Two-ingredient homemade ice-cream

What can I say?  The title pretty much says it all.

A couple of days ago, I found Kevin and Amanda's recipe for homemade ice-cream. It immediately caught my eye because it didn't require an ice-cream machine or rock salt.  Plus, you only needed two ingredients to make the basic vanilla recipe.

Say what?  You must be kidding.

Nope.  They were serious.... ice-cream serious.

So of course I had to try it out for myself.  The results?  Take a look below:


It was yummy and had a light texture and super creamy taste.

Chuck ab-so-lutely loved it.

We tried their cinnamon bun ice-cream recipe.  I've put the recipe below, but you can find other yummy flavors on their blog like Nutella peanut butter chip, Krispy cream, and hazelnut mocha fudge swirl.  Yum, yum, and double yum.

Cinnamon Bun Ice-cream Recipe (from Kevin and Amanda):

Ingredients:
2 C heavy cream
1 14 oz can of sweetened condensed milk
3 T of melted butter
1/2 tsp ground cinnamon
1/2 tsp vanilla extract

Directions:
1.  Whip heavy cream into stiff peaks.
2.  Thoroughly whisk the butter, cinnamon, vanilla, and condensed milk together in a very large bowl.
3.  Fold the whip cream into your butter/cinnamon/vanilla/condensed milk mixture.
4.  Pour everything into a 2-qt tupperware container.  Cover and freeze until firm.  (I waited overnight.)

Then, enjoy (and feel like a cool foodie because you just made ice-cream from scratch).

Have a great weekend.  See you next week!

Thursday, June 27, 2013

Gluten free Cocoa Brownie

Last week we celebrated hubby's birthday.  In case you didn't know, hubby is a big, big fan of chocolate.  Me, not so much. But every year I put aside my indifference and try to bake him something chocolatey.

Last year I really struggled to find a good gluten-free chocolate cake recipe.  This year, I tried again to find a yummy recipe that would satisfy hubby's choclatey wishes and satisfy Chuck's dietary restrictions.

After looking around the internet, I found this cocoa brownie recipe and tweaked it.  Instead of normal flour, I used Domata gluten free flour.  (It was so easy.  I just exchanged 1/3 C of normal flour for 1/3 C of my gluten free flour.)

The results?  Woot woot!  Finally some gluten free baking success.  I got a whole batch of dense, fudgy, and extremely chocolatey brownies.

They were delicious.


This recipe's a keeper.  Sometimes it's so tough seeing other kids at birthday parties eating cake and knowing that Chuck can't eat any of it.  Now I know I can bake him something special and chocolatey too.

Hope you have a great weekend.  See you next week!


Monday, June 24, 2013

Make a Corn Husk Doll

Today we're going to be making a corn husk doll!  I love Summer time because it means that two of my favorite  foods (watermelon and corn) are stocked in stores and super cheap.  Yum, yum!  Lately we've been eating a lot of corn.  Too lazy to stand over a boiling pot of water, I just throw them in the oven (husks, and all) and roast them for about an hour.  Deee-licious.

Even though I really enjoy eating corn, I'm always slightly disturbed at the end of the meal.  Have you ever noticed just how much we toss out once we're done with the corn?  Those corn cobs and husks are quite heavy and take up a lot of space  in comparison to the tiny yellow kernels 

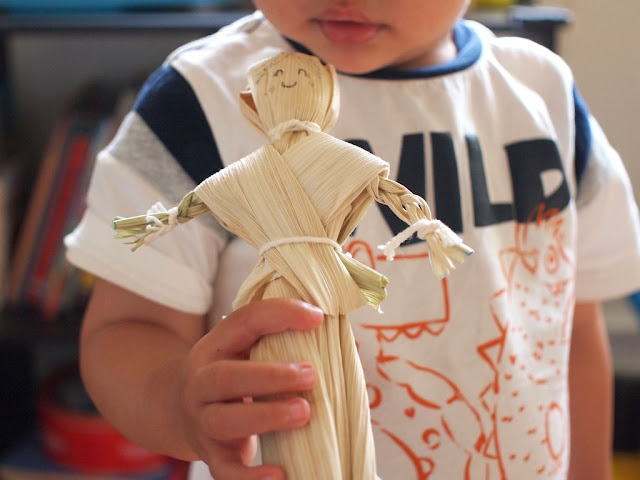
So, I thought I'd try making something from the castaway bits.  Here's my little corn husk doll.

Corn Husk Doll

how to make corn husk doll


Materials to Make Corn Husk Doll:

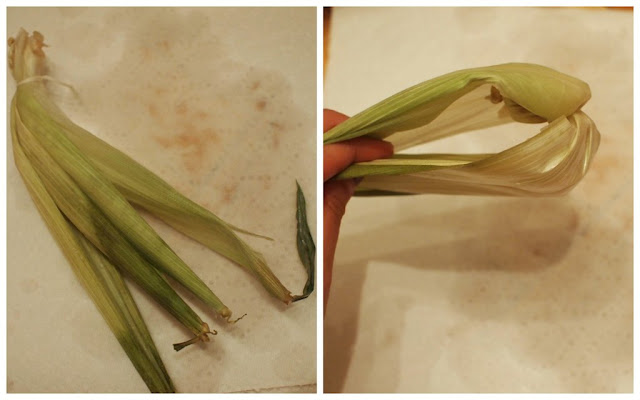
- Corn husks (I used corn husks from about 5 ears of corn.  But note-  since I roast my corn, I was only able to get a couple leaves from ear.  You could probably do it with fewer ears if you use up all the leaves.)
- Yarn
- Scissors
- Paper towels
- Baking pan 
- Shallow Pan
- Sharpie marker
- Water

Directions to Make Corn Husk Doll:

1.  Rip off the leaves from your corn.  Set them out to dry.  (We live in an apartment, so I just placed them on a baking dish near a sunny window.  After a couple of days they just shriveled up.)  Note:  If you make the dolls with the green leaves, all your bindings will come loose once the leaves start shriveling up and drying.

2.  Once your leaves dry, re-hydrate them in a  bit of water.  (It took my leaves about half an hour to plump out.)
steps to make a corn husk doll

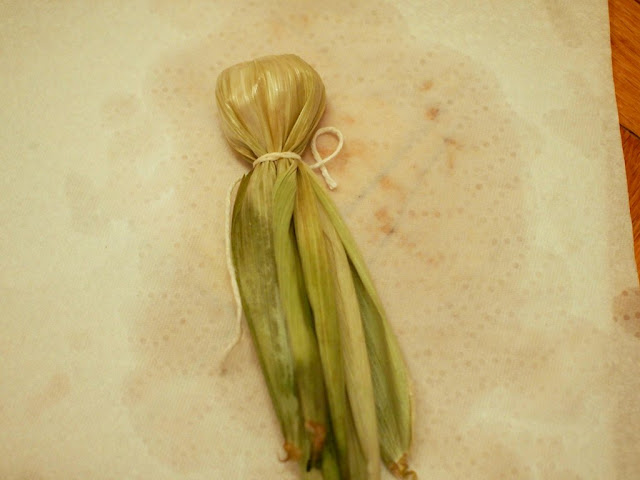
3.  Now you're going to make the head and the body.  Pick out 4-5 nice large leaves.  Tie them tightly together with a bit of yarn.  

4.  Flip the leaves over your yarn.  
steps to make corn husk doll head

5.  Straighten out the leaves and then tightly tie a piece of yarn to make your head.  (Make sure that the leaves are smoothed out and  cover each other.  Try not to have any gaps where the yarn is visible.  I wasn't too careful and my poor doll's head had a bit of gap once the leaves started drying again.)
completed corn husk doll head

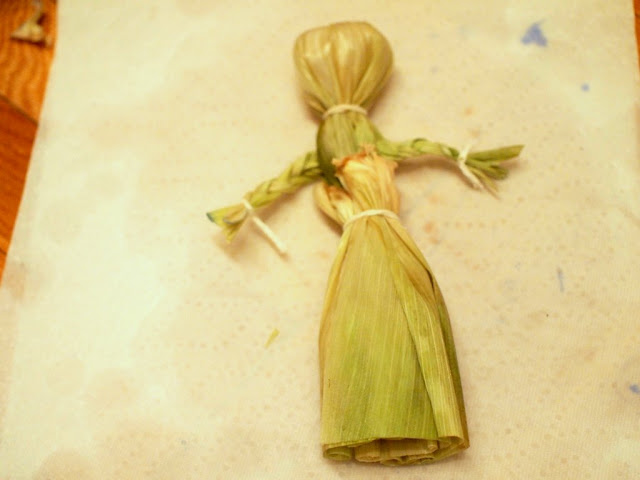
6.  Now you're going to make the arms.  Find another nice large leaf.  Cut two slits on one side of the leaf.  Then, cut two slits on the other side of the leaf.  Braid both sides and secure the braids with bits of yarn.   Trim off the ends.
how to make corn husk doll arms

7.  Open up your doll's body and slide the braided arms in.  Tie another piece of yarn to create the waist and hold the arms in.  completed corn husk doll arms

8.  Now you're going to make a skirt.  Take a bunch of nice big leaves and wrap them around your doll's waist.  Tie these leaves to the waist with another piece of yarn.  Then, trim off the the ends of the leaves to create the skirt.  (If you wanted to give your doll pants, you could also just split your leaves up into two piles and tie those off to create trousers.)
corn husk doll skirt

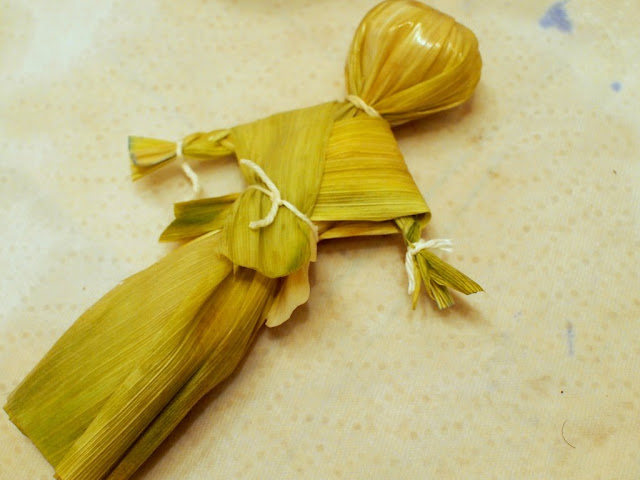
9.  Now you'll create a shawl for the doll (which will help cover the ugly waist bit.)  Take two nice leaves and criss-cross them over and behind the dolls body.  Tie off your leaves with yarn.  Trim any excess bits.  
completed corn husk doll

10.  Now you've got yourself a doll.  Once the doll dries, use a Sharpie marker to draw a face on it.  Voila.  Now you've got your very own corn husk doll.
how to make a corn husk doll


Not sure if Chuck was a big fan of the doll, but I enjoyed the experience of taking something destined for the garbage and giving it a second life.

For more information on making corn husk dolls, check out these three great resources: GardenMama blogAcorn Pies blog or this YouTube video  They really helped me to figure everything out. 

Happy crapting!