Showing posts sorted by date for query felt. Sort by relevance Show all posts

Tuesday, January 21, 2014

DIY: 5 Ways to update your old beanie

Hubby's away and Chuck and I are currently stuck at home, sick.  Boo.  We're watching the lovely fluffy flakes falling outside and I'm soooo tempted to bundle him up to play outside.  But, I'm holding myself back until he gets better. 

(Hrmm... but maybe I could bring some snow inside for us to play with.... thanks Lisa for that idea!)

Anyway, here's a short cold weather post in honor of the snow.

Do you have an old beanie just lying around? Maybe you never really wear it, but you just can't bring yourself to give it away just in case you need it one day?  Well, here are five super easy ways to update your drab head wear.   And bonus!  None of these are permanent changes, so you could potentially wear all five looks this winter! 

  1. Pom Pom Beanie

This update was my favorite.  Chuck is beginning to recognize Micky Mouse.  So when I saw Eugenia Kim's Pom pom beanie (for $185- holy empty wallet!), I knew that I had to make my own cheapie version.  I followed this pom pom tutorial  from Crafted.  Then, I sewed the two semi-identical (eek!) pom poms onto the corners of my beanie.  Bam.  Instant mousekateer cool.

And here I am modelling the four other updates....
2.  "Hi" Beanie:  I cut out the letters "H" and "i" from felt.  Then, I just sewed them onto the front of the beanie for some friendly headwear.  Make sure you sew the letters closer together because they will stretch apart when you wear the hat.

3.  Polka dot Pom Pom Beanie:  I bought a pack of mini pom poms from the craft store and then sewed them onto the hat.  To help with placement, I marked the hat with chalk first so I would know where to sew.

4.  Spiked Beanie:  I poked a couple of screwback cone spikes through the front of the beanie.  I thought the hat made me look like a punky Statue of Liberty. 

5.  Sparkly heart Beanie:  I cut out a heart shape from felt.  Then, I hot glued some rhinestones onto the heart.  Then, I sewed the heart back onto the hat.   Wouldn't this version be nice for Valentine's Day?  

 Alright that's it.  Time to take a nap. Stay warm and well, friends!

Monday, January 20, 2014

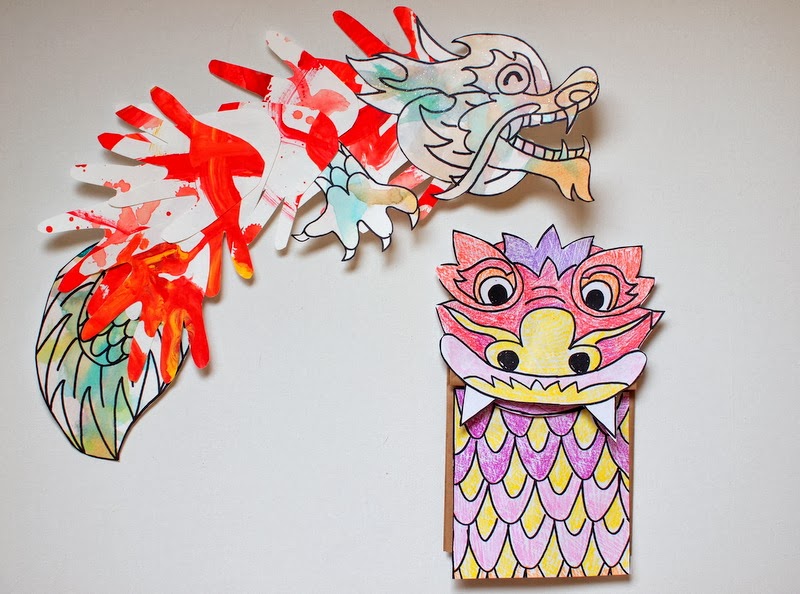
Two Chinese New Year Dragon Crafts


Ready for a fun Chinese New Year Craft?  Chinese New Year is one of those really fun holidays that I enjoyed celebrating as a kid.  Yummy food, wearing new clothes, red envelopes filled with money, and watching cool dragon and lion dancing?  Come on, what's not to love?  Since the holiday is just around the corner, I showed Chuck some lion dancing videos (Youtube to the rescue!) and then thought it'd be fun if we did some dragon crafts together:

Two Chinese New Year Dragon Crafts

Chinese New Year Dragon Crafts


Little background about me- Growing up I always felt like a "twinkie."  Yellow on the outside, white on the inside.  You see, I looked Asian, but I didn't always feel that way.  Now that Chuck's getting a bit older, hubby and I are trying to figure out how two twinkies like us pass down their cultural traditions. (Ehh... it's a work in progress....)

This craft is one way that we're trying to pass down our tradition.  And, in the interest of full disclosure, Chuck really enjoyed making the handprint dragon.... but he wasn't too keen on coloring my paper bag dragon pieces.  However, once I colored and glued everything down for him, he enjoyed playing with it like a puppet.

So, do you wanna see how we made these two dragons?  (I've got templates too!  Ooh la la!)  Keep on reading!

(And if you like this craft, definitely check out this dancing Chinese Dragon Puppet.  It actually dances and is made from recycled materials!)


Sunday, January 19, 2014

Make a Valentine's Day "Arrow through the Head" Headband

Oh no!  Chuck's been shot...
(With Cupid's arrow.. teee hee hee)

Valentine's Day "Arrow through the Head" Headband


DIY "Arrow through the head" Headband

Looking for a cute Valentine's Day accessory that is affordable, easy-to-make, kid friendly, and boy friendly?  Well, you could always try making this "Arrow through the head" headband...

Friday, January 17, 2014

I took the risk... so now what?

Last Thursday, I shared with you my secret, well now not-so-secret dream to make a career as a craft blogger.  Today I just wanted to briefly share what's been happening since then...  

Ehh... a lot of hard work.
End of post.

Image by Marc Johns, found here
What, you're still here?  Ok, ok, maybe I was kind of vague.

Monday, January 13, 2014

6 ways to entertain a toddler at home

Looking for some easy ways to entertain your toddler in the winter?

So... how about that polar votex?  Boy, oh boy, that was some crazy weather.  With the snow, ice, and freezing cold winds, Chuck and I hunkered down at home. 


After a couple of hours of reading the same books over and over again, and playing with the same toys over and over again, and listening to the soundtrack of "Planes" for the trillionth time, I finally cracked.

Redrum, redrum?

Thankfully, we didn't make it to that point.  But, we definitely bounced off the walls a bit.  To maintain some sense of sanity, we had to do something to make the time at home more enjoyable.  So here are a couple of fun activities that kept us sane and smiling...

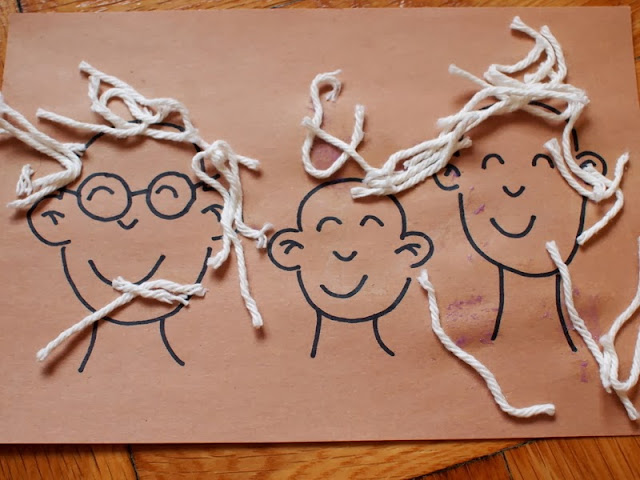
1.  Yarn family portrait craft

yarn hair family portrait craft
Chuck loves using scissors and the glue sticks, so this activity was a hit.  First he helped me cut tons of short, white yarn strands.  Then, I doodled a bald family on a piece of paper.  Then, he helped me glue hair onto all of their heads.  The result is this cute and funny family portrait. 

Keep reading to see more ways we entertained ourselves at home...

Tuesday, December 31, 2013

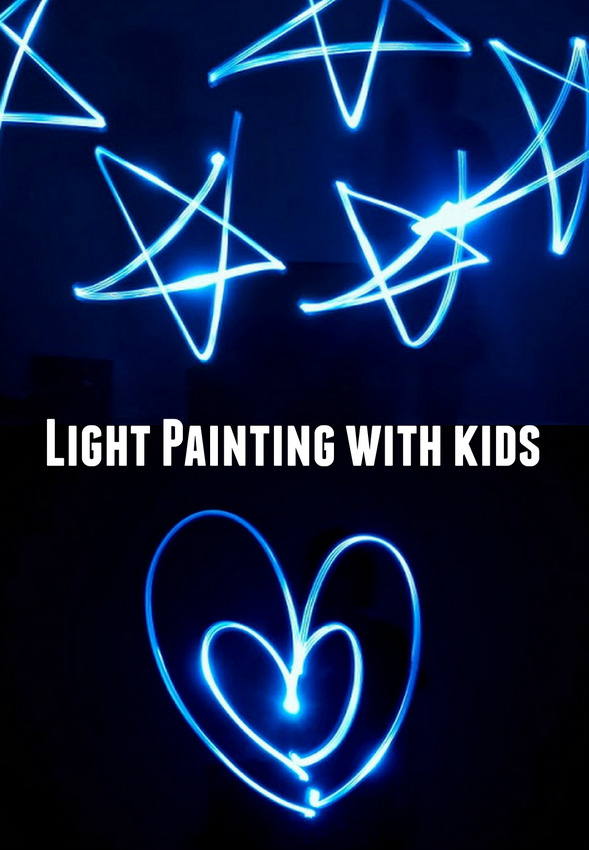
Light Painting with a Flashlight

Hubby and I love seeing things glow in the dark. We've taken photos with glow sticks (and then cut them up to see what was inside- muah ha ha), made our Christmas lights look like different shapes, and even made glow-in-the dark chalk.

This past Christmas our uncle gave us his old tripod (Thanks Tito Ric!), so hubby wanted to try light painting.  We basically just waved around a flashlight in the air to make lovely "drawings" in the dark.

How to do light painting with kids- Easy and unique way to make art at night!


Tuesday, December 24, 2013

Merry Christmas!


We wish you all a merry, merry Christmas.
May your homes be filled with love, joy, and peace this holiday season.  

And in case you need a little extra holiday cheer, here are some goofy photos of Chuck and me wearing a lovely Santa/Gnome beard.  (I just cut out a beard shape from felt and hot glued elastic to both sides.)

Happy Holidays!  (And happy crafting!)


Tuesday, December 17, 2013

DIY Earmuffs? (A craft flop)

A couple of weeks ago I couldn't sleep.

Did I drink too much coffee?  Nope.  Was I worried about Christmas shopping? Nope.

Don't laugh, ok?  *Big breath* I couldn't sleep because I kept thinking about how I could crapt myself a pair of earmuffs using stuff in our apartment. 

Weird right?  I don't even wear earmuffs... but for some reason I kept wondering if I could make them.  So the next day I played around with some materials ... and I ended up with a pair of these:


I have kind of mixed feelings about them.  On the plus side, they look like earmuffs and they also block out some of the cold.  However, they feel a little too light and stiff around my ears. 

So, while I'm proud that I made a pair of semi-working earmuffs, I think this is probably a craft flop.  Now if for some reason you want to see how I crapted these earmuffs (or you wanna see Chuck wearing the earmuffs), keep on reading!


Monday, December 16, 2013

DIY Reindeer Antler Headbands

On Wednesday we're having a small holiday get-together with our toddler library group.  I wanted to put Chuck in a cute holiday outfit, but I didn't get a chance to pick up anything yet.  But not to worry!  I had all the items needed to make these two cute reindeer antlers.  I love how they came out.  They're super festive, Chuck will actually wear them, (yes!) and added bonus- they were both made in one night.... my kind of craft!

DIY Reindeer Antler Headbands


DIY Reindeer Antler Headbands


Wanna see how I made them?  (Or, do you wanna see cute photos of Chuck modelling them?)  If so, read on!


Friday, December 13, 2013

Make a felt and cardboard gingerbread house

Today's craft was inspired by gingerbread houses.  It's a little cardboard and felt "gingerbread" house with felt "candy" decorations. Pretty neat, right? All the decorations can be easily placed on and taken of, so you can decorate and re-decorate to your heart's content.

DIY Felt and Cardboard Gingerbread House Toy

DIY Felt and Gingerbread House Toys


This post contains affiliate links. Thank you for your support.

If you'd like to make your own, keep on reading!

Monday, December 9, 2013

Make Homeamde Felt Milk Jug Cap Ornaments


Each year I try to make a couple of handmade ornaments for our tree.  Last year, Chuck and I made these hand and feet salt dough ornaments.  I would have made him a new set this year... but his feet are so big that the ornaments would end up being the size of small plates.

So instead, this year I turned a bunch of milk jug caps (gifted to me by a craft-loving aunt- thanks!) to make these mini felt ornaments.  Each one has a different design and they came out so colorful and cute.... I just want to eat them up.   But don't worry, I won't because they're made of felt...and glue...and plastic...

Can you guess which one is Chuck's favorite?  Keep on reading to find out... 

Thursday, December 5, 2013

Thanksgiving photos

Hi everyone.

Hubby and I just finished watching Sound of Music.  Wow!   That was really a marathon of music.  I can't believe that the singers had the stamina to last three hours. I felt exhausted just watching them! 

(Did you watch it?  I completely melted when I heard the head nun singing "Climb every mountain."   Wow.  Voice  as like butter, I tell ya.)


Back to today's post.  Here are the promised Thanksgiving photos.  Ermm.... looking through them, I realize now that they're mostly of food.  I gave hubby the camera for the night while I hung out with the kids.  He came back with lots of food photos... so you could tell what he was mostly focused on. :)   Just imagine some people congregating around the food and then you've got the gist of  our Thanksgiving.

Happy Friday, friends!

I took this photo before the evening's events.  Chuck just looked too adorable and I knew that the outfit would be covered with food by the end of the night.

Yum.

*Drool*


I'm getting hungry again...

Yurmmm.... pie...... I wonder what we have in our fridge to snack on....

Wednesday, December 4, 2013

Homemade gift: DIY Felt Board

Do you remember playing with felt boards as a kid?  (Is that too old school?  Maybe kids nowadays play with fancy touch screens instead ... hrmm....)  Anyway, I remember using a felt board in school and LOVING it.   So I thought I'd try making a homemade felt board for Chuck. After consulting a couple of tutorials online, here's what I came up with:

Let's make a DIY Felt Board

how to make a DIY Felt Board


(This post contains affiliate links.  Thank you for your support!)

Now, in full disclosure, I wish I could say that Chuck loved it and played hours and hours with it while I took a nap on the couch.  Errrm.....  It didn't quite turn out that way.  He played with the car parts for a bit, but then seemed much more interested in rolling around real cars.

But I won't call this a craft fail just yet.  I'm hoping (cross your fingers!) that he'll grow to love the felt board as much as I did.  But if not, no big deal.  The entire thing only cost about 4 dollars to make because I already had most of the materials lying around the apartment.  Score!

Now if you have a felt-loving child in your life, you can try making your own felt board too!  (I bet it would make a great Christmas gift.)  Here's how I made mine:

Materials to make a DIY Felt Board:


Directions to make a DIY Felt Board:

1.  Clean your work area.  Felt attracts stuff.  (I worked on the floor, so I swept it first.)

how to make a DIY Felt Board
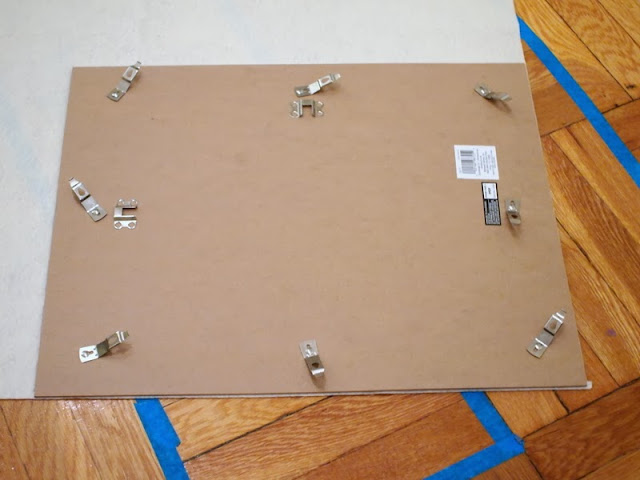
2.  Take out the back of your photo frame.  Discard the glass.  Place the back on your piece of felt and trace it.  Cut the rectangle out.

3.  Optional:  If your felt is a bit wrinkly, carefully iron it.  (I turned my iron to a lower setting and placed one of those protective ironing pressing pads over my felt before ironing it so I wouldn't melt or burn the felt.)

Glue on your felt
4.  Place your piece of felt directly over the photo frame back.  Make sure the sides all line up.  To help with the gluing, fold one side of the felt over the other.  Then, use your sponge brush and brush a bit of Mod Podge right next to the fold.   Press the fabric down over the glue.  Then, spread a little more Mod Podge next to your new fold and press the felt down again.  Keep repeating this procedure until one side is fully glued down.  Then, repeat the procedure with the other side.  

5.  Once the Mod Podge dries, put your board back into the frame.  That's it!

Now comes the fun part- making your felt pieces.  Doodle your designs onto paper.  Then, trace them onto felt and cut them out.  I chose to make a set of Christmas tree felt pieces and a set of car part pieces.
Homemade Felt Board Tutorial
Happy crafting!

DIY Felt Board Tutorial

Wednesday, November 6, 2013

Star Painting (using Contact Paper)

Lately the cooler temperatures and shortened daylight hours have me looking at the sky to find stars.  However, since we live in a well-lit, urban environment, star gazing isn't really a viable option.

So once again I felt the urge to make some star-inspired artwork.  If I can't see stars in the sky, then I'll just have to make my own to enjoy.  Now, if you've been following this blog for some time, you'll recall that this isn't the first time I felt drawn towards the stars.  Last year I placed a galaxy of cardboard stars on our living room wall.  Then earlier this year I painted the inside of an umbrella to look like a galaxy.  This time I took a simpler approach and made myself some star artwork using contact paper.


Materials:
  • Canvas
  • Contact Paper
  • Pen
  • Scissors
  • Paint
  • Sponge brushes (or paint brushes)

Directions:

  1. Sketch out your stars onto the back of your contact paper.  Cut the stars out.
  2. Place the stars on your canvas.  Play around with their arrangement until you're satisfied.  Once you have a pleasing design, pull the backing off and stick the stars onto your canvas. (Make sure that they are stuck on well so that you get nice crisp lines.)
  3. Dab paint over your canvas.
  4. Once the paint dries, carefully peel off your contact paper stars.  You should see a bunch of white stars where your contact paper blocked the paint.

Quick and easy, right? Just remember to make sure that your contact paper stars are completely stuck on tight.  Eeek!  See that leftmost star below?  The paint bled through because the contact paper wasn't sticking to the canvas properly.

 Happy star crafting!

Monday, November 4, 2013

Halloween photos (Past and Present)

How was your Halloween?  Ours was pretty jam packed.  We entertained some out-of-town guests, carved pumpkins, attended a couple of kids' parties, and went trick-or-treating.  I was loving most of it until the very end.  I was definitely burned out by the last Halloween party.   Phew.  Too much candy and partying for this mama.

Here are some photos from our Halloween adventures:


Several pieces of felt and dozens of hot glue sticks later.... I finally finished both Mack and Lightening McQueen costumes.  Chuck and I wore them out when we trick-or-treated around our neighborhood.   (Click here to see how I made the costume and click here to see how I made his matching Lightening McQueen shoes,   Or, click here to see Chuck's previous  Thing 1 Costume and his Mr. Potato Head Costume.)

DIY Mac and Lightening McQueen Halloween Costume

In addition to trick-or-treating, we attended two Halloween parties at the library.  It was uber-cute seeing dozens of toddlers dressed up in costumes.  I also couldn't help but ooh and ahh over the cute treats that some moms made.  Check out these marshmallow monsters.  Too. Darn. Adorable. 


Thursday, October 31, 2013

Happy Halloween from a little Lightening McQueen

Happy Halloween everybody!  

Hope you have a wonderful and magical day!  
As promised, here are some photos of Chuck in his Lightening McQueen costume at a church party.
(And if you want to see my matching Mack costume, click here.)


(Did you see shoes?  Click here to see how I painted his Lightening McQueen Shoes.)

And here are a couple of photos showing how I made it. 

Monday, October 21, 2013

Trip to Lancaster

We just got back yesterday from our trip to visit hubby in Pennsylvania. He's been down there for work so we thought we'd hang out with him and enjoy the scenery.  

Here are some photos from downtown Lancaster:


Lancaster's Central Market was hustling, bustling, and full of yummy foods!


Then, we visited Cherry Crest Adventure Farm.  It was amazing because there were tons of fun activities to do and lots of yummy baked goods and apple cider to sample. (I wish we lived closer so that we could go back....)

Chuck loved riding the "choo choo" wagon ride!


Yummy freshly roasted corn


My first whoopie pie (Apparently these sweet treats originated from Lancaster county.  Legend has it that children yelled "Whoopie!" when they found these baked treats in their lunch pails.)


Day at the farm from Pink Stripey Socks on Vimeo.

I had to stop and admire the beautiful view.  It's so different from the one at home.


We ended the night by warming ourselves around the bonfire.   It felt like a perfect Fall day.


Friday, October 18, 2013

What's up, Chuck?

Yay!  It's finally Friday.  I've been counting down the days to the weekend since Monday.  Hooray! We made it. 

*Collapses*

The week really crawled by and honestly, by Wednesday I was ready to throw in the towel. (Do you ever feel like this too?  Too bad we can't just build ourselves a time machine and fast forward to Fridays and cool holidays.)  Thank God we made it.  Now it's finally Friday we're going to visit hubby in Pennsylvania.  I'm really looking forward to seeing him and hanging out together as a family.  Cross your fingers that the weather stays sunny for us, ok? 

Hopefully this weekend will be as nice as the last.  We had lots of adventures with family and friends.  Hubby came back from work, we celebrated a cousin's birthday, and I met up with my college roommates in the city.   Here are some photos from our adventures: 

Here's Chuck hanging out with Auntie Grace at the birthday party.  (This kid loves balls, gluten free pizza, rice kripsy treats, and balloon animals.  Luckily for him, the party included all of the above, so we had a blast!)


Me, my sister, and my cousin


I loved seeing this little cutie utterly enchanted by a puffy yellow yarn ball. 


It was so nice just hanging out with old college friends that I didn't remember to whip out my camera.  All I have to remember our time spent together are these sparkly nails.  One of the gals brought some cool nail stickers for us to try out.  It felt like we were back in college, laying on someone's bed, chatting and laughing.  (Can you see Chuck's hand in the background?  He wanted some sparkly nails too.)


This last photo is kind of unrelated but I wanted to include it anyway.  Nana gave Chuck a whole bunch of car socks.  He loves wearing them, but kept slipping and sliding on our wood floors.   I added some black puff paint to the bottom of his socks and now he's got some traction.  No more slipping!  (Thanks Pinterest!)


That's it!  I hope you have a wonderfully relaxing and refreshing weekend friends.  See you next week!

Tuesday, October 15, 2013

DIY Flower Crown Tutorial

Lately hubby's had to do quite a bit of traveling for work.  (Boo!)  Chuck and I try to hold down the fort during the weekdays, but it's just not the same and we miss him terribly.  So we're always glad when the weekend finally rolls around and we get to have fun as a family.

This weekend we're hoping to visit a nearby Rennaisance Faire.  Fingers crossed that on Saturday we'll be watching jousting knights, chomping on large turkey legs, and seeing lots of people in lovely costumes (my favorite part.) 

This will be Chuck's second Rennaisance Faire. (You can see our previous faire adventure here.)  And like last time, I wanted to make a floral crown to wear there.  Last year I crapted a floral crown out of plastic bags but this year I used leftover flowers from my crystallized flower experiment.

There are tons of tutorials and videos out there showing how to make floral crowns, but I followed this one from Kimmie of Sugar and Dots because it was really easy and straight forward.


Materials:
  • felt that's the same color as your hair
  • fake flowers
  • hair elastic
  • glue gun
  • scissors

Directions:

1.  Remove the flower heads and leaves off the stems.  Cut off the green plastic bit off the back of your flower so you'll have a flatter surface to glue onto the felt.  But be careful not to cut the green bit completely off or your flowers will just come apart.

2.  Cut out two similar sized strands of felt. 

3.  Hot glue your leaves onto one strand of felt.  Then, hot glue your flowers on.  (I glued on the larger flowers first and then added the smaller flowers.)

4.  Cut your second strand of felt into smaller rectangles.

5.  Hot glue your flower felt band onto your elastic head band.  To make sure that the elastic stays put, glue on your smaller felt rectangles on top of the elastic.  Your elastic band should now stay put because it's sandwiched between felt. 

6.  Optional:  I've worn this headband now a couple of times and noticed that the felt on both ends of the headband is starting to peel away from the elastic band.  To help ensure that they stay in place, you could always just pull out a needle and thread and add a couple of stitches on each side.

And that's all it takes to make this floral crown.

Happy crafting!

Tuesday, September 10, 2013

Make Homemade Sidewalk Chalk

I'd been meaning to try my hand at making homemade sidewalk chalk out of plaster of paris for awhile now.  But I never got up the nerve to try it out until this past weekend.   As I stared at my craft cabinet filled with dozens of empty toilet paper rolls, I felt the crafting itch take over.

Armed with my Michaels coupons, I took the plunge and bought myself some plaster of paris.  Then, a day later, Chuck and I made these:

Like the two colors?  Me too.  Now we get both pink and blue all in one piece of chalk.  Whoa.  Mind blowing.