

Showing posts sorted by date for query winter. Sort by relevance Show all posts
Showing posts sorted by date for query winter. Sort by relevance Show all posts
Tuesday, September 20, 2016
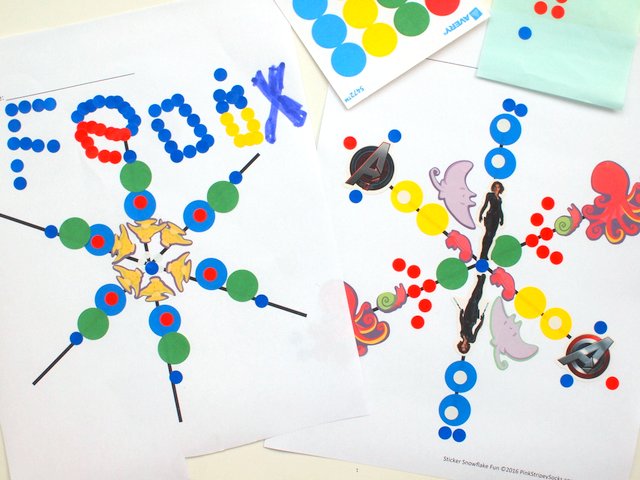
Groovy Sticker Snowflakes Art (Printable included)
With the start of the new school year, our family is still trying to find its new normal. Transitions from school to home can sometimes be rough. So we've been trying to keep things easy with more downtime in the afternoon. We play at the park, read books, or do simple open-ended crafts. Today I wanted to share a really easy open-ended snowflake craft that my son and I really enjoyed. We pulled out some old stickers and made ourselves some groovy sticker snowflakes!
 This post contains affiliate links. Thank you for the grocery money. For my full disclosure policy, click here.
Wednesday, December 16, 2015
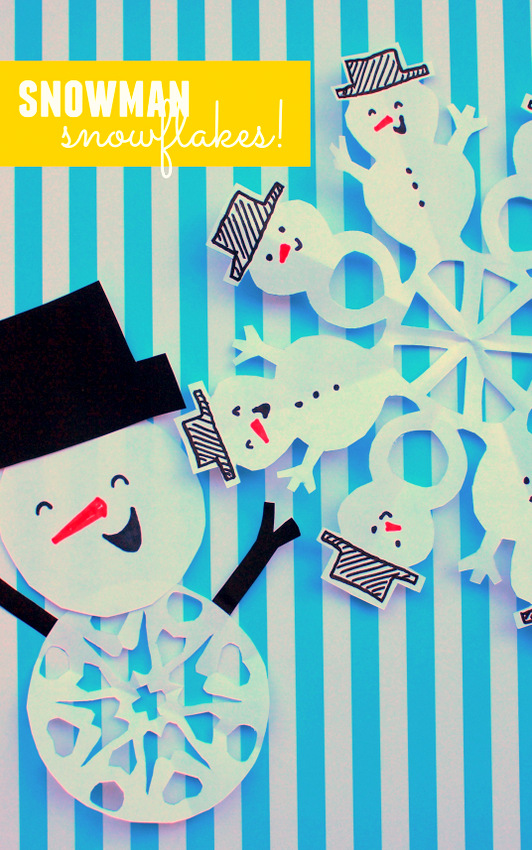
How to Cut Snowman Snowflakes (2 ways!)
Today we're making snowman snowflakes!
2 Ways to Make Snowman Snowflakes!
This post contains affiliate links. Thank you for your support!
Monday, November 30, 2015
Milk Jug Santa Claus Craft
Got a milk jug lying around? Well don't throw that baby out! Instead, use it to make a recycled Christmas Craft! My preschooler and I recently turned ours into this cute

Milk Jug Santa Claus!
This post contains affiliate links. Thank you for your support!
Wednesday, November 18, 2015
Mini Painted Sponge Christmas Trees
Can you believe that it's already mid November? Time sure flies by quickly! Even though it's not yet Thanksgiving, my son's already asked me to put up the Christmas tree and make Christmas Crafts.
Well, we still haven't put up the tree, but we have been crafting more together at night. Recently, we turned a bunch of old makeup sponges into mini Christmas trees. I know, they're not as beautiful as the real thing... but for now, they'll do!

Well, we still haven't put up the tree, but we have been crafting more together at night. Recently, we turned a bunch of old makeup sponges into mini Christmas trees. I know, they're not as beautiful as the real thing... but for now, they'll do!
Mini Sponge Christmas Trees

This post contains affiliate links. Thank you for your support!
Friday, November 6, 2015
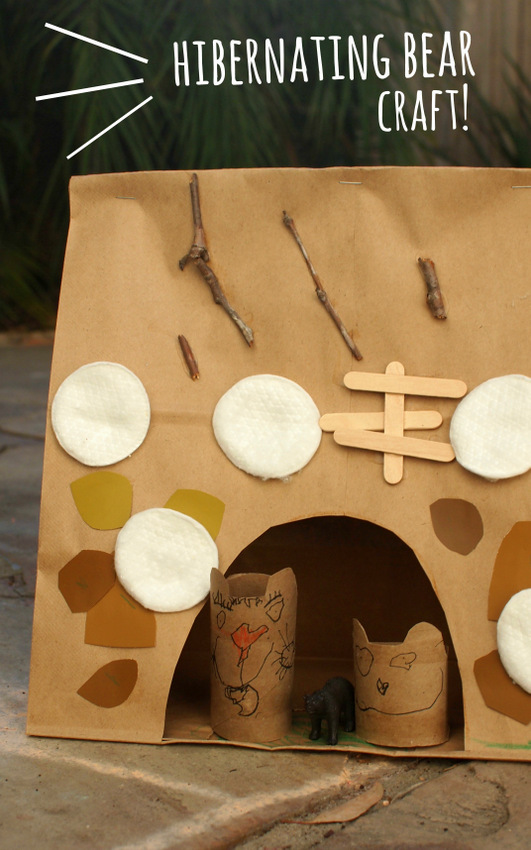
Recycled Hibernating Bear Craft! (And our favorite Bear books!)
Does your child love learning about nature? With the recent cooler weather we've been turning to more fall crafts and winter crafts. Recently we talked about bears and hibernation. (For some reason my preschooler was amused by the idea of an animal sleeping through the winter. As a tired, pregnant mom... the idea of sleeping for a long time really appealed to me!)
Today I'm sharing this easy Recycled Hibernating Bear Craft! It's a great way to teach kids about their natural world using some creative arts and crafts fun!
Today I'm sharing this easy Recycled Hibernating Bear Craft! It's a great way to teach kids about their natural world using some creative arts and crafts fun!
Recycled Hibernating Bear Craft
This post contains affiliate links. Thank you for your support!
Friday, January 9, 2015
The Snowy Day Shadow box
Howdy, friends! Today the Creative Preschool Collaborators and I are sharing 5 fun Winter-themed preschool activities and crafts! So be sure to scroll down to the bottom of the post for other great ideas!

The Snowy Day Shadow Box
This post contains affiliate links. Thank you for your support.
Ezra Jack Keats' book, The Snowy Day, has always been a favorite of mine. His illustrations are simple, charming, colorful, and graphic. He really captures the magic of a winter snowfall. Plus, I love that he supports multiculturalism and made his main character a young black boy. So when I found out that this week's theme was Winter, I was excited to read this book with Chuck and combine it with a craft.
Thursday, January 1, 2015
Fluttering Butterfly Craft!
Hello friends! Today I wanted to share this really neat fluttering butterfly craft that I recently did with Chuck. We cut out, painted, and folded butterflies that flutter when you move them! (We also made some lovely butterfly notebooks too!) The whole process entertained Chuck for quite awhile, so I thought other kids might like it too!

I know it's winter, and most people are doing winter crafts with their kids, but honestly, I just haven't had the heart to do so. Our weather is right now in the 60s which is totally bizarre to me. I'm used to cold, wet, or snowy winters.... not cool, sunny ones. It's very weird ... but I'm thankful for the sun and warmth!
This butterfly craft was inspired by our local butterfly grove. Nearby our home is a plot of land where monarch butterflies migrate to during the winter. How neat is that? Last week we hiked up to the butterfly grove and saw thousands of butterflies, clumped together in tree branches. It was a pretty amazing sight. (And I WISH I could have taken photos of them, but they were just too high up to get a decent shot.) One of the other children at the park found a dead butterfly on the ground and showed everyone. Chuck really wanted to find one of his own, but we never did. So I came up with this craft so that he could have his very own fluttering butterfly.
Fluttering Butterfly Craft
This post contains affiliate links. Thank you for your support!
I know it's winter, and most people are doing winter crafts with their kids, but honestly, I just haven't had the heart to do so. Our weather is right now in the 60s which is totally bizarre to me. I'm used to cold, wet, or snowy winters.... not cool, sunny ones. It's very weird ... but I'm thankful for the sun and warmth!
This butterfly craft was inspired by our local butterfly grove. Nearby our home is a plot of land where monarch butterflies migrate to during the winter. How neat is that? Last week we hiked up to the butterfly grove and saw thousands of butterflies, clumped together in tree branches. It was a pretty amazing sight. (And I WISH I could have taken photos of them, but they were just too high up to get a decent shot.) One of the other children at the park found a dead butterfly on the ground and showed everyone. Chuck really wanted to find one of his own, but we never did. So I came up with this craft so that he could have his very own fluttering butterfly.
Looking for kids' butterfly books?
This would definitely be a great craft to go along with any of these great butterfly books!
- Hungry Catterpillar
- My Oh My- A butterfly
- Butterfly and Moth
- Gideon's Dream
- From Caterpillar to Butterfly
Monday, November 10, 2014
Maple Syrup Candy + Craft Fail book review!
Now that the weather is a bit chillier, I thought it would be fun to do more fall and winter crafts and activities. I loved reading the Little House on the Prairie series as a child and always wanted to try doing the things Laura did. Last year, we made homemade butter from heavy cream. This year, we tried our hand at making homemade maple syrup candy!
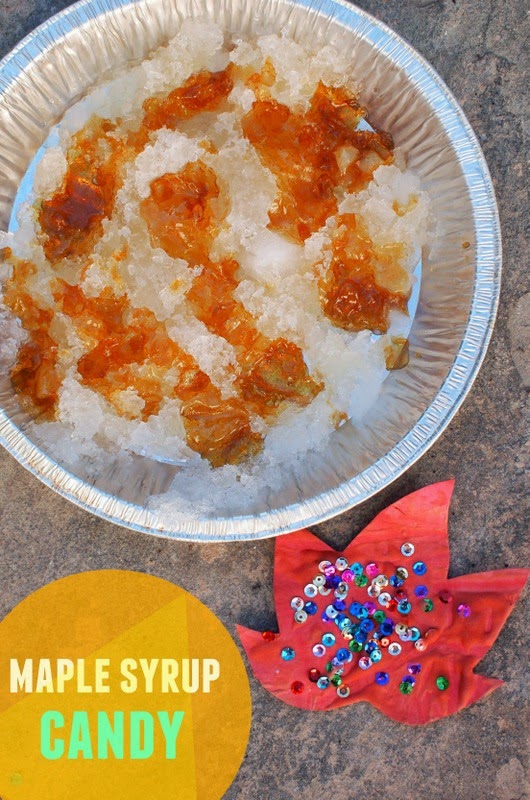
Let's Make Homemade Maple Syrup Candy!
(using snow-- ooh la la)
This post contains affiliate links. Thank you for your support.
Wednesday, April 23, 2014
Easter Photos
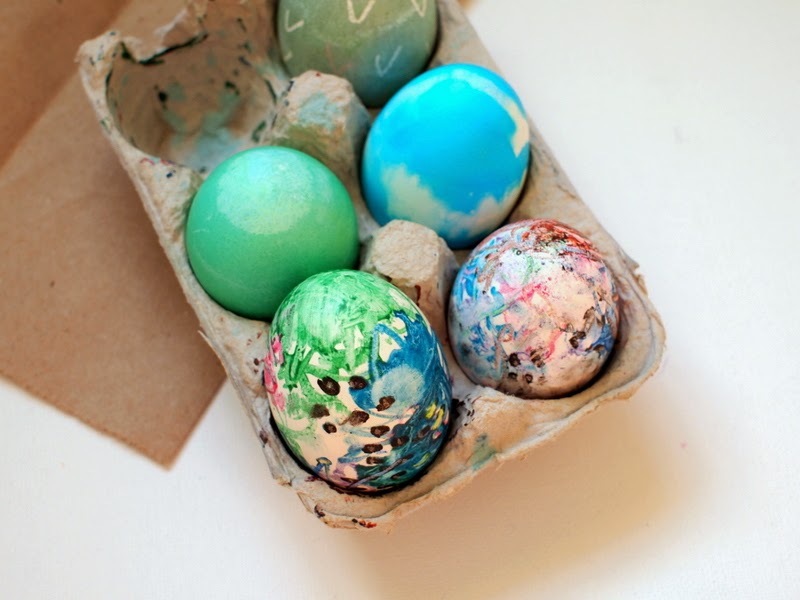 |
| Melted Crayon Easter Eggs |
Since we were away in Australia for a bit, Easter really snuck up on me this year. I felt like I didn't have time to prepare my heart for what it meant, and I didn't have time to prepare too many Easter crafts for the kids to do. Fortunately, the holiday still came and went with a lot of joy, fun, and crafting. This year we attended two Easter celebrations, one with a couple of good mommy friends, and the other with family.
As a mommy (and a blogger), I always try to bring my camera whenever we attend get-togethers. I think those events are special and I want to capture all the beautiful memories, yummy food, and funny moments that inevitable occur. But lately, I've noticed that when I pull out the camera to snap photos, I also miss out on a bit of the moment's magic. Sure, I've captured a memory in photograph, but I also wasn't really a part of it (probably because I'm fiddling around with camera knobs... blech technology). Does that make sense? Does anyone feel that way too?
Anyway, I guess this was a really long intro to just explain why this year's photos were kind of lacking... and why my shots were mostly of crafts. We loved celebrating Easter with friends and family this year.... and I was just having a bit too much fun beiing in the moment to stop and capture the moment.
Wednesday, February 12, 2014
Cherry Blossom Tissue Paper Flower Craft (Tree printable included!)
I know, it's a little early for cherry blossoms crafts. But this mama is seriously over winter. Buh-bye! With yet another snow storm scheduled to come tomorrow, this tissue paper cherry blossom tree craft is my attempt to kick winter in the face. Hiyah!
.JPG "Cherry blossom Tissue paper tree craft")
Like the tree? You can use it for your kids' crafts too! I turned my painting into a pdf so you can just download it and print it out....
Ahh, cherry blossoms... so beautiful... so springy...
Like the tree? You can use it for your kids' crafts too! I turned my painting into a pdf so you can just download it and print it out....
Monday, February 3, 2014
Make Fake Snow from Diapers
Guess what Chuck and I played with today while it snowed outside? Fake snow! We made some from a Pull up Diaper.

Say what?
Oh yeah. We visited our nearby science center last week and the kids loved playing with their fake snow. I found out that the fake snow was made from the same material found inside of diapers! Wow. Mind blown. So of course we had to make it at home.
Keep reading to find out how we made our fake snow!
Tuesday, January 21, 2014
DIY: 5 Ways to update your old beanie
Hubby's away and Chuck and I are currently stuck at home, sick. Boo. We're watching the lovely fluffy flakes falling outside and I'm soooo tempted to bundle him up to play outside. But, I'm holding myself back until he gets better.
(Hrmm... but maybe I could bring some snow inside for us to play with.... thanks Lisa for that idea!)
Anyway, here's a short cold weather post in honor of the snow.
Do you have an old beanie just lying around? Maybe you never really wear it, but you just can't bring yourself to give it away just in case you need it one day? Well, here are five super easy ways to update your drab head wear. And bonus! None of these are permanent changes, so you could potentially wear all five looks this winter!

This update was my favorite. Chuck is beginning to recognize Micky Mouse. So when I saw Eugenia Kim's Pom pom beanie (for $185- holy empty wallet!), I knew that I had to make my own cheapie version. I followed this pom pom tutorial from Crafted. Then, I sewed the two semi-identical (eek!) pom poms onto the corners of my beanie. Bam. Instant mousekateer cool.
And here I am modelling the four other updates....
 2. "Hi" Beanie: I cut out the letters "H" and "i" from felt. Then, I just sewed them onto the front of the beanie for some friendly headwear. Make sure you sew the letters closer together because they will stretch apart when you wear the hat.
3. Polka dot Pom Pom Beanie: I bought a pack of mini pom poms from the craft store and then sewed them onto the hat. To help with placement, I marked the hat with chalk first so I would know where to sew.
4. Spiked Beanie: I poked a couple of screwback cone spikes through the front of the beanie. I thought the hat made me look like a punky Statue of Liberty.
5. Sparkly heart Beanie: I cut out a heart shape from felt. Then, I hot glued some rhinestones onto the heart. Then, I sewed the heart back onto the hat. Wouldn't this version be nice for Valentine's Day?
Alright that's it. Time to take a nap. Stay warm and well, friends!
(Hrmm... but maybe I could bring some snow inside for us to play with.... thanks Lisa for that idea!)
Anyway, here's a short cold weather post in honor of the snow.
Do you have an old beanie just lying around? Maybe you never really wear it, but you just can't bring yourself to give it away just in case you need it one day? Well, here are five super easy ways to update your drab head wear. And bonus! None of these are permanent changes, so you could potentially wear all five looks this winter!
- Pom Pom Beanie
This update was my favorite. Chuck is beginning to recognize Micky Mouse. So when I saw Eugenia Kim's Pom pom beanie (for $185- holy empty wallet!), I knew that I had to make my own cheapie version. I followed this pom pom tutorial from Crafted. Then, I sewed the two semi-identical (eek!) pom poms onto the corners of my beanie. Bam. Instant mousekateer cool.
And here I am modelling the four other updates....
3. Polka dot Pom Pom Beanie: I bought a pack of mini pom poms from the craft store and then sewed them onto the hat. To help with placement, I marked the hat with chalk first so I would know where to sew.
4. Spiked Beanie: I poked a couple of screwback cone spikes through the front of the beanie. I thought the hat made me look like a punky Statue of Liberty.
5. Sparkly heart Beanie: I cut out a heart shape from felt. Then, I hot glued some rhinestones onto the heart. Then, I sewed the heart back onto the hat. Wouldn't this version be nice for Valentine's Day?
Monday, January 13, 2014
6 ways to entertain a toddler at home
Looking for some easy ways to entertain your toddler in the winter?
So... how about that polar votex? Boy, oh boy, that was some crazy weather. With the snow, ice, and freezing cold winds, Chuck and I hunkered down at home.After a couple of hours of reading the same books over and over again, and playing with the same toys over and over again, and listening to the soundtrack of "Planes" for the trillionth time, I finally cracked.
Redrum, redrum?
Thankfully, we didn't make it to that point. But, we definitely bounced off the walls a bit. To maintain some sense of sanity, we had to do something to make the time at home more enjoyable. So here are a couple of fun activities that kept us sane and smiling...
1. Yarn family portrait craft

Keep reading to see more ways we entertained ourselves at home...
Sunday, December 22, 2013
Four Winter Toddler Crafts and Activities
Looking for some easy toddler winter crafts and activities?
I'm officially over winter. Buh-bye shortened days! Buh-bye cold weather! Buy-bye staying inside! Oh, how I wish it were already spring. But, until warmer, sunnier days come, Chuck and I are going to persevere and have fun indoors. Here are four crafts and activities that have kept us busy, happy, and sane for the past couple of weeks.1. Cereal Box Gingerbread Men

Chuck's attention span: He probably spent about 5-10 minutes on this activity before he lost interest.
2. Hand and Foot Reindeer Wreath

Here are the different components of the wreath:
.JPG)
Chuck's attention span: He probably spent about 10 minutes on this activity before he lost interest.
3. Homemade Play Dough

He used a blunt plastic knife, measuring spoons, measuring cup, and an olive jar (our makeshift rolling pin) to play with the dough.

Chuck's attention span: This activity was a hit! We spent about 30-45 minutes on two separate days playing with our "play dough."
4. Water Bead Play

Here's what the water beads initially looked like ...

After a couple of hours, our beads grew and Chuck had a blast scooping them from container to container.
Warning: Yes, they can be a choking hazard. I repeatedly told him that the beads weren't food and I made sure to watch him while he played. Once we were done with the beads, I threw them away in the garbage can. (You can't pour them down the drain because they can clog your pipes.)

So, for all you mamas out there who are also stuck at home with young ones... stay strong! We can make it through winter! Hopefully one of these ideas will help keep you sane this week.
Happy crafting, friends!
Thursday, December 19, 2013
Finding beauty in the everyday
Heart shaped candy canes
(bent using this tutorial)
Our current car collection

Christmas tree toys

Red and white rice krispy treats

White play dough on our black table

Happy Thursday friends!
Tuesday, December 10, 2013
Make Snowflake Window Clings
Tomorrow it's supposed to snow. Chuck went to bed super excited because I promised him that we'd build a snowman.
Cross your fingers that our town is dusted in snow, ok?
Although this will be the first real snowfall of the season, our apartment's windows have already been covered with snowflakes for the past couple of weeks. Every winter I cut out snowflakes from paper, but this year I tried something new and made snowflake window clings out of tulle and fabric paint. I think they make Chuck's room a bit more festive and fun.
 To see how I made them, read on...
Cross your fingers that our town is dusted in snow, ok?
Although this will be the first real snowfall of the season, our apartment's windows have already been covered with snowflakes for the past couple of weeks. Every winter I cut out snowflakes from paper, but this year I tried something new and made snowflake window clings out of tulle and fabric paint. I think they make Chuck's room a bit more festive and fun.

Tuesday, November 12, 2013
Sparkly Ombre Popsicle Stick Star Garland (using Mod Podge)
Note: This is a post sponsored by Plaid, but the opinions are 100% mine.
Halloween is finally out of my mind and I'm now looking forward to the next set of holidays. Even though I don't really like winter (boo, shortened daylight hours), I do appreciate that we're entering a special season filled with cozy sweaters, yummy food, family get-togethers, yummy food, twinkly lights, yummy food and of course... holiday crafting (and yummy food)! Right now I've got an itch to add more glitter and sparkle to my life. Luckily for me, Plaid sent me a couple of holiday-themed crafting items, including Mod Podge Sparkle, which will help me to do just that.
Psst- If you're new to Mod Podge, here's a bit of an introduction to their line of awesome products
So, inspired by the upcoming holiday season and my love of the nighttime sky, I made this sparkly, ombre, popsicle stick star garland.

Wanna make this simple and sparkly garland? Well, put on your favorite holiday song and let's get started!
Materials:

Directions:

1. Decide how many stars you want to make. Then, take that number and multiply it by 5 to figure out how many craft sticks to paint. (Each star will be made out of five craft sticks.) Now it's time to paint. To create an ombre effect, first paint five stars your darkest color. (Be sure to paint the sides of your sticks too!) Then, add a bit of white paint to your original color to lighten it just a bit. Paint five more sticks with this lighter color. Keep repeating this procedure and mixing in white paint as you paint each new set of five sticks. Your original color will become lighter and lighter, creating an ombre effect.
 2. Once your paint dries, use the spouncer to apply Mod Podge Sparkle to your sticks. This will protect your paint job and add just a bit of lovely sparkle. Lay your sticks on parchment paper to dry. (The parchment paper prevents the sticks from sticking to your work surface.) Try to make sure that your sticks don't touch one another as they dry
 3. Once your sticks are dry, it's time to make your stars! (If you have a bit of excess Mod Podge around the edges, use your scissors to trim it off.) To make sure that your stars look similar, first make a practice star and then use a pencil to trace your star's five points. Use these pencil marks as guidelines when you hot glue your stars together.
 4. Arrange your stars in order.
 5. Cut out your desired length of string. Then, tie your stars on one by one to the string, starting from your darkest color and ending with your lightest color. To make sure that the stars don't slide off, tie your string through the center of each star and not through one of the arms.
And voila! A lovely star garland, just perfect for the holiday season (or really... everyday!)

(To see how I painted the star painting, click here.)
If you'd like to learn more about Plaid Products, you can always connect with them on Facebook, check out their Paint Me Plaid Blog, or sign up for their Newsletter.
And.... Happy crafting!
Halloween is finally out of my mind and I'm now looking forward to the next set of holidays. Even though I don't really like winter (boo, shortened daylight hours), I do appreciate that we're entering a special season filled with cozy sweaters, yummy food, family get-togethers, yummy food, twinkly lights, yummy food and of course... holiday crafting (and yummy food)! Right now I've got an itch to add more glitter and sparkle to my life. Luckily for me, Plaid sent me a couple of holiday-themed crafting items, including Mod Podge Sparkle, which will help me to do just that.
Psst- If you're new to Mod Podge, here's a bit of an introduction to their line of awesome products
- Mod Podge is an excellent all-in-one glue, sealer, and finish. It's available in a ton of different formulas, making it a perfect to use for your holiday (or everyday) gift giving projects.
- You can buy Mod Podge at tons of retailers nationwide or directly from Plaid's website as well
- Not sure how to start using the product? No worries. Plaid's website has a ton of great tips and tricks for using all their products: http://www.plaidonline.com/decoupage/dept/basics.htm
So, inspired by the upcoming holiday season and my love of the nighttime sky, I made this sparkly, ombre, popsicle stick star garland.

Wanna make this simple and sparkly garland? Well, put on your favorite holiday song and let's get started!
Materials:
- Mini Craft Sticks
- FolkArt Multi-Surface paint
- Plastic Artist's Palette
- Paint Brush
- Scrap paper
- Mod Podge Sparkle
- Mod Podge Spouncer (an easy to use sponge brush)
- Hot Glue Gun
- Parchment Paper
- String
- Scissors

Directions:

1. Decide how many stars you want to make. Then, take that number and multiply it by 5 to figure out how many craft sticks to paint. (Each star will be made out of five craft sticks.) Now it's time to paint. To create an ombre effect, first paint five stars your darkest color. (Be sure to paint the sides of your sticks too!) Then, add a bit of white paint to your original color to lighten it just a bit. Paint five more sticks with this lighter color. Keep repeating this procedure and mixing in white paint as you paint each new set of five sticks. Your original color will become lighter and lighter, creating an ombre effect.


And voila! A lovely star garland, just perfect for the holiday season (or really... everyday!)

(To see how I painted the star painting, click here.)
If you'd like to learn more about Plaid Products, you can always connect with them on Facebook, check out their Paint Me Plaid Blog, or sign up for their Newsletter.
And.... Happy crafting!
Sunday, November 10, 2013
What's up Chuck? Canstruction!
Hi everyone! Did you have a good weekend? Ours was kind of a mixed bag. On the one hand we got a chance to relax and hang out as a family... which is especially nice since hubby is still away most of the week for work. But on the other hand, we were just so sad hearing about Typhoon Haiyan's terrible aftermath in the Philippines. (To see how you can help the survivors, click here.)
*Sigh*
Ok, I'm trying to stay positive here. Hearing about such destruction and devastation reminds me to be thankful for all the things I usually take for granted. So I'm thankful for moments that we get to share together as a family:
 |
| Pretending to be monsters |
 |
| Showing off our non-existent yoga moves |
 |
| Enjoying the warm weather (Look! No coat!) |
 |
| Chasing each other around the park |
I'm also thankful that we were able to see Canstruction at the Brookfield Place Winter Garden. It's a joint competition and food drive where teams of engineers, architects, designers, and students create sculptures out of nonperishable foods. Sculptures will be up until November 13th and admission is free (just bring some canned food to donate). Then, they'll be taken apart and the food will be donated to City Harvest, an organization dedicated to feeding the hungry in New York City.
The sculptures were amazing. I left feeling quite inspired seeing how people's artistic and creative skills were used to highlight the very real problem of hunger in New York City.
Have a safe Monday, friends!


Subscribe to:
Posts (Atom)