Showing posts with label cardboard. Show all posts

Tuesday, April 15, 2014

DIY Easter Bunny Bean Bag Toss

Tomorrow the theme is bunnies at our library toddler group.  We're going to make paper bag bunnies and play a bunny game too.  Since I already had this lovely large piece of cardboard, I made a really simple Cardboard Easter Bunny Bean Bag Toss game.... complete with... wait for it... carrot bean bags.  

DIY Easter Bunny Bean Bag Toss

DIY Easter Bunny Bean Bag Toss


Ack.  Too adorable.  Too adorable!  (Btw, is it strange that I swoon over large pieces of cardboard?)   Hrmm... anyway... hopefully the kids will have fun playing tomorrow.  But even if they don't, I'm just going to lug this guy home and prop him up against my wall.   His cheesy grin is just too cute. 

Keep reading to see photos of how I made it...

Friday, March 28, 2014

Toilet Paper Roll Flowers and Cacti

I've said it once, and I'll say it again.  I've got a black, black thumb.  And this saddens me because deep down, my heart is really green.  I love looking at plants, I love eating plants, and goodness one year I was even a tree for Halloween!  But I'm a plant killer.  So this makes today's toilet paper roll craft perfect for me.  These cardboard roll plants are pretty to look at, and impossible to kill.


Make Toilet Paper Roll Flowers and Cacti

make toilet paper roll cacti and tulip flowers craft

Yup.  Aren't they pretty?  If you're interested in making yourself some everlasting recyclable plants, keep on reading!


Tuesday, March 18, 2014

Cardboard Space Shuttle Craft (template included)

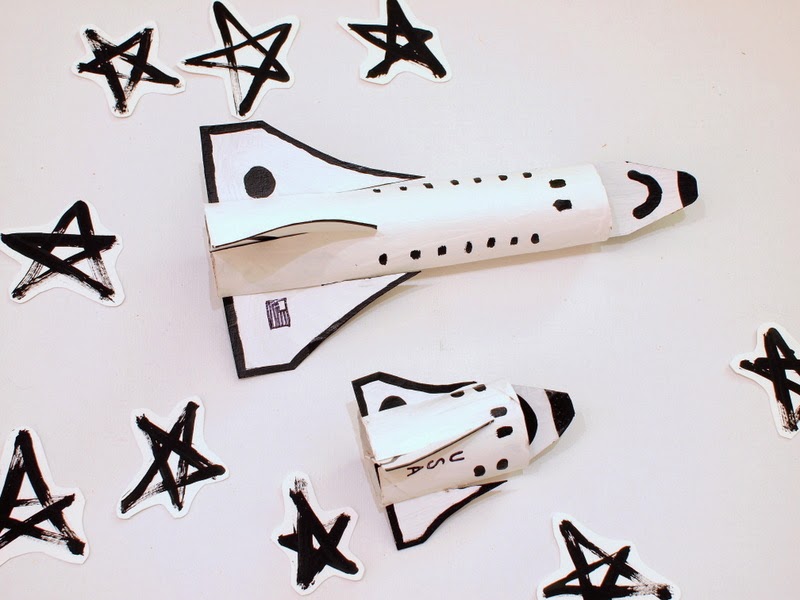
A couple of weeks ago we visited our nearby Science Center and Chuck fell in love with a small space shuttle toy.  Of course, the wheels in my head began whirring and I knew that we could easily transform a  paper towel roll into our very own rocket ship.  So after a couple days of planning, cutting, and painting, we are now the proud owners of two cardboard roll space shuttles:

Cardboard Space Shuttle Craft


make cardboard roll space shuttle craft

Want a ride to the moon on your very own cardboard roll space shuttle?  Then keep reading to see how we made them (template included)!


Monday, March 3, 2014

Leprechaun Hat Headband DIY

I'm not Irish. (Surprise!)  But I appreciate St. Patrick's Day because it gives me the opportunity to wear green and cute Leprechaun gear.  So today's craft is a DIY Leprechaun hat headband that was made from... wait for it.... toilet paper rolls and cereal boxes!   

Yup!  Today we're making our very own Leprechaun hat!
Leprechaun Hat Headband DIY from Toilet paper Roll
Keep reading to see how we made this little Leprechaun hat headband!


Monday, February 24, 2014

Cereal Box Fireman's Hat (Template included)

Currently Chuck loves pretending to be a fireman.  He tells me that random things are on fire and then sprays them with an imaginary hose to put the fire out.  To help encourage his play, we recently made this fireman's hat out of an old cereal box.

(Of course, we had to make a fireman's hat for his best friend Piggy too!)

Make a cereal box fireman's hat for child and toy


Got a pretend firefighter in your family too? Curious to see how a cereal box turned into a fireman's hat? Keep reading to see how we did it!

Friday, January 31, 2014

Two Heart themed Valentine's Crafts- Heart Glasses and Painted Heart Rocks

Note:  This post is sponsored by Plaid, but the opinions are 100% mine.

Did you know that the heart is my favorite shape?  (Is it weird that I have a favorite shape?)  I know that triangles and hexagons are super trendy right now, but I'm an old-fashioned romantic.  Hearts will always have a special place in my... well heart.  (Tee hee hee.)  So when Plaid sent me a box of Apple Barrel Craft Paint to create a Valentine's Day School Craft, I knew that it had to be heart related. 


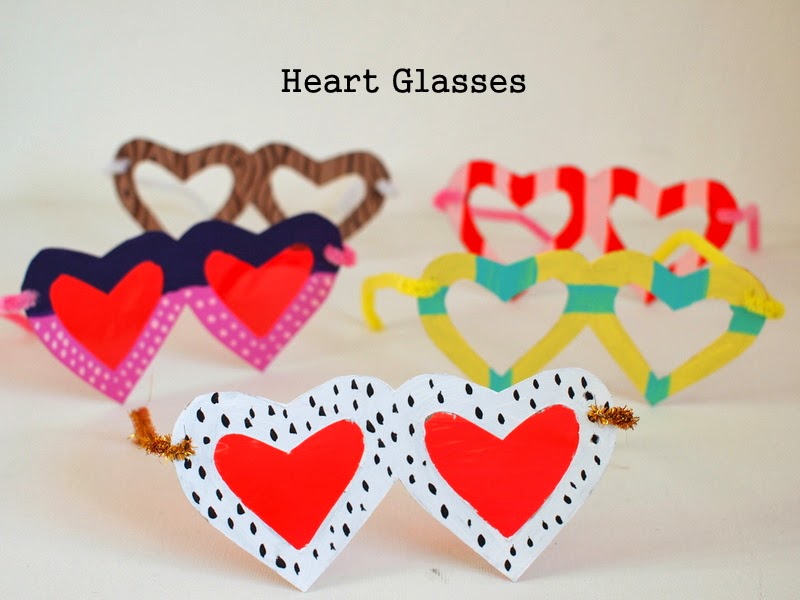
So I came up with these Cereal box Heart Glasses and Heart Painted Rocks.  Both crafts are super colorful and fun to make.   

Cereal box Heart Glasses


DIY Heart Shaped Glasses


Keep reading to see directions and template!

Wednesday, January 29, 2014

Two Bird Feeder Crafts: Toilet Paper Roll Feeders and Ice Feeders

Earlier this week my posts focused on sending some lovin' to the special people in your life (Click herehere and here.)  Well, that's all well and good.  But what about sending love to others?  How about the birds?  With the freezing cold weather outside, our feathered friends are bound to need some loving too.  So why not try out these two bird feeder crafts?  Chuck and I made some toilet paper roll bird feeders and some heart shaped ice feeders.  Both were really easy to make and currently dangling on a tree outside our building.

Here's an up-close shot of our Toilet Paper Roll Feeder:
Toilet Roll Bird Feeder Craft

To see how I made the toilet paper roll feeders and ice feeders, keep reading!

Wednesday, January 15, 2014

Make a Cardboard Bridge for Trains and Cars

We bought an Ikea train set awhile back and Chuck loves it.  The only problem is that our poor Thomas train is too big and doesn't fit under the train set's tunnel.  So I poked through my trusty cardboard stash and made him a cardboard mountain bridge.  

Cardboard Bridge for Trains and Cars

Aha!  Problem solved.
cardboard bridge for trains and cars

Now all the trains can fit underneath the mountain while his cars drive over the train track.  Yay! 

Wanna make a bridge too?  Well then keep on reading! 

Monday, January 6, 2014

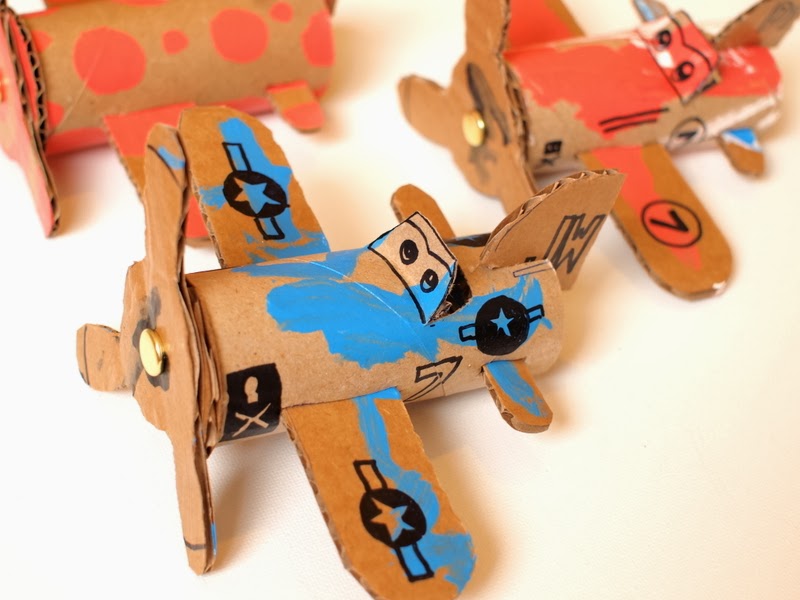
Make Toilet Roll Airplanes (template included)

Make Toilet Paper Roll Airplanes

Initially, I titled this post "Bad Mamas make toilet roll airplanes" because I wanted to admit something to you.

I'm a baaaad mama.

Yup, you read that right.  I'm a bad mama... a really bad mama...  why?  Well, the other day we were playing around with Chuck and we started humming different songs for him to guess.  At first we hummed his favorite song ("Life is a Highway" from the movie Cars) and he guessed it!  Intrigued, we kept humming other songs from Cars 1, Cars 2, and Planes (his faves.)  He couldn't name the songs specifically, but he could identify the movie that each song came from. 

And then I started humming "ABC" to him, thinking that it would be a breeze for him to guess.   I got through the entire song and then my son... my dear, sweet, transportation-loving child, looked up at me and said "Me no know mama."

What?! "Me no know?"  He knows songs from movie soundtracks... but can't recognize ABC?  We sing ABC to him at least twice a day when we brush his teeth.  Oof.  Double oof.

I guess we're not as entertaining as talking vehicles...

So... this reeeeeeaaaaally long intro was just my way of saying that my son loves cars, planes, trucks, trains... erm... basically anything that moves.  So I thought I'd try to foster his love with a toilet paper airplane craft.  These planes were inspired by the characters Dusty Crophopper and Skipper from the movie "Planes."  


Toilet paper Roll Planes Skipper and Dusty Crophopper


(This post contains affiliate links.  Thank you for your support.)

Keep reading to see how we made these planes ( plane template included!)...

Sunday, December 22, 2013

Four Winter Toddler Crafts and Activities

Looking for some easy toddler winter crafts and activities?

I'm officially over winter.  Buh-bye shortened days!  Buh-bye cold weather!  Buy-bye staying inside!  Oh, how I wish it were already spring.  But, until warmer, sunnier days come, Chuck and I are going to persevere and have fun indoors.  Here are four crafts and activities that have kept us busy, happy, and sane for the past couple of weeks. 


1.  Cereal Box Gingerbread Men


Cereal Box Gingerbread men
I cut out a whole bunch of gingerbread men from my empty cereal box stash.  (Yes, I'm a proud cardboard hoarder!)  Then, I brought them to the library and let the kids decorate them with googly eyes and foam stickers.  The older 2-year olds had fun making funny men and the babies just watched their moms do the craft. 

Chuck's attention span:  He probably spent about 5-10 minutes on this activity before he lost interest.


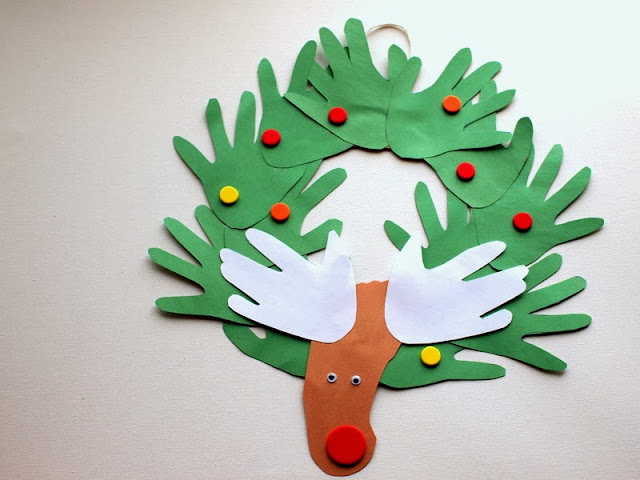
2.  Hand and Foot Reindeer Wreath

 hand and foot print reindeer wreath Christmas
I've seen versions of this craft all over the internet... and thought they were so cute and perfect for the holidays.  I traced Chuck's hand once to make a template for the wreath and horns.  I also traced Chuck's foot to make the reindeer's head.  Then, I glued everything together and he helped me add foam shapes and googly eyes.

Here are the different components of the wreath:

parts needed to make handprint and reindeer wreath craft
Chuck's attention span:  He probably spent about 10 minutes on this activity before he lost interest.


3.  Homemade Play Dough


child playing with homemade playdough
I followed this craft clay recipe and we had tons of fun rolling, cutting, and shaping our clay.  Unfortunately, our ornaments cracked when they dried.  Boo.  But, we had such fun manipulating the stuff that I kept leftovers in a sealed bag in the fridge.  It didn't dry out and we got to play with it another day. (Right now the "play dough" is still in our fridge... so we'll try it out again this week.)

He used a blunt plastic knife, measuring spoons, measuring cup, and an olive jar (our makeshift rolling pin) to play with the dough. 

boy using a plastic knife to cut homemade playdough

Chuck's attention span:  This activity was a hit!  We spent about 30-45 minutes on two separate days playing with our "play dough."


4.  Water Bead Play


water bead play
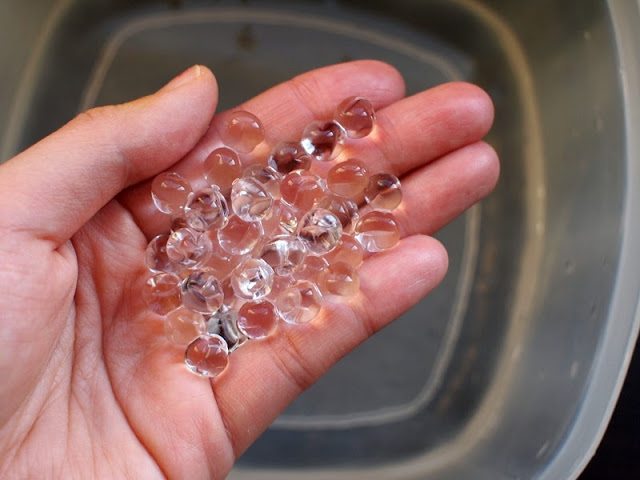
Again, I saw a ton of other mommies raving about these beads so I had to give them a try.  I found mine at Michaels in the flower section.  The beads are made of a special polymer that expands in water.  The resulting beads look a bit like boba balls and are slippery and firm.  They also bounce a bit if dropped.

Here's what the water beads initially looked like ...
what do water beads look like- explanation

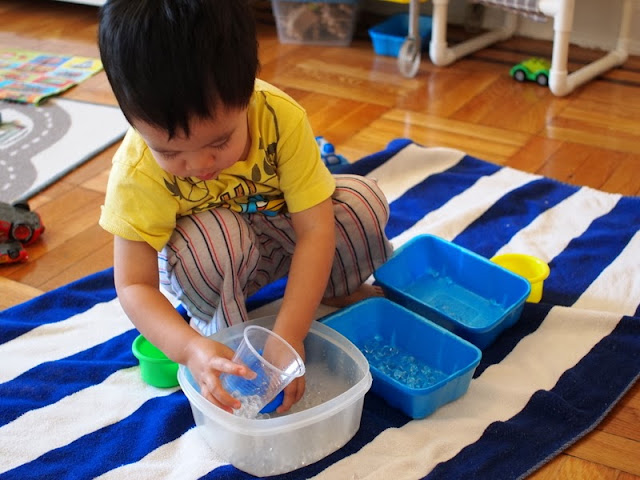
After a couple of hours, our beads grew and Chuck had a blast scooping them from container to container.

Warning:  Yes, they can be a choking hazard.  I repeatedly told him that the beads weren't food and I made sure to watch him while he played.  Once we were done with the beads, I threw them away in the garbage can.  (You can't pour them down the drain because they can clog your pipes.)

toddler playing with water beads
Chuck's attention span:  This activity was a hit!  He spent about an hour just scooping the beads from container to container.


So, for all you mamas out there who are also stuck at home with young ones... stay strong!  We can make it through winter!  Hopefully one of these ideas will help keep you sane this week.

Happy crafting, friends!

Friday, December 13, 2013

Make a felt and cardboard gingerbread house

Today's craft was inspired by gingerbread houses.  It's a little cardboard and felt "gingerbread" house with felt "candy" decorations. Pretty neat, right? All the decorations can be easily placed on and taken of, so you can decorate and re-decorate to your heart's content.

DIY Felt and Cardboard Gingerbread House Toy

DIY Felt and Gingerbread House Toys


This post contains affiliate links. Thank you for your support.

If you'd like to make your own, keep on reading!

Monday, December 2, 2013

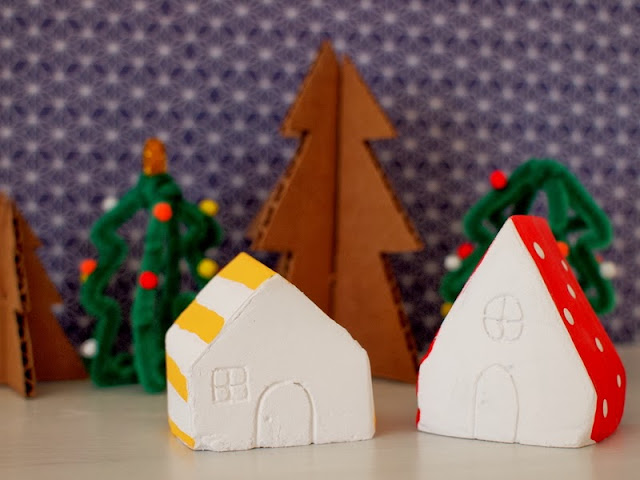
DIY Mini Plaster of Paris Christmas Village

I've always loved Christmas.  It's the time of year when twinkly lights decorate the dark nighttime sky.  And, it's the time of year that I'm reminded to hope because of God's great love for us.

Nowadays, Chuck and I love looking at the miniature Christmas village on display at our local craft store.  We always walk around oohing and ahhing over the little houses, ferris wheel, and tiny dog playing in snow.  It's magical.

So that's why I made us our own miniature Christmas village out of materials that we had lying around our apartment.

Let's Make a DIY Mini Christmas Village!


DIY Mini Plaster of Paris Christmas Village
This post contains affiliate links.  Thank you for your support!

(Psst- Click here to see see how I made the pipe cleaner and cardboard trees.)


Thursday, November 7, 2013

DIY Kids' Portable Stove top

Sometimes when I'm cooking in the kitchen, Chuck pretends to cook alongside me.  It's pretty cute.  I'll give him one of my unused pots and a large plastic spoon, and he'll whip up something for me to try.

Lately he's been cooking for his toy cars.  With this new interest in entertaining, I thought it was high time he got his own stove.  Taking inspiration from this Pack-n-Go Kids Play Stove, I made him a mini portable stove top.

DIY Portable Kids Stove Top Toy


DIY Kids' Portable Stove Top

Since we live in a small apartment, I'm always hesitant to purchase large toys for Chuck.   I loved this simple DIY toy because it supports his imaginative play and doesn't take up too much space!  The storage container's lid becomes the "stove top" and all his cooking toys are stored inside.


Materials:
  • Plastic storage container
  • Sharpie Marker
  • Scissors
  • Contact Paper

Directions:
1.  Doodle some burners and knobs onto your contact paper using your Sharpie marker.
2.  Cut out your doodles.
3.  Stick them onto your plastic storage container.

That's it!  Now you've got an easy-peasie DIY stove for cooking.  Pretty awesome!

How to make a toy stove top for kids


Happy crafting!

Saturday, October 5, 2013

Make your own glow in the dark chalk

A couple of weeks ago Chuck and I were perusing the Halloween aisles at Target (for the bajillionth time... what can I say?  It's my favorite holiday!) and I spotted a pack of glow in the dark chalk.

Then a light bulb went off in my head.  I could buy the chalk... but it'd be more fun to try making my own.  So after tinkering around for a bit.... I came up with this result. 

Ooh!  It glows!


What what?  Yup.  They glow after you "charge" them with light.  Just doodle a design at night, shine a light on them to "charge" them, and then turn off your light.  Your doodles should glow for a bit and then you'll need to charge them again.  

To make this novelty chalk, I simply modified this homemade chalk recipe.  Instead of tempera paint, I added 3 T of glow in the dark paint to the mixture.  Here's what my chalk looked like setting up:


Have a great weekend!

Tuesday, April 23, 2013

Kids' Cheesy Cardboard Camera

Hi everoyne!  

Happy belated Earth Day!

 Today I'll share about how I made this cheesy cardboard camera for Chuck.   This crapt was inspired by his love for eating cheese and touching my camera.  Here's what the camera looks like from the front:
 And here's what it looks like from the back:


Materials:
- small metal cylinder container with lid (or you could probably use a paper towel roll)
- can opener
- small, sturdy cardboard box
- craft knife
- scissors
- self-healing mat
- drill
- pencil
- 3 caps (I used 3 baby food squeeze pack caps)
- 3 brass fasteners
- packing tape
- lanyard (or string)
- disposable baking sheet (or plastic container lid or heavy duty aluminum foil)
- glue
- craft paint
- paint brushes and foam brush
- Mod Podge

Directions:
1.  I used a can opener to remove the bottom of my small, cylinder container.  I made sure that the can opener made clean cuts so that I wouldn't cut Chuck's fingers.  This cylinder became my camera "lens."

2.   The photo below shows my original box.  It was initially too big, so I chopped off a couple of inches off the right side of the box.  I used the cut off bits to fashion a top for the camera.

 3.  I cut out two circles, one in the front and one in the back of my camera.  The circle in the front was the same size as my cylinder.  (I just traced the cylinder and then cut the circle out.) The circle in the back of the box was slightly smaller than my cylinder.  (This ensured that my lens would poke out through the front, but not slide out through the back.)

4.  I also cut a rectangle from in the top, right hand corner of the front of my camera.  This became my "flash."

5.  Hubby drilled five holes in my cardboard:
- Two holes in the back to insert my back red knobs
- One hole on my top piece to insert my top green knob
- A hole on each side of the camera to string my lanyard strap through the body

He also drilled a hole into each of my three caps.  All the holes had to be big enough so that a fastener could fit through them.


 Here's a photo showing how the pieces fit together on the inside.  (I didn't use fasteners on the sides of my camera. I just poked them through the holes to show you where the holes were)

Here's how the camera  looked like with the top piece on:
I took this photo before cutting out the rectangle hole for the flash.
6.  After making sure my camera parts fit together, it was time to paint.  I gave the cardboard parts and cylinder two coats of yellow craft paint.  I also painted on my grey circles.
 7. Once the paint dried, I attached my "knobs", "lens", and "flash."  I used the brass fasteners to fasten the knobs onto the cardboard pieces.   I cut out a rectangle from my disposable baking pan and taped it over my rectangular "flash" hole.  I used a lot of packing tape to attach my cylinder to the inside of my camera.
8. I touched up my paint job a bit. Then, I coated my camera with Mod Podge to protect the paint.

9.  I strung lanyard through the body of the camera and then used glue and packing tape to attach the top piece to the body.

10.  To further protect my paint job, I ended up putting a thin strip of packing tape on the edges of the camera. (I've noticed that paint chips off the edges first, so I made sure to protect those with tape.)  I also put some tape near the lanyard hole in case the weight of the camera pulled on the lanyard and ripped the cardboard.

Phew.  Once I was done, I couldn't help but smile a cheesy grin.  (Hee hee.)  Here are some photos of Chuck playing around with his new cardboard camera.


Say "Cheese!"

Thanks for joining me on another crapty adventure.  If you're interested in making other crapty cardboard toys, check out my cardboard guitarcardboard rattle drumcereal box elephant, or cereal box giraffe.

Monday, April 1, 2013

Easter egg crafts

Hi everyone!

I hope you had an egg-cellent Easter.
We had a really nice time eating and celebrating with our egg-stended family.
I think I went a bit overboard with this Easter's egg-related crafts:

Inspired by Krokotak's egg carton hens, I made my own chicken and ladybug egg holders.

I also blew out a bunch of eggs, colored them, and then turned them into confetti eggs for our family Easter egg hunt.

Blowing out the eggs:  
I used a safety pin and pricked the top and bottom of the egg.  Then, I used the safety pin to enlarge the bottom hole.  Then, I placed my mouth over the smaller top hole and blew the egg out over a bowl.  Once the egg was emptied, I rinsed the shell out and left it to dry on a paper towel.

Marbleizing eggs with nail polish:
Once the eggs were hollowed out, my sister and I marbleized some of the eggs using Camille Styles' instructions.  (Note:  Her eggs came out beautifully!  As you can see, I had a lot of trouble getting even results. Maybe it's because my nail polish was the cheap 2 dollar kind... or too old?  Or, perhaps my water wasn't the right temperature?  Hrmm...  Did anyone else have trouble making these eggs?)


Designing with masking tape  and dying eggs:
I had much better luck dying the rest of my eggs.  Hubby and I used masking tape to first create designs and then we dyed them.  To create each color, we simply combined 1 cup of boiling water, 20 drops of food coloring, and 2 teaspoons of vinegar in a large mug.  Then, we held our eggs in the dye until they took on the hue that we liked.


Filling the confetti eggs:
Once all the dye dried (and the nail polish smell dissipated... yuck), I filled the hollowed out eggs with  rice krispy treats (poured through a simple funnel made from rolling a piece of paper) and sealed up the holes with masking tape.

The kids had fun finding these special eggs and stomping on them to reveal the rice krispies within.


Although these eggs were fun to make, it was even more fun to see the kids smile each time they found a special "stomping egg."

Happy Monday!

Friday, March 15, 2013

St. Patrick's day photo props

Today our toddler time is holding a St. Patrick's day event for the kids.  Here are two photo props that I crapted for the event:


Both props were made out of old cereal boxes. The kids are supposed to stick their faces through the hole in the left prop and they're supposed to stand underneath the hat on the right.

Please send some good Irish luck our way.  I'm hoping that the kids will use the props and we get some super cute and silly photos.

Happy St. Patrick's Day!

Wednesday, January 30, 2013

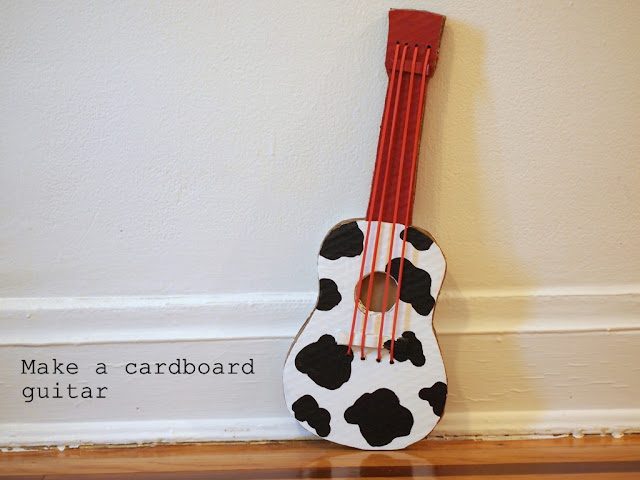
Make a cardboard guitar

Whenever I play the guitar, Baby Chuck seems keen to join in.  He pulls on strings, turns the tuning keys, and inevitably drops picks (and possibly raisins- ick) into the body.  I figured he'd like his own guitar, so I made him this black and white cutie.  It's the size of a ukulele.

(Why cow print?  Well, whenever we ask him "What does a cow say?" he responds "Mmm mmm."  Then we always cheer because that's close enough for us.)

Want to make your own guitar?  Read on!

DIY Cardboard KidsGuitar

how to make a cardboard guitar for kids

(Disclaimer:  I got the template and directions from Make It and Love It.  They wrote a really comprehensive set of directions packed full of lovely photos.  Check out their post for detailed directions and cute kid pics.  I'm posting up this set of directions because I did things slightly differently.)

(Disclaimer 2:  This project takes a long time.  Crapting helps me to relax, so I didn't mind.)

Materials Needed to Make a DIY Kids Guitar

- Already cut out and assembled guitar template (follow her directions on how to resize, cut, and assemble pieces)
- Exacto knife
- Aleene's tacky glue (you'll need something stronger than Elmer's, hot glue didn't quite work for me)
- Scissors
- Nice cardboard (no bends or stains) <-- crap
- Ruler
- Drill
- Paint, paint brushes, Mod Podge
- 4 jumbo 7 inch rubber bands (purchased at Staples)
- 2 paperclips (I used jumbo sized ones, but I think 1 inch ones would work too)
- heavy books

Directions to Make Your Own DIY Cardboard Guitar:

1.  Trace and cut out 4 guitar pieces out of your cardboard:

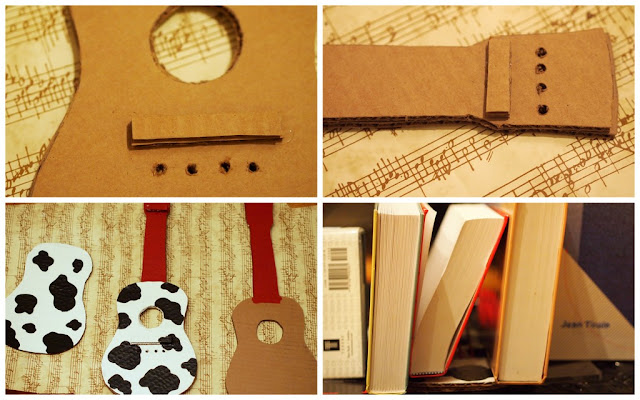
  • 3 full length guitar cutouts (with holes cut out of the center of them)
  • 1 body only guitar cutout (cut your template at the dotted line and just trace out the bottom portion)


2.  Glue together two of your full length guitar pieces.  Now you have a nice sturdy  base.  (You don't want your rubber bands to bend the cardboard.)

3. Cut out 4 rectangles out of cardboard:

  • 2 larger rectangles- approximately 3 inches x 1/4 inch
  • 2 smaller rectangles- approximately 1 3/4 inches x 1/4 inch

4.  Glue your two large rectangles, one on top of each other, about 1 inch below the cutout circles on your previously glued together guitar cutouts.  Glue your two smaller rectangles, one on top of another, around the neck of your previously glued together guitar pieces.


cut out cardboard guitar shapes

5.  Now it's drilling time. (Aka- Time to call hubby because drills totally freak me out.)  Drill four holes approximately 1/3 inch below your larger rectangles and about 1/2 inch above your smaller rectangles.  Honestly, the measurements aren't that important.  You can just eyeball it.  Just make sure that (a) your holes are evenly spaced and (b) four rubber bands could potentially be strung from one set of holes to the other.  Oh yeah, when drilling the holes on the head of the guitar, try not to place the end holes too close to the edge of the cardboard.  Otherwise your rubber band will periodically slide off...

6.  Now it's painting time (Aka- Let's get funky and creative!)

  • Completely paint one side of the smaller guitar body  (I painted it cow print)
  • Completely paint one side of your glued together guitar cutouts.  (I painted it red and cow print.) 
  • Paint the neck of your third guitar cutout (That's the only part that will be showing in your final product
Once your paint dries, apply Mod Podge to protect your lovely work.  Let Mod Podge dry.

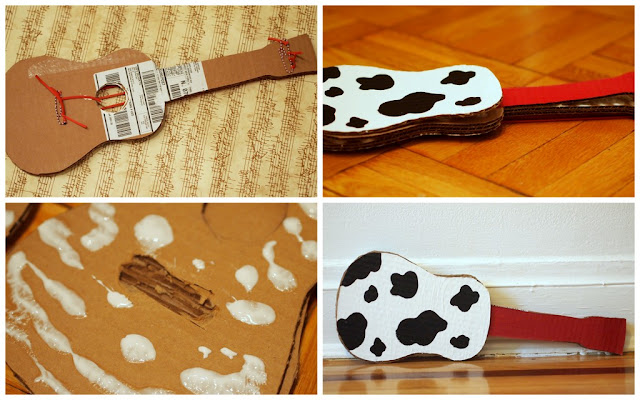
7.  You may notice that your cardboard starts bending.  This isn't good because it will prevent your cardboard pieces from properly sticking together.  Don't worry!  Just use some heavy books to flatten your cardboard out.  (Sadly, my two previously glued together guitar pieces were coming undone.  I reattached them by squeezing in more glue between the crevices.)  Let glue dry.


drill, paint, and complete your DIY cardboard guitar toy for kids

8.  Now let's string the guitar!  Cut your four jumbo sized rubber bands to make four long strands.  Double knot each rubber band to a paperclip.  Then, string your four strands through the holes in the neck of the guitar.  Pull to make sure that your paperclip sits flush against the cardboard.  Pull those strands down one by one through the holes in the body of your guitar.  Double knot the strands to another paperclip.  (I had some problems tying my middle rubber bands to the paper clip, so I just double knotted them to each other.)  Trim all your excess rubber band bits.

9.  Make four small indentations in your cardboard rectangle bits (on the front of the guitar) to keep rubber bands in place.

10.  What? Aren't we done yet?  No way. Crapting is not for the weary. Time to cover up the ugly rubber band ends and paper clips.  Spread a thick layer of glue on the back of your newly strung guitar and glue on your third full guitar piece.  Make sure the painted neck is shown.  Apply pressure to make sure the pieces stick together.  Then, glue on your small guitar body on top of that.  Again, apply pressure.

11.  Note:  I found that my pieces wouldn't stay glued together because my jumbo paper clips were pretty thick.  If you find yourself with this problem too, you may need to cut out two "wells" in your cardboard so that the paperclips have a nice place to rest.  Then your cardboard pieces should sit nicely together.

12.  Enjoy and rock out.

how to make a DIY cardboard guitar for kids


And here are our two new cardboard instruments:
(Click here for directions to make a cardboard rattle-drum.)
DIY cardboard instruments kids craft

Phew.  I'm exhausted.  Time for bed.  Goodnight!