Showing posts with label recycled. Show all posts

Thursday, May 1, 2014

Build a toy car that moves

I love painting things with Chuck, but sometimes I yearn to make things that actually move or do things.  So when a mommy friend suggested that we build cardboard toy cars that actually move, wowzers, I had to say yes.  She found the directions in an old kids' science book (that I don't remember the name of... sorry).  And that's how we spent an awesome play date with five kids- eating pizza and then building and racing some cardboard racing cars

Kid Science: Let's Build a Car that Moves!

how to build a cardboard car that moves
Today's craft is awesome for 2 reasons:

1.  The cars really move.  Really.  You just twist the tin can and then let go.  Bam.  The rubber bands store the potential energy and then once released, they turn the can... and your car moves by itself!

2.  You don't need any expensive materials.  In fact, you probably have most of the items already at home.  

Have I whet your appetite enough?  Ok.  Let's build! Vroooom!

Friday, March 28, 2014

Toilet Paper Roll Flowers and Cacti

I've said it once, and I'll say it again.  I've got a black, black thumb.  And this saddens me because deep down, my heart is really green.  I love looking at plants, I love eating plants, and goodness one year I was even a tree for Halloween!  But I'm a plant killer.  So this makes today's toilet paper roll craft perfect for me.  These cardboard roll plants are pretty to look at, and impossible to kill.


Make Toilet Paper Roll Flowers and Cacti

make toilet paper roll cacti and tulip flowers craft

Yup.  Aren't they pretty?  If you're interested in making yourself some everlasting recyclable plants, keep on reading!


Tuesday, March 18, 2014

Cardboard Space Shuttle Craft (template included)

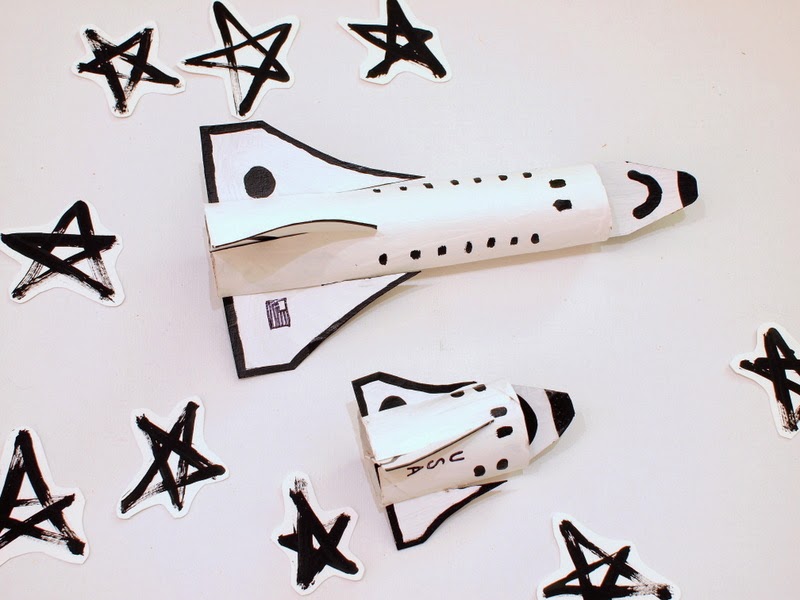
A couple of weeks ago we visited our nearby Science Center and Chuck fell in love with a small space shuttle toy.  Of course, the wheels in my head began whirring and I knew that we could easily transform a  paper towel roll into our very own rocket ship.  So after a couple days of planning, cutting, and painting, we are now the proud owners of two cardboard roll space shuttles:

Cardboard Space Shuttle Craft


make cardboard roll space shuttle craft

Want a ride to the moon on your very own cardboard roll space shuttle?  Then keep reading to see how we made them (template included)!


Thursday, March 13, 2014

DIY Tin Wall Art

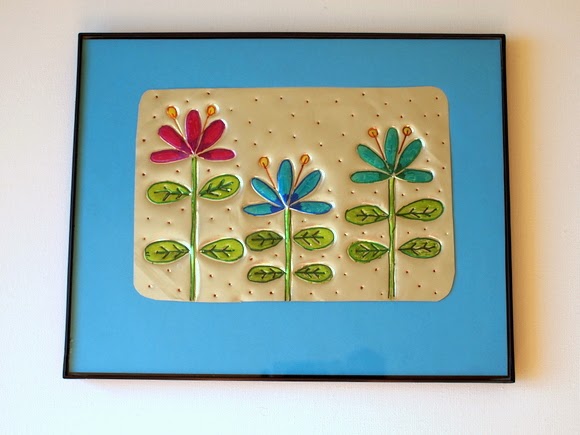
The weather last weekend was glorious and I'm mentally already in Spring mode.  Doesn't matter that today was freezing cold... nope, no siree.  The sun is shining, it's March, so yes, Spring is here (in my mind at least.)  And to celebrate the sunnier, warmer weather, I'm over at Handmade Charlotte today sharing how I made this lovely spring themed DIY Tin Wall Art.


Use disposible baking dish to make tin wall art


Tin Wall Art sounds pretty fancy-shmancy.  I actually made it using materials that I already had at home!  Adults and kids can easily turn a simple disposable aluminum baking pan into a piece of lovely and personalized artwork.  So grab your Sharpies and baking pan, and head on over to Handmade Charlotte to see how to make yourself some lovely DIY Tin Wall Art!

Thursday, March 6, 2014

4 Easy Kids' Crafts


Today Chuck's sick and we're stuck at home.  Boo!  I was going to skip posting today and instead just upload our everyday craft photos onto my Instagram account.  But the photos were so cute... so I gave in and I'm uploading a collage here too, just in case you're looking for some crafty inspiration.

4 Really Easy (Practically no prep) Kids' crafts


Keep reading to see how we made each craft:

Monday, March 3, 2014

Leprechaun Hat Headband DIY

I'm not Irish. (Surprise!)  But I appreciate St. Patrick's Day because it gives me the opportunity to wear green and cute Leprechaun gear.  So today's craft is a DIY Leprechaun hat headband that was made from... wait for it.... toilet paper rolls and cereal boxes!   

Yup!  Today we're making our very own Leprechaun hat!
Leprechaun Hat Headband DIY from Toilet paper Roll
Keep reading to see how we made this little Leprechaun hat headband!


Friday, February 28, 2014

Plastic Bottle Sumo Wrestler Bowling Pins

About a year ago I had the great opportunity to be a guest craft poster at Sugar and Dots (Now Hello M{ess}).   My first craft on her blog was this set of cute and quirky sumo wrestler bowling pins.  It's still one of my most popular (and favorite) craft posts, so today I thought I'd re-share my sumo wrestler pins over here.

Plastic Bottle Sumo Wrestler Bowling Pins

Sumo Wrestler Plastic Bottle Bowling Pins
Ack!  Too cute....


Keep reading to see how these cute guys were made:

Friday, January 31, 2014

Two Heart themed Valentine's Crafts- Heart Glasses and Painted Heart Rocks

Note:  This post is sponsored by Plaid, but the opinions are 100% mine.

Did you know that the heart is my favorite shape?  (Is it weird that I have a favorite shape?)  I know that triangles and hexagons are super trendy right now, but I'm an old-fashioned romantic.  Hearts will always have a special place in my... well heart.  (Tee hee hee.)  So when Plaid sent me a box of Apple Barrel Craft Paint to create a Valentine's Day School Craft, I knew that it had to be heart related. 


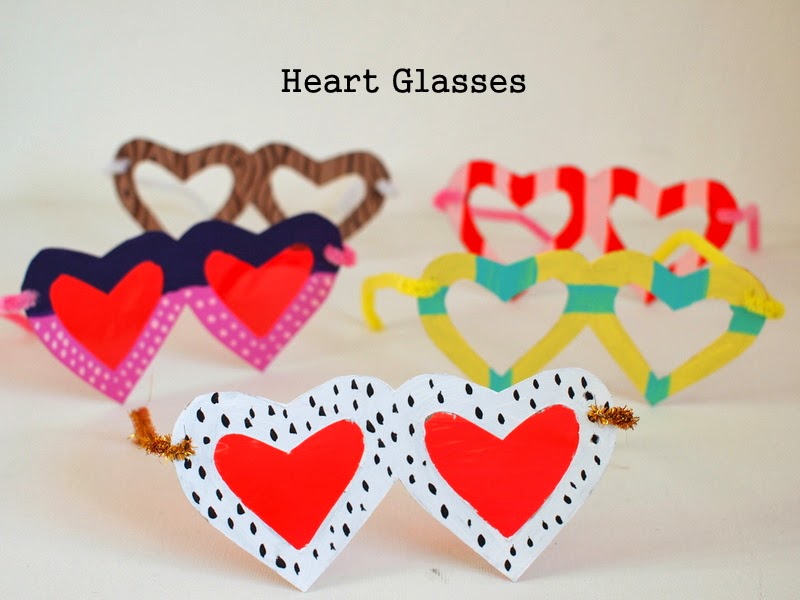
So I came up with these Cereal box Heart Glasses and Heart Painted Rocks.  Both crafts are super colorful and fun to make.   

Cereal box Heart Glasses


DIY Heart Shaped Glasses


Keep reading to see directions and template!

Wednesday, January 29, 2014

Two Bird Feeder Crafts: Toilet Paper Roll Feeders and Ice Feeders

Earlier this week my posts focused on sending some lovin' to the special people in your life (Click herehere and here.)  Well, that's all well and good.  But what about sending love to others?  How about the birds?  With the freezing cold weather outside, our feathered friends are bound to need some loving too.  So why not try out these two bird feeder crafts?  Chuck and I made some toilet paper roll bird feeders and some heart shaped ice feeders.  Both were really easy to make and currently dangling on a tree outside our building.

Here's an up-close shot of our Toilet Paper Roll Feeder:
Toilet Roll Bird Feeder Craft

To see how I made the toilet paper roll feeders and ice feeders, keep reading!

Wednesday, January 15, 2014

Make a Cardboard Bridge for Trains and Cars

We bought an Ikea train set awhile back and Chuck loves it.  The only problem is that our poor Thomas train is too big and doesn't fit under the train set's tunnel.  So I poked through my trusty cardboard stash and made him a cardboard mountain bridge.  

Cardboard Bridge for Trains and Cars

Aha!  Problem solved.
cardboard bridge for trains and cars

Now all the trains can fit underneath the mountain while his cars drive over the train track.  Yay! 

Wanna make a bridge too?  Well then keep on reading! 

Monday, January 13, 2014

6 ways to entertain a toddler at home

Looking for some easy ways to entertain your toddler in the winter?

So... how about that polar votex?  Boy, oh boy, that was some crazy weather.  With the snow, ice, and freezing cold winds, Chuck and I hunkered down at home. 


After a couple of hours of reading the same books over and over again, and playing with the same toys over and over again, and listening to the soundtrack of "Planes" for the trillionth time, I finally cracked.

Redrum, redrum?

Thankfully, we didn't make it to that point.  But, we definitely bounced off the walls a bit.  To maintain some sense of sanity, we had to do something to make the time at home more enjoyable.  So here are a couple of fun activities that kept us sane and smiling...

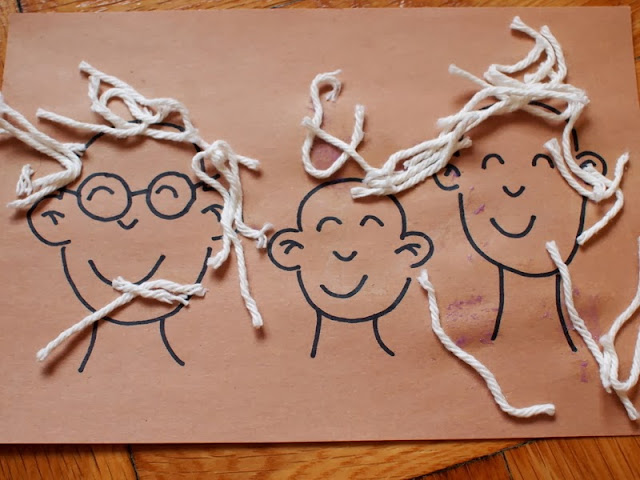
1.  Yarn family portrait craft

yarn hair family portrait craft
Chuck loves using scissors and the glue sticks, so this activity was a hit.  First he helped me cut tons of short, white yarn strands.  Then, I doodled a bald family on a piece of paper.  Then, he helped me glue hair onto all of their heads.  The result is this cute and funny family portrait. 

Keep reading to see more ways we entertained ourselves at home...

Monday, January 6, 2014

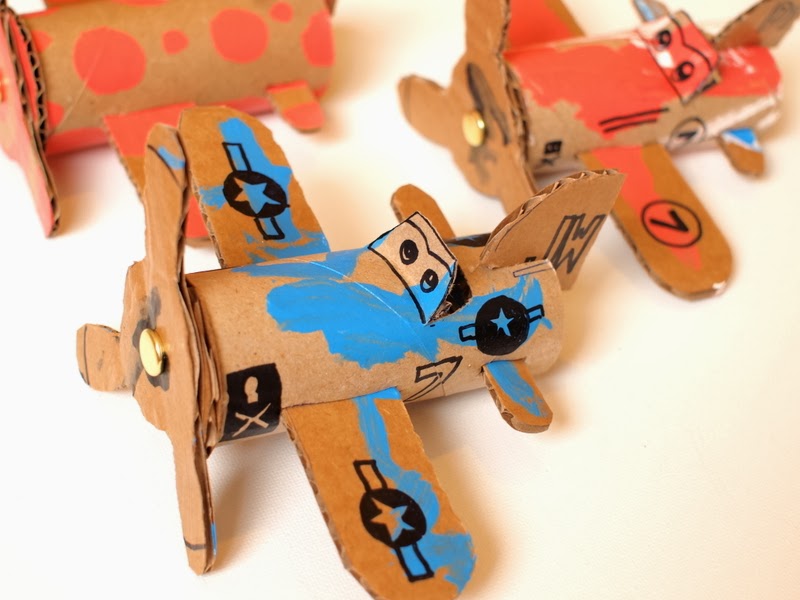
Make Toilet Roll Airplanes (template included)

Make Toilet Paper Roll Airplanes

Initially, I titled this post "Bad Mamas make toilet roll airplanes" because I wanted to admit something to you.

I'm a baaaad mama.

Yup, you read that right.  I'm a bad mama... a really bad mama...  why?  Well, the other day we were playing around with Chuck and we started humming different songs for him to guess.  At first we hummed his favorite song ("Life is a Highway" from the movie Cars) and he guessed it!  Intrigued, we kept humming other songs from Cars 1, Cars 2, and Planes (his faves.)  He couldn't name the songs specifically, but he could identify the movie that each song came from. 

And then I started humming "ABC" to him, thinking that it would be a breeze for him to guess.   I got through the entire song and then my son... my dear, sweet, transportation-loving child, looked up at me and said "Me no know mama."

What?! "Me no know?"  He knows songs from movie soundtracks... but can't recognize ABC?  We sing ABC to him at least twice a day when we brush his teeth.  Oof.  Double oof.

I guess we're not as entertaining as talking vehicles...

So... this reeeeeeaaaaally long intro was just my way of saying that my son loves cars, planes, trucks, trains... erm... basically anything that moves.  So I thought I'd try to foster his love with a toilet paper airplane craft.  These planes were inspired by the characters Dusty Crophopper and Skipper from the movie "Planes."  


Toilet paper Roll Planes Skipper and Dusty Crophopper


(This post contains affiliate links.  Thank you for your support.)

Keep reading to see how we made these planes ( plane template included!)...

Sunday, December 22, 2013

Four Winter Toddler Crafts and Activities

Looking for some easy toddler winter crafts and activities?

I'm officially over winter.  Buh-bye shortened days!  Buh-bye cold weather!  Buy-bye staying inside!  Oh, how I wish it were already spring.  But, until warmer, sunnier days come, Chuck and I are going to persevere and have fun indoors.  Here are four crafts and activities that have kept us busy, happy, and sane for the past couple of weeks. 


1.  Cereal Box Gingerbread Men


Cereal Box Gingerbread men
I cut out a whole bunch of gingerbread men from my empty cereal box stash.  (Yes, I'm a proud cardboard hoarder!)  Then, I brought them to the library and let the kids decorate them with googly eyes and foam stickers.  The older 2-year olds had fun making funny men and the babies just watched their moms do the craft. 

Chuck's attention span:  He probably spent about 5-10 minutes on this activity before he lost interest.


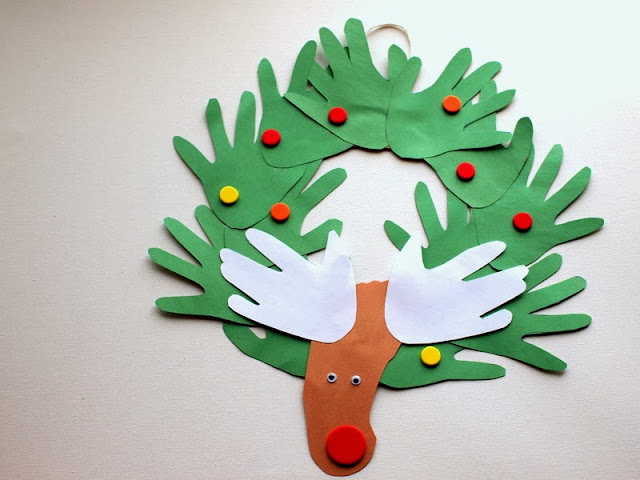
2.  Hand and Foot Reindeer Wreath

 hand and foot print reindeer wreath Christmas
I've seen versions of this craft all over the internet... and thought they were so cute and perfect for the holidays.  I traced Chuck's hand once to make a template for the wreath and horns.  I also traced Chuck's foot to make the reindeer's head.  Then, I glued everything together and he helped me add foam shapes and googly eyes.

Here are the different components of the wreath:

parts needed to make handprint and reindeer wreath craft
Chuck's attention span:  He probably spent about 10 minutes on this activity before he lost interest.


3.  Homemade Play Dough


child playing with homemade playdough
I followed this craft clay recipe and we had tons of fun rolling, cutting, and shaping our clay.  Unfortunately, our ornaments cracked when they dried.  Boo.  But, we had such fun manipulating the stuff that I kept leftovers in a sealed bag in the fridge.  It didn't dry out and we got to play with it another day. (Right now the "play dough" is still in our fridge... so we'll try it out again this week.)

He used a blunt plastic knife, measuring spoons, measuring cup, and an olive jar (our makeshift rolling pin) to play with the dough. 

boy using a plastic knife to cut homemade playdough

Chuck's attention span:  This activity was a hit!  We spent about 30-45 minutes on two separate days playing with our "play dough."


4.  Water Bead Play


water bead play
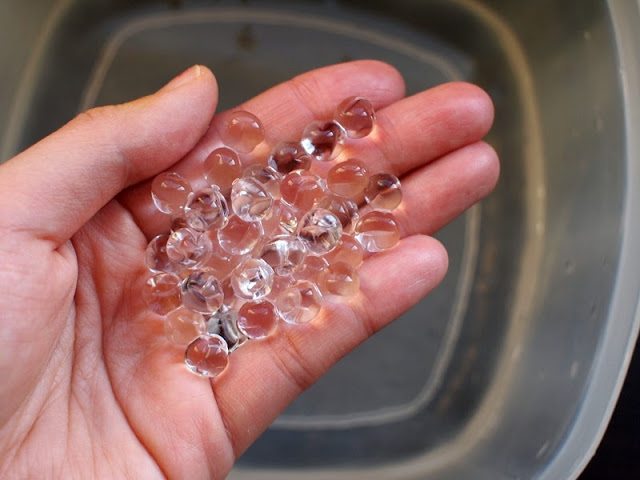
Again, I saw a ton of other mommies raving about these beads so I had to give them a try.  I found mine at Michaels in the flower section.  The beads are made of a special polymer that expands in water.  The resulting beads look a bit like boba balls and are slippery and firm.  They also bounce a bit if dropped.

Here's what the water beads initially looked like ...
what do water beads look like- explanation

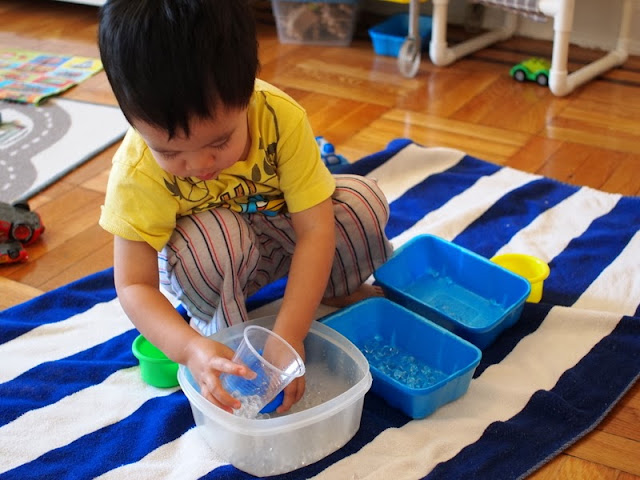
After a couple of hours, our beads grew and Chuck had a blast scooping them from container to container.

Warning:  Yes, they can be a choking hazard.  I repeatedly told him that the beads weren't food and I made sure to watch him while he played.  Once we were done with the beads, I threw them away in the garbage can.  (You can't pour them down the drain because they can clog your pipes.)

toddler playing with water beads
Chuck's attention span:  This activity was a hit!  He spent about an hour just scooping the beads from container to container.


So, for all you mamas out there who are also stuck at home with young ones... stay strong!  We can make it through winter!  Hopefully one of these ideas will help keep you sane this week.

Happy crafting, friends!

Friday, December 13, 2013

Make a felt and cardboard gingerbread house

Today's craft was inspired by gingerbread houses.  It's a little cardboard and felt "gingerbread" house with felt "candy" decorations. Pretty neat, right? All the decorations can be easily placed on and taken of, so you can decorate and re-decorate to your heart's content.

DIY Felt and Cardboard Gingerbread House Toy

DIY Felt and Gingerbread House Toys


This post contains affiliate links. Thank you for your support.

If you'd like to make your own, keep on reading!

Monday, December 9, 2013

Make Homeamde Felt Milk Jug Cap Ornaments


Each year I try to make a couple of handmade ornaments for our tree.  Last year, Chuck and I made these hand and feet salt dough ornaments.  I would have made him a new set this year... but his feet are so big that the ornaments would end up being the size of small plates.

So instead, this year I turned a bunch of milk jug caps (gifted to me by a craft-loving aunt- thanks!) to make these mini felt ornaments.  Each one has a different design and they came out so colorful and cute.... I just want to eat them up.   But don't worry, I won't because they're made of felt...and glue...and plastic...

Can you guess which one is Chuck's favorite?  Keep on reading to find out... 

Monday, December 2, 2013

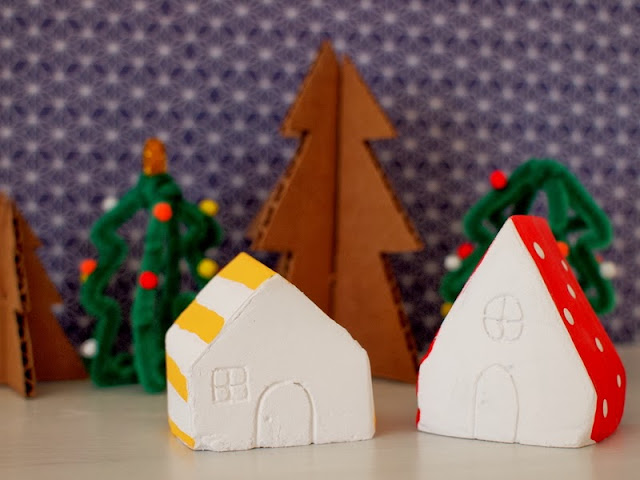
DIY Mini Plaster of Paris Christmas Village

I've always loved Christmas.  It's the time of year when twinkly lights decorate the dark nighttime sky.  And, it's the time of year that I'm reminded to hope because of God's great love for us.

Nowadays, Chuck and I love looking at the miniature Christmas village on display at our local craft store.  We always walk around oohing and ahhing over the little houses, ferris wheel, and tiny dog playing in snow.  It's magical.

So that's why I made us our own miniature Christmas village out of materials that we had lying around our apartment.

Let's Make a DIY Mini Christmas Village!


DIY Mini Plaster of Paris Christmas Village
This post contains affiliate links.  Thank you for your support!

(Psst- Click here to see see how I made the pipe cleaner and cardboard trees.)


Thursday, October 10, 2013

Two Toddler approved Fall Crafts

Even though I really enjoy crafting, sometimes it takes a bit of persuasion to get Chuck to join in.  Currently he's much more into playing with toy cars than crafting with mom.  Go figure! :)  But I'm a persistent bugger, so I keep encouraging him to make stuff with me.

So far several of my craft plans flopped, but here are two crafts that Chuck actually participated in. (Hooray!) 

1.  Paper Bag Pumpkins:


Materials:
  • Lunch bags
  • Tissue paper squares
  • Glue stick
  • Marker 
  • Googly eyes (optional)
  • Pipe Cleaner
  • Newspaper

Directions:
  1. Glue your tissue paper squares onto your lunch bag.
  2. Add a face
  3. Crumple up newspapers and stick them into your bag.
  4. Use a pipe cleaner to seal up the bag.

And here are some pumpkins made during our toddler craft time:


2.  Contact Paper Leaves
 
Materials:
  •  Leaves
  • Contact paper
  • Scissors
  • Tape
  • Tissue paper (optional)

Directions:

  1. Place leaves in a heavy book to flatten them.
  2. Tape down contact paper, sticky side up.
  3. Stick leaves and tissue paper squares onto your contact paper.
  4. Place a piece of contact paper(sticky side down) on top of your first piece of contact paper.
  5. Trim the edges and tape your leaves onto a window.


Have a great weekend!

Friday, September 20, 2013

Cardboard Spaceship Climbing Toy

Currently Chuck and I have been reading books about the moon and space travel.  He loves the Berenstein Bears "On the Moon" book and Eric Carle's "Papa, please get the moon for me." 

So with that in mind, I made him a little cardboard spaceship climbing toy.  I found some lovely examples online and one of the mommies in our toddler group made a very simple version out of paper.  So, I based my design off of these.        


To operate the toy, you simply attach the moon to the wall or a doorknob.  Then, you pull the two brown tabs apart and your spaceship shoots straight to the moon.


Materials:
  • Cardboard box
  • Scissors
  • String
  • Paint and paint brushes
  • Mod Podge and brush (to protect your paint job)
  • Packing tape
  • Straw 


Directions:
This was a really quick and simple toy to make.
1.  Cut out your spaceship, moon, and two small rectangular stopper pieces out of cardboard.
2.  Paint your spaceship and moon.
3.  Once the paint dries, protect your paint job with Mod Podge.
4.  Cut your straw in half.  Tape it to the back of your spaceship.
5.  Fold your long piece of string in half.  Tape the middle of the string to the back of your moon.  Then, string your two strands through the two straws.  Tape the ends of  string to your cardboard rectangles so that the spaceship doesn't fall off.

Here's a shot of the mechanics: 

And that's it.  Simple to make, and simple to use.  You don't even have to make a spaceship and a rocket.  What about an alien spaceship and earth?  Or a basketball player and a basket?  The possibilities are endless.

We went this route, and Chuck got a kick out of sending his cardboard rocket to the moon.


Cardboard Rocket Ship sent to the moon from Pink Stripey Socks on Vimeo.


And then, since I was working with cardboard already.... I figured I'd make Chuck some cardboard food as well.  All that flying sure gives an astronaut a hearty appetite. 


Have a wonderful weekend!  See you back on Monday.


Psst-  If you've got a ton of cardboard lying around... check out these fun kids' crafts that use cardboard:

Tuesday, August 27, 2013

Spiked and Braided T-shirt Bracelet

I can't believe that September is just a week away.  Eeek!  Is it just me, or does every store sign seem to scream "Back to School?"

Growing up, I loved this time of the year for two reasons.  1)  I loved school. (Yeah, nerds!) and  2)  I loved back to school shopping.  New blank notebooks?  Swoon.   New clothes and shoes?  Double swoon. (Was anyone else like this as a kid?)

But, buying a ton of new items gets costly quite quickly. 

Fueled by my thrifty nature, I made these spiked and braided t-shirt bracelets.  They came out pretty cute. I like to imagine some creative, quirky gal wearing them to the first day of school. 

The colors are quite girly, but the spikes show that you've got some spunk!


Materials:
  • Multicolored T-shirt
  • Fabric scissors
  • Spikes with screwbacks
  • Pen (Optional)
  • Needle and thread
  • Tacky Glue

Monday, June 10, 2013

Make a sailboat out of a shampoo bottle

((Thank you to everyone for entering my Kiwi Crate Giveaway.  Before I talk about today's crapt, let me just announce that the winner of the giveaway is Mel!  Congratulations!  Please email me your mailing address so I can send you a Kiwi Crate straight away.))


Hi everyone!  Today I'm going to share how I made this shampoo bottle sailboat after being inspired by this DIY boat kit found here:

Materials:
- empty shampoo bottle <-- crap!
- 2 rubber bands
- wine cork <-- crap!
- drill
- stirrer <-- crap!
- straw <-- crap!
- pair of scissors
- triangle from a potato chip bag <-- crap!
- tape (packing tape is best, but I only had clear plastic tape)

Here are the boat's main components:

Directions:
1.  Cut your cork in half lengthwise.  Then, drill a hole through the middle.  The hole should be big enough to hold your stirrer (aka the mast) up.

2.  Your straw is going to be the horizontal bar holding up your sail (aka, the boom).  Cut your straw to the desired length.  Then, make two triangle cutouts on each side of the straw, so that your stirrer (aka the mast) can slide into the straw.  Both your stirrer and straw will support your plastic bag sail.  


3.  Cut your plastic chip bag into a triangle sail shape.  Tape the plastic bag onto your stirrer and straw to create a sail.


4.  Use two rubber bands to attach your cork to your shampoo bottle.  Then, stick your stirrer into the cork's hole and voila, instant sail boat.

The boat sails nicely in your bathtub, but Chuck and I took it one step further and sailed the high seas (eh hem... a nearby lake.)  We just tied a ribbon to it so that it wouldn't float away.

Hope you and your little one enjoy this crapt!