Showing posts sorted by date for query felt. Sort by relevance Show all posts

Wednesday, August 20, 2014

Let's Explore Art Materials like Scientists

Whenever we do art projects, I always hand Chuck certain drawing materials because I know their properties and how they'll look and interact with each other.  In this activity I thought it would be fun to change it up a bit and let Chuck do some exploring.  So we tried our hand at exploring art materials like scientists!    

Scientifically exploring Art Materials with Kids


how to explore different art materials with kids in a scientific way
(This post contains affiliate links.  Thank you for your support!)


Sunday, July 13, 2014

DIY Felt Shape Activity

Are you looking for a fun, open-ended, creative activity to do with the kids?  Then this DIY Felt Shape Activity is right up your alley!  It's easy to make and provides kids with countless opportunities to be creative, use their imaginations, visualize things spatially, and practice using their mathematical language!    

DIY Felt Shape Activity

DIY Felt Shape Activity:  Use different shapes to create scenes!


This post contains affiliate links.  Thank you for your support!


Wednesday, July 2, 2014

2 DIY Cardboard Fourth of July Hats!

Fourth of July is in a couple of days.  Now if you're like me, you probably just realized that fact just this week.  (Oh wait... am I the only one is in a perpetual time warp and constantly forgets what day it is?)  This year we plan on seeing fireworks with Chuck and I thought it would be fun to whip up some cute Fourth of July Cardboard Hats for us to wear.  Can you believe that these 2 hats were made from cereal boxes, toilet paper rolls, and corrugated cardboard?

2 Easy DIY Fourth of July Hats!

Make 2 cardboard Fourth of July Hats with the kids!

(This post contains affiliate links. Thank you for your support!)

Tuesday, July 1, 2014

Cardboard and Pom Pom Soccer Game

Are you watching the World Cup?  Hubby's been keeping track of the games, but Chuck and I haven't been paying too much attention to the scores.  However, because it's soccer season, I still felt inspired to make something soccer-related.  So that's why I crafted this mini cardboard and pom pom soccer game for us to play.

Cardboard and Pom Pom Soccer Game

make a cardboard and pom pom soccer game
(This post contains affiliate links.  Thank you for your support!)


Thursday, June 12, 2014

No Sew Super Hero Cape

I don't sew.  I tried, but it just never happened.  (And since we're disclosing dirty, crafty secrets, I'll also admit that I don't crochet and I'm a terrible knitter.)  Last week we saw a boy wearing a cape in the park.  Chuck loved it so much that he asked me to make him a cape too.  That's when I thought, "Uh oh.  I'm a terrible sewer... that might be a problem."  But then I thought about it and came up with this ridiculously easy, super quick, crazy cheap, no sew super hero cape. 

No Sew Super Hero Cape 

(Perfect for your little super hero and his or her best super hero friend)

easy, no sew super hero cape!
(This post contains affiliate links.  Thank you for your support!)
 
This cape took only a couple of minutes to make... which was awesome because Chuck and piggy were too excited and trying their very best to wait patiently.   I almost didn't post this tutorial because it was ridiculously easy.  But the photos of Chuck wearing the cape were too cute to not share.  Let's get making!

Thursday, June 5, 2014

Homemade Body Paint Recipe (2 ingredients Needed!)

Last week I shared a simple 3-ingredient homemade body paint recipe. While we had fun trying it out, I kept wondering if there was another way to make homemade body paint.  Turns out there is!  I peeked around the internet and found this neat series of body paint recipes.  The author shares a couple recipes that involved using washable white paint (which I kind of felt weird using on my skin...)  and one that involved using two ingredients that I already had on hand.  

2 Ingredient Homemade Body Paint Recipe


how to make homemade body paint


Tuesday, June 3, 2014

Melted Crayon and Watercolor Frames (Kid made gift)

Do you ever feel like life is moving at a super fast speed and you are just being pulled along for a ride?  That's what I've felt these past two weeks.  We battled an illness, hosted a good friend for a couple of days, and celebrated my sister's graduation.  Oh yeah.  We've also been preparing for our move to California later this summer.  Ahhh!  (More on that later.)  So today's kid-made crayon and watercolor frame was actually made quite a few weeks ago.  I'm excited to finally be posting it today.  I love how easy the it was to make and how lovely it turned out.  (This would definitely be a great kid-made Father's Day gift!)  But, I can't take full credit for the idea.  I originally spotted the idea on fellow Rockin' Art Mom Twodaloo's Crayon Resist Photo Display post.  And she was originally inspired by Artful Parent's Melted Crayon on Wooden Blocks post.  (These two ladies are super creative, so definitely check their blogs out!)


Kid Made Gifts- Melted Crayon and Watercolor Frames


(This post contains affiliate links)

Friday, May 23, 2014

Make Homemade Body Paint

A couple of days ago my sister came over to visit.  Chuck and I were super excited for her to come.  She also enjoys making things so I wanted to try Paging Fun Mom's homemade body paint with her.  I ended up not following their recipe and just winging it.  It still came out and we had lots of fun painting homemade body paint on ourselves.

Make Homemade Body Paint

how to make homemade body paint

 (Note: This post contains affiliate links.  Thanks for your support!)

You just need three ingredients to make this creamy (and very moisturizing) body paint.  Just FYI- it has a completely different consistency then real body paint and it's not meant to stay on.  But that was ok with us.  We ended up painting our pictures, wiping off our artwork, and then painting something else.  Interested?  Let's get making!


Monday, May 5, 2014

Brooklyn Flea Adventure

This weekend my sister took me out to city to celebrate my birthday.  We passed the time thrifting, eating, walking, and chatting.  It was a really perfect day.  I loved hanging out with my sister and I felt so inspired seeing all the colorful street art and lovely handmade items.

Here are some photos from our adventures in Brooklyn...
The colors and smiling children made me so happy
To see more photos, keep on reading!

Wednesday, April 23, 2014

Easter Photos

Melted crayon easter eggs
Melted Crayon Easter Eggs


Since we were away in Australia for a bit, Easter really snuck up on me this year.  I felt like I didn't have time to prepare my heart for what it meant, and I didn't have time to prepare too many Easter crafts for the kids to do.  Fortunately, the holiday still came and went with a lot of joy, fun, and crafting.  This year we attended two Easter celebrations, one with a couple of good mommy friends, and the other with family.

As a mommy (and a blogger), I always try to bring my camera whenever we attend get-togethers.  I think those events are special and I want to capture all the beautiful memories, yummy food, and funny moments that inevitable occur.  But lately, I've noticed that when I pull out the camera to snap photos, I also miss out on a bit of the moment's magic.  Sure, I've captured a memory in photograph, but I also wasn't really a part of it (probably because I'm fiddling around with camera knobs... blech technology).  Does that make sense? Does anyone feel that way too?

Anyway, I guess this was a really long intro to just explain why this year's photos were kind of lacking... and why my shots were mostly of crafts.  We loved celebrating Easter with friends and family this year.... and I was just having a bit too much fun beiing in the moment to stop and capture the moment.


Monday, April 21, 2014

Make Easter Egg Weebles

This Easter we had a lot of fun hanging out with family and friends.  I kept meaning to take lots of photos.... but I was having too much fun doing activities with the kids.  I'll try to upload my one or two photos this week.  Today I just wanted to show you this really quick DIY Easter Egg Weeble Craft.  Yup, you read that right. I made Chuck a couple of cute little Easter Egg Weebles from plastic Easter Eggs.  They're weighted, so they don't fall down.  (Scroll down for a video of Chuck trying to run them over with a Jeep... yup... that's my kid.)

Cacti and Farm Animal Easter Egg Weebles

Make Plastic Easter Egg Weebles

If you still have your plastic eggs lying around, you might like making these little guys too.  Keep reading to find out more!

Friday, April 18, 2014

Australia Photos (Part 1)

Yikes!  I just realized that I hadn't posted any photos from our trip oversees.   (Hubby's from Australia and we recently flew there to visit family.)  Some of you were so keen on seeing them, so here are some highlights from our trip.  We had a really jam packed schedule, so we were able to travel all over.  First stop- The Beautiful Gold Coast!

(Special thanks to hubby and my sister-in-law for taking some of these photos!)

Pops takes Chuck to meet the ocean for the first time.

His reaction^^  Yup.  Apparently he isn't a big fan of the water and waves. Sand is much more his thing.

Our beautiful Gold Coast view  (Don't all the buildings look super modern?)

Nanna hanging out with her two favorite grandkids

One of the few rare shots where both boys are facing the camera. (I swear, kids at this age are just super squirmy.  Photographing two clear faces?  Fuggettaboutit!)

Sharks are so cool... and super scary looking.  Eeek.

Loved touching the starfish- these felt like lovely, bumpy rocks

Hee hee... Chuck loved feeding his cousin hot dogs.

Hubby holding the two cousins.  (Aren't their identical penguin hats adorable?  Sadly we lost them somewhere in Australia... Boo.)


And that's it for now.  I'll upload the rest next week.  ( But if you can't wait that long, you can always check out my Instagram feed for a couple more.)

Have a great weekend!

Tuesday, April 15, 2014

DIY Easter Bunny Bean Bag Toss

Tomorrow the theme is bunnies at our library toddler group.  We're going to make paper bag bunnies and play a bunny game too.  Since I already had this lovely large piece of cardboard, I made a really simple Cardboard Easter Bunny Bean Bag Toss game.... complete with... wait for it... carrot bean bags.  

DIY Easter Bunny Bean Bag Toss

DIY Easter Bunny Bean Bag Toss


Ack.  Too adorable.  Too adorable!  (Btw, is it strange that I swoon over large pieces of cardboard?)   Hrmm... anyway... hopefully the kids will have fun playing tomorrow.  But even if they don't, I'm just going to lug this guy home and prop him up against my wall.   His cheesy grin is just too cute. 

Keep reading to see photos of how I made it...

Monday, March 24, 2014

DIY Magnetic Fishing Game

Currently, one of Chuck's favorite books is 10 Little Fish by Audrey and Bruce Wood.  It's a cute book about subtraction.  Kids count colorful fish on each page as they leave one by one.  And (my favorite part), it has a fishy romance at the end (What can I say?  I'm a closet romantic... tee heee hee.)  To accompany his love for fish, we recently made this DIY Magnetic Fishing Game

DIY Magnetic Fishing Game


Make Easy DIY Fishing Game
It's cute and colorful and really fun to make and easy to play.  Want to make your own fishing game?  Keep reading to see how we made ours! 


Monday, March 3, 2014

Leprechaun Hat Headband DIY

I'm not Irish. (Surprise!)  But I appreciate St. Patrick's Day because it gives me the opportunity to wear green and cute Leprechaun gear.  So today's craft is a DIY Leprechaun hat headband that was made from... wait for it.... toilet paper rolls and cereal boxes!   

Yup!  Today we're making our very own Leprechaun hat!
Leprechaun Hat Headband DIY from Toilet paper Roll
Keep reading to see how we made this little Leprechaun hat headband!


Sunday, February 9, 2014

Felt Heart Button Covers

Valentine's day is coming up this Friday.  Are you still looking for something kind of "Valentines-y" to wear?  Well, why not add temporary heart embellishments to the clothing you already own?  Try making these DIY felt heart button covers.  They're easy to make and add some festive Valentine's spirit.

Keep on reading!

Wednesday, February 5, 2014

DIY Splatter Painted Pants

Everything outside is grey, grey, grey.  Bah.  I've been longing for some color in my life.  So that's why I took a pair of pants and went crazy.  Yurrrp.  I splatter painted the whole thing bright happy colors.

DIY splatter painted pants

They look pretty crazy... and pretty cool.  (They were also inspired by by this awesome splatter pant tutorial from PS-I Made This.) So far I've worn these pants around the apartment but I have yet to wear them outside.  (What's the correction occasion for such colorful pants?  Hrmm...)Now if you'd like some color in your life too, keep reading!


Sunday, February 2, 2014

DIY Inkblot Shirt

We received a bunch of hand-me-downs awhile back and one of the items was a plain black shirt.  I saw it and immediately knew that I wanted to try painting something on it.  But I wasn't sure what...   Now that I've been sick for the past couple of weeks, Chuck and I have pretty much stayed at home.... the whole time.

Now,  I love Chuck, but being locked indoors for long periods of time totally drives both of us CRAZY....   So that's what inspired me to make this DIY Inkblot shirt.

What do you see when you look at the design?
DIY Inkblot shirt for kids
Keep on reading to find out how I made this bad boy!

Thursday, January 30, 2014

Why I'm thankful for all of my Craftgawker Rejections

This is the last week of our #RiskRejection series.  (New to the series?  About 20 or so bloggers have been bravely taking risks and sharing about them every Thursday on their blogs.)

So far, I've risked by
  • sharing that I'd like a career as a craft blogger 
  • sharing that I was overwhelmed by what it took to become a professional craft blogger
  • taking Chuck out sans diaper for the first time

This past week I've been reflecting about rejection quite a bit.  Specifically, I was thinking about being rejected by Craftgawker.   Have you heard about this site?  It's a lovely, curated compilation of crafts.  Crafters and artists submit their best project photos hoping that the site will showcase their work and send readers to their sites.  Craftgawker is EXTREMELY PICKY about the photos they accept.  Only bright and beautiful photos are showcased. 

My first submission to the site was this fortune cookie advent calendar photo...


It  was rejected and I was crushed.  I may have cried.... I'm not sure, but I definitely remember eating carbs to cheer myself up.  

Yup, I was really hurt.  I'd like to say that all of my following submissions were accepted... but I'd be lying.  Out of my approximately 80 submissions, only about 40 were accepted.  Yup, I have a 50% acceptance rate.  Pretty poor right?  But, you know what? 

I'm really REALLY thankful for those rejections.  They pushed me to take better photos.

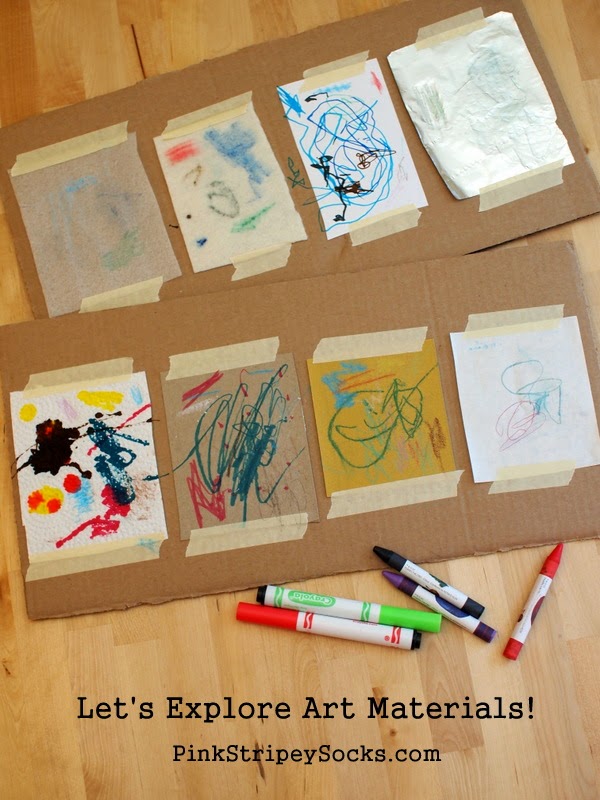
You see, every time I received a rejection, I also received a reason for the rejection.  Maybe my lighting was too dull, or my composition was too tight, or I had white balance issues. 

When I first started blogging, I would have had no idea what they were talking about.  I took photos like a cave person.  "Ooh, ooh.  Me click button.  Magic picture on screen.  Me got whole face in picture and eyes are open.  Me likey."


Now I'm able to decipher those terms.  I look at white balance and composition.  I'm learning how to take brighter photos at night time.

Here's a photo of my latest submission (Ice Bird Feeder Craf):


Can you see the difference between these two photographs?  I can.

That's why I'm really REALLY thankful for all my Craftgawker rejections.  Rejection stings, no question about that.  But each one pushes me to become a better photographer and a more resilient and determined blogger.

(By the way, if you've ever felt frustrated by Craftgawker, check out this post  from Dream a Little Bigger.  Allison offers helpful and easy-to-follow insight on how to improve your photos.)

 So even though our #RiskRejection month is over, let's continue to be brave and risk together, dear friends!

Friday, January 24, 2014

My Scarlet Letter and Taking hazy plastic bag photos


A couple of days ago, Chuck and I went to Target and I was super nervous. (Like armpit sweat nervous.) For the past week and a half, we had a breakthrough in potty training.  He was telling me when he needed to use the bathroom.  (Finally!  Yes!  Insert choir of angels.)  But, I was still putting him in pullups when we went out.  I was afraid that he would have an accident outside.  


But since we're on week 3 of Amy's #RiskRejection challenge (where bloggers embrace risk even if it involves getting rejected), I felt emboldened.  If other ladies could risk big and start businesses and non-profits, apply to become foster parents, write books, and move to other states and countries, then certainly Chuck could wear underwear outside.   

So Chuck and I both put on our big kid pants and went to Target sans pullups.  In the beginning, everything seemed was fine.  I kept reminding him to let me know when he needed to potty and he said that he would. 


But then we entered the toy section... that terrible black hole in the store where logic and reason escape and wails and tears (Mom's silent ones and children's vocal ones) are heard in every aisle.  We got to the Cars section and Chuck hopped out, super excited.

And then he peed.  


Oof.

It was just a tiny accident, but I still felt so bad.  We cleaned up in the bathroom and then I told the workers.  I expected to see a smirk, a roll of the eyes, a shaking of the head, or the accusation of "Bad Mommy!  Now you have to wear the scarlet P!"  But none of this happened.

They were actually... nice about the whole thing.  Within a couple of minutes everything was cleaned up and no one was the wiser.

I was hesitant to share this risk as part of my #RiskRejection Challenge because I wasn't moving mountains.  My risk was small.  But maybe that's ok?  Maybe taking small risks like this one will still mold me to be a better, braver person and mom.


Psst- If you want to see how I took this hazy photo, keep on reading!